How to Upload All the Files to the /wp-content/plugins/simple-footer-widget-area
Since a WordPress footer is so useful, at some point, you must acquire about the footer, how it works, what's possible in terms of editing it, and how to remove preset footer content that'southward not relevant to your brand. That'south why we want to show you how to edit a footer in WordPress, along with a total explanation of a footer's benefits and what can go into one.
Website footers take a long history of containing whatever data doesn't fit within a website's chief menu. From links to support documents and social media pages, various elements go rather well in a footer.
Allow'southward become started!
What Is a WordPress Footer?
Footers aren't exclusive to WordPress. Most website builders and content management systems offer the ability to include a footer. Even so, WordPress offers its unique footer functionality, along with a preset footer design that generally comes with the theme you lot install.
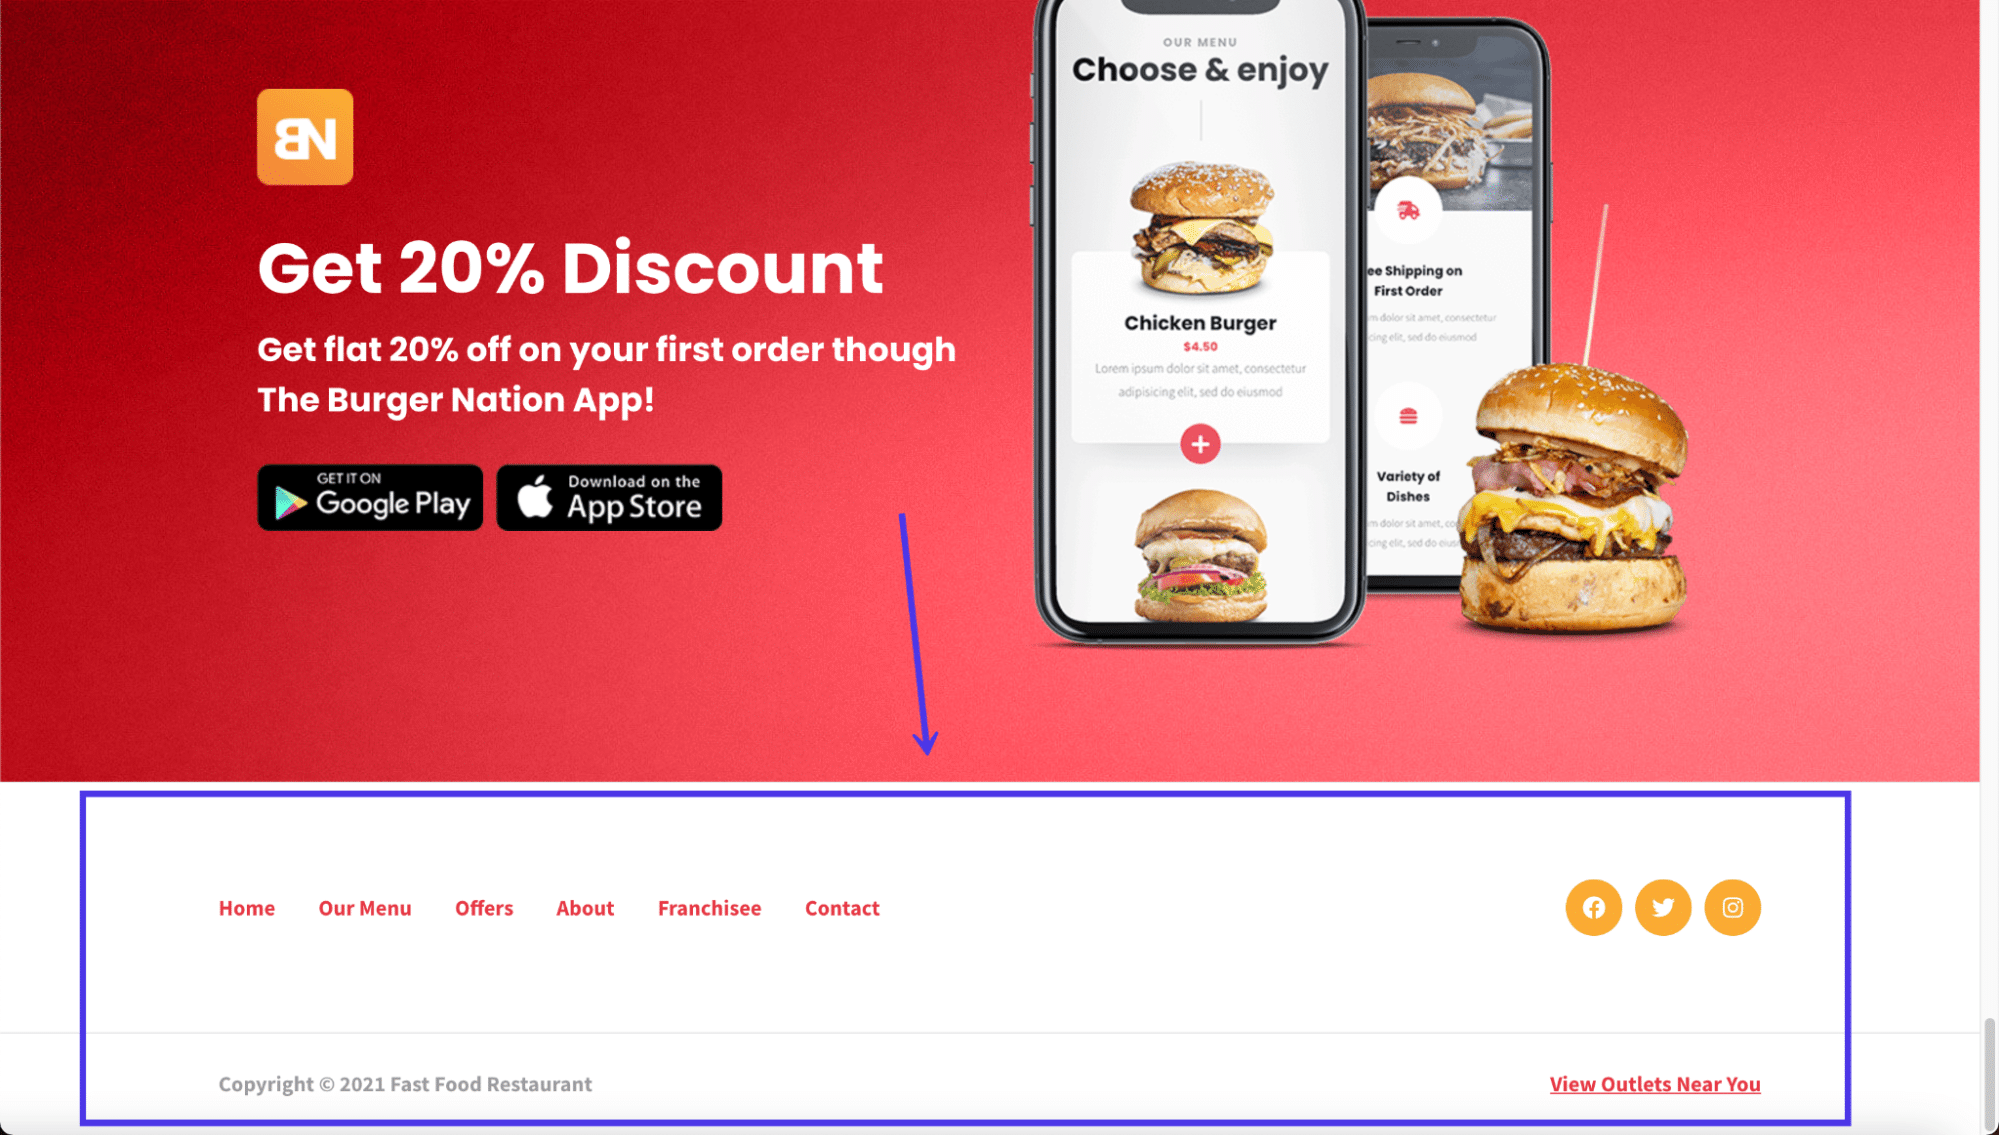
A WordPress footer sits at the base of your website. It's a static content area that shows upward at the very bottom, regardless of which folio a user lands on. Although not as visited as the header, the footer is even so extremely important to provide users with social media buttons, client support links, and contact data.
Overall, if you make a website on WordPress, y'all can await to run into a footer placed in your pattern by default. WordPress has a core file built into its system specifically to manage the footer (footer.php).
Footers come in all shapes and sizes, and you can edit them to include different colors, fonts, and backgrounds. You can also insert content elements within the footer, such every bit web log post lists, security badges, and even forms and images.
The footer is like the decision to your entire website. It shows essential links and information for those interested in and dug deep into your content. Finally, the footer completes the overall design of your site, much like the final slide in a slideshow presentation or the conclusion to a spoken language.
Reasons To Have (and Edit) a WordPress Footer
It's tempting to forget about your footer or exit it as the last item you design. Many people even want to remove their footers since they don't run into much value in them. This isn't the greatest plan. The footer does have value, even if it's not viewed or clicked on as much every bit your principal carte or primary content areas.
To give you an thought of what makes a footer valuable, hither'south a list of all the reasons to have ane and learn how to edit a footer in WordPress to fit your brand.
- The WordPress footer offers a static module shown on every page of your website, making information technology more visible than a standard page that disappears when someone clicks away.
- Information technology completes the website's pattern, both visually and in your WordPress files. It tells WordPress where to cease its lawmaking and indicates to users when the content ends. Not to mention, it makes for a cleaner interface.
- Many internet users have come to expect specific links and content in the footer, so they'll go directly to the footer to detect them. Recollect back up links and social media buttons.
- The footer provides more than conversion and engagement opportunities, like a call to action at the terminate of a web log post. You tin can add forms, links to other content, or even a company tagline.
- It's a identify to include important links that may not brand the cutting for the chief card.
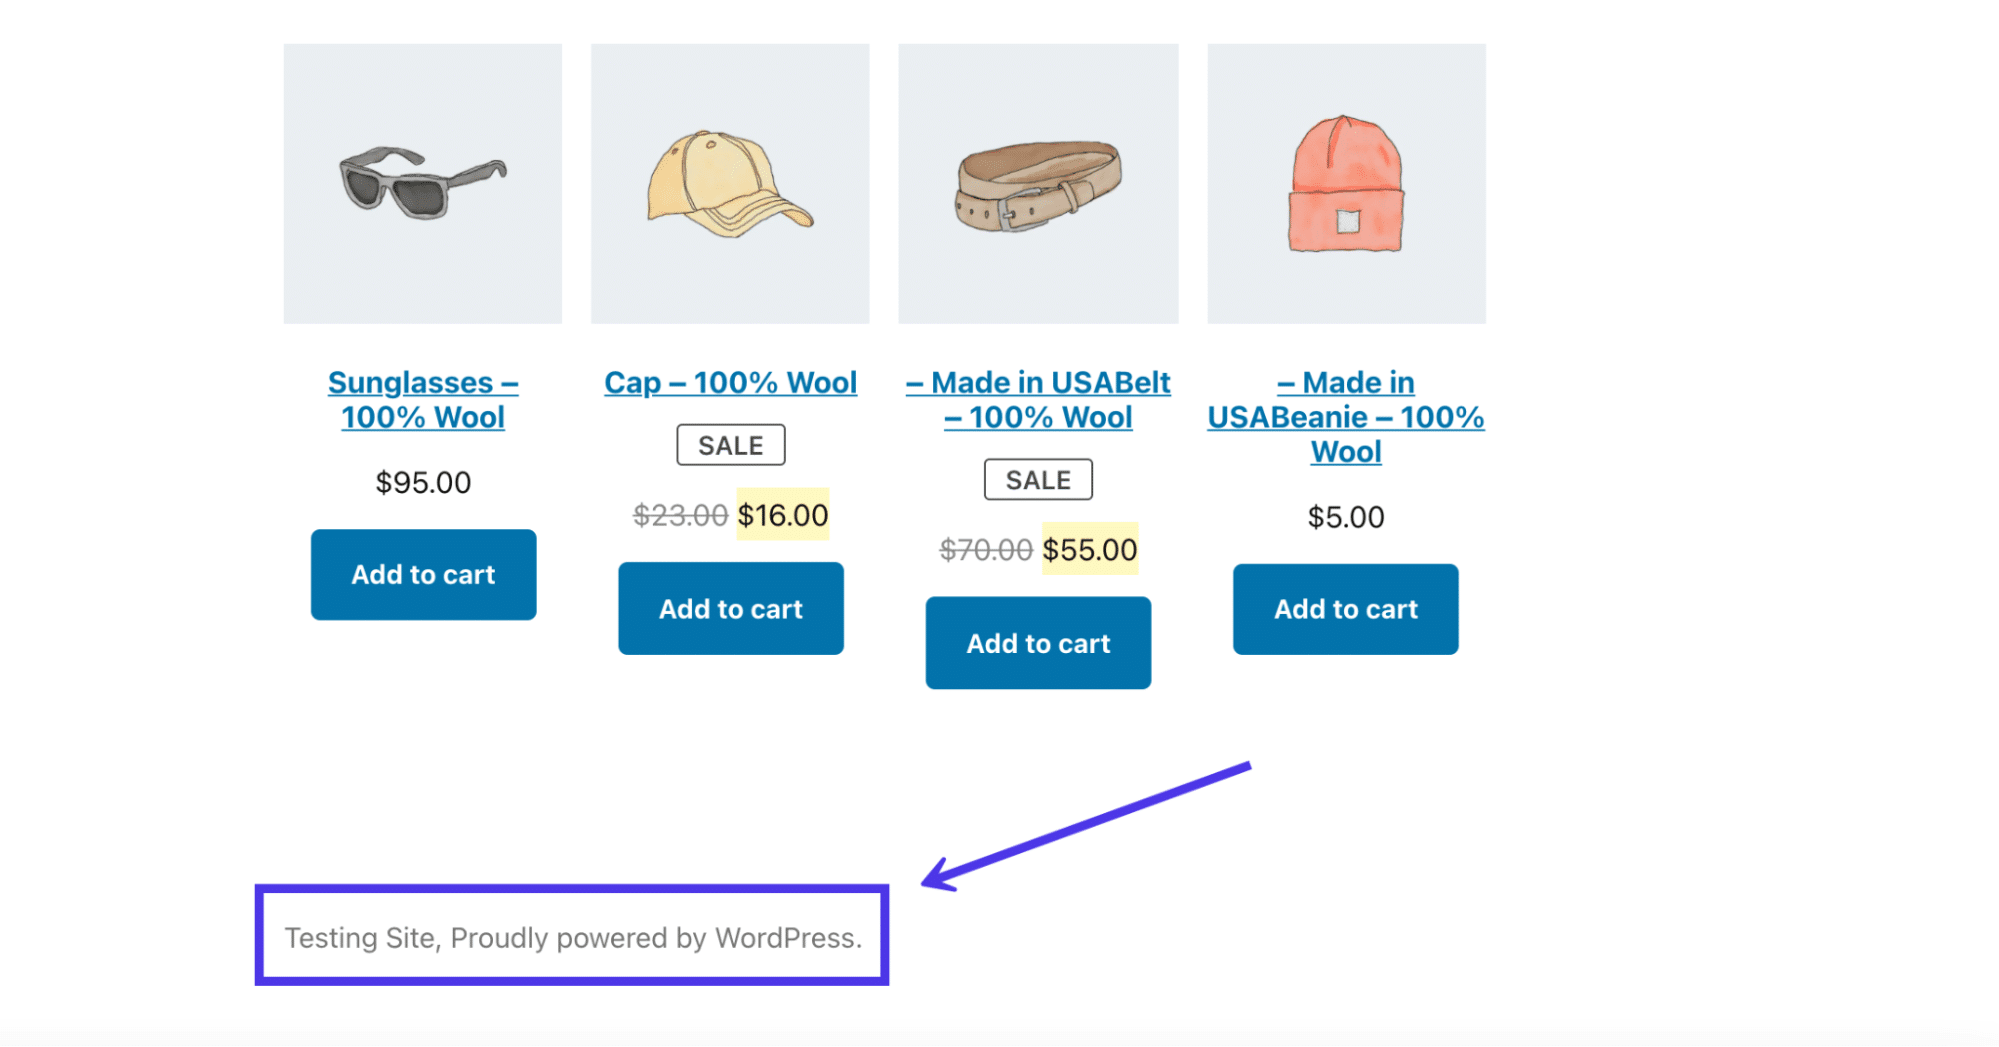
Now that we know the benefits of using a footer, the big question of what to place in the footer comes into play. All themes differ, but information technology's common to see a "Powered by WordPress" message in the footer after installing a new theme.
Other times, theme developers might include their own premade designs or messages most who made the theme.

None of that's bad, merely the goal is to customize your WordPress footer to link to your valuable pages, include content related to your brand, and clear out the default content like letters from theme developers or WordPress. It's besides wise to adjust the styling to match your branding with custom fonts and colors.
Then, what are some elements to put inside your WordPress footer?
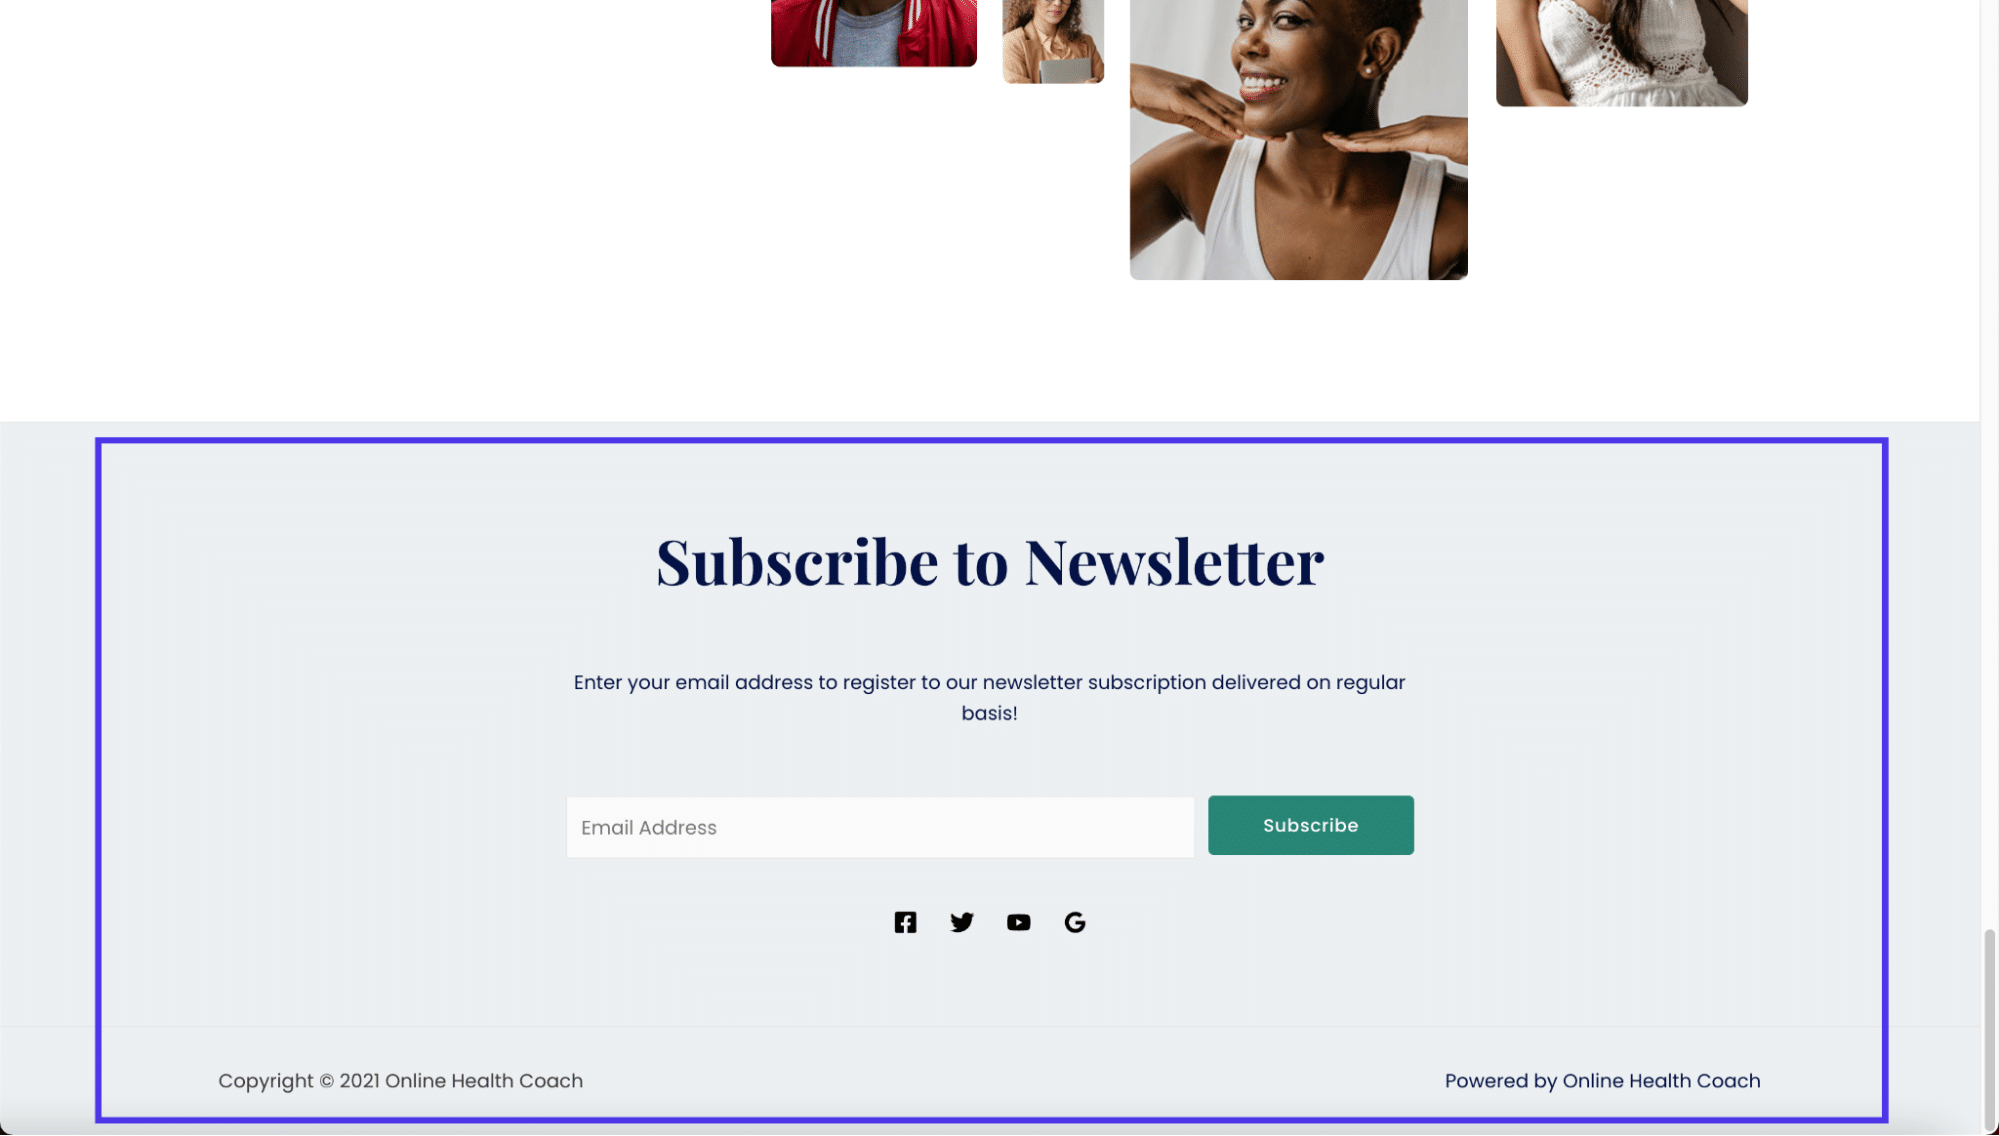
- Forms for users to subscribe to your newsletter messages or blog updates
- Links to client support resources, like FAQs, knowledgebase manufactures, and forums
- Icon links to download digital products like apps and podcasts
- A list of upcoming events
- A listing of contempo web log mail articles
- Links to loyalty and affiliate programs
- Links to advisory pages, like an Almost Us or Career page
- Badges and icons to promote your reputation, past awards, or site security
- Social media icons that link to the pages
- A full sitemap for easier navigation throughout your website
- Legal statements like copyright claims, privacy policies, and terms and conditions
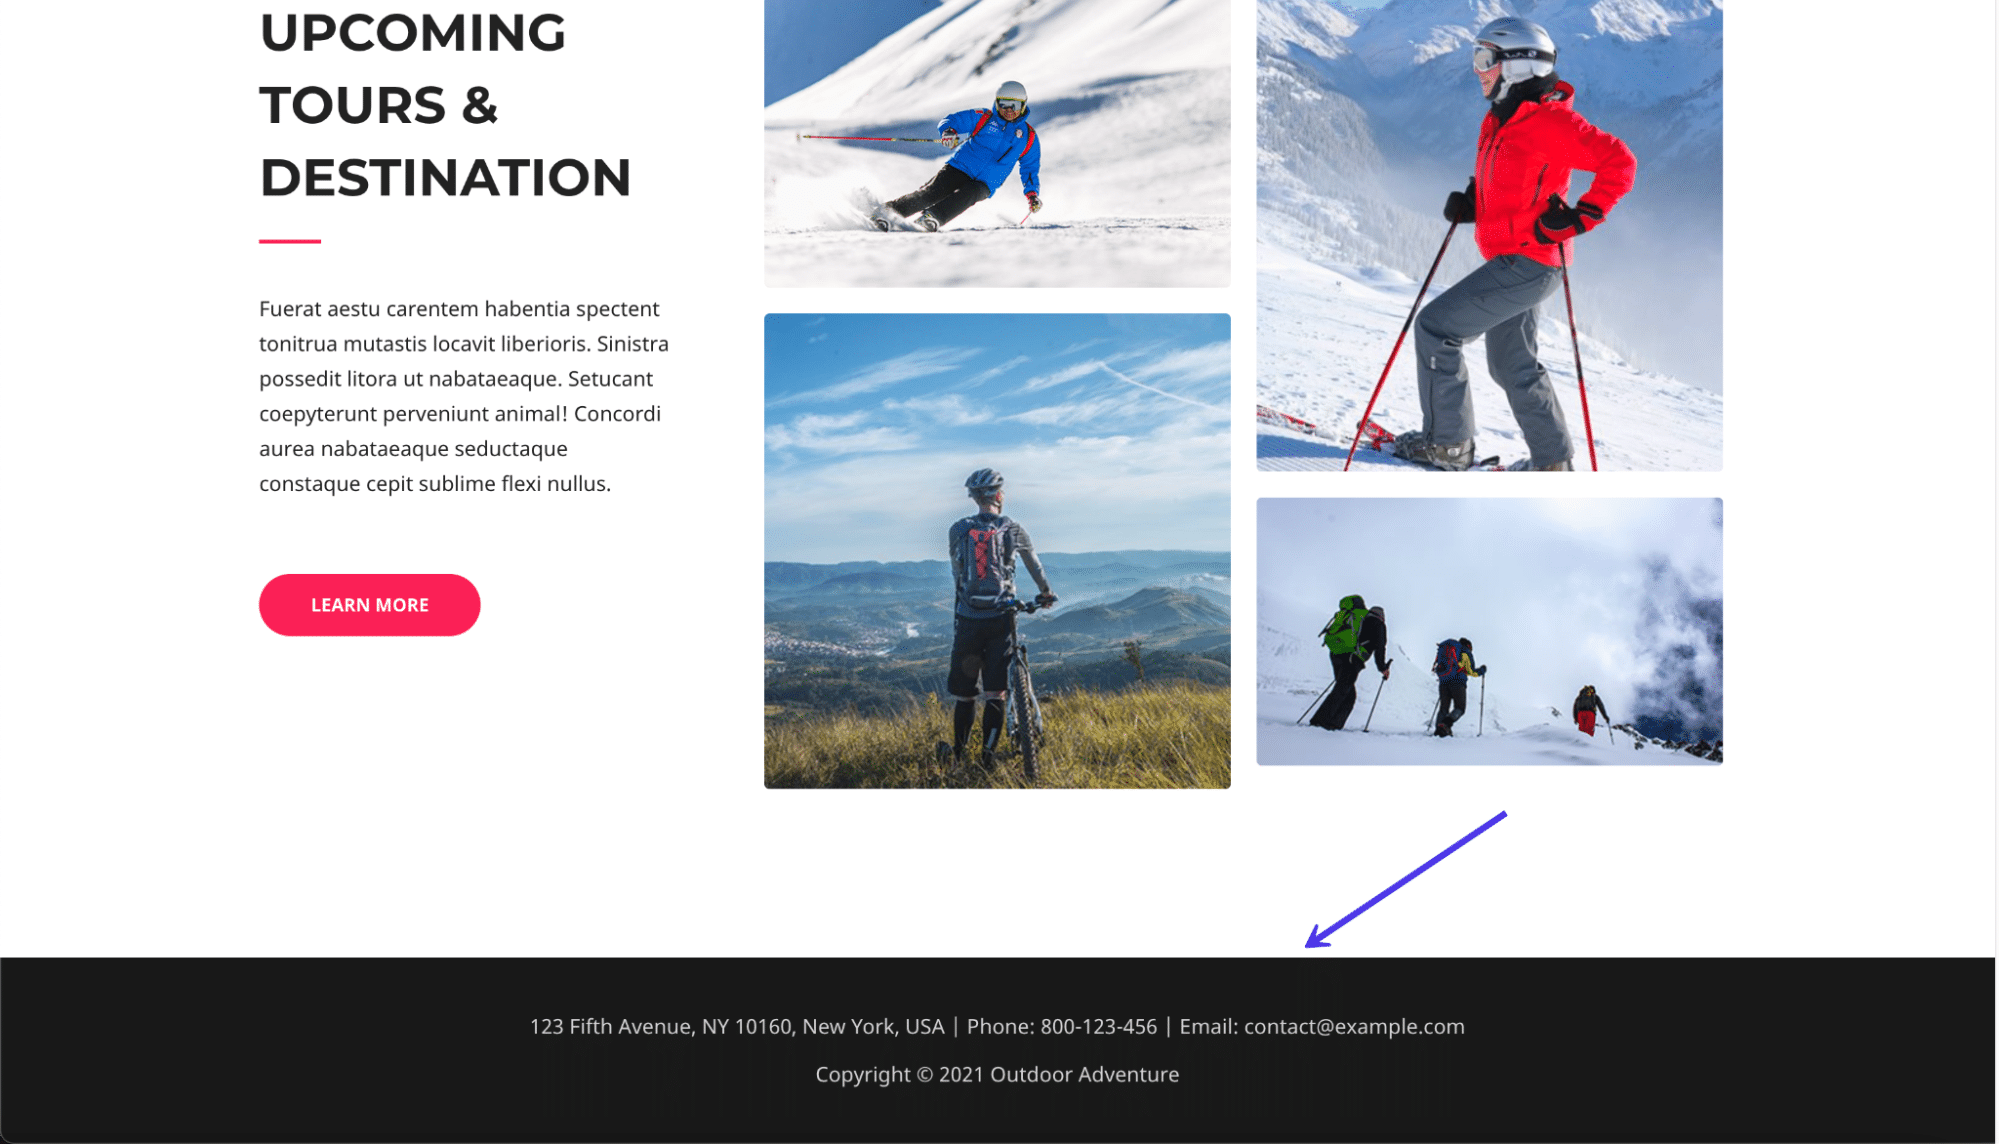
- Contact information such equally your address, locations, telephone number, and business organisation hours, or a contact form
- A search box for improved navigation
- Any other additional pages that don't fit in your main menu but nevertheless demand a place on your site
How To Edit a Footer in WordPress (Self-Hosted Version)
There are a handful of tactics to edit the footer of a WordPress.org (cocky-hosted) website. In the post-obit sections, nosotros'll talk almost editing a footer in WordPress using the theme customizer, widgets, plugins, and code. As a bonus, we'll discuss managing the WordPress footer with a visual page builder like Elementor.
Edit WordPress Footer with Theme Customizer
The fastest and almost efficient fashion to edit a WordPress footer is past utilizing the built-in WordPress Theme Customizer. The Theme Customizer settings vary depending on your chosen theme, merely the customizer itself is always located in the verbal location on the WordPress dashboard.
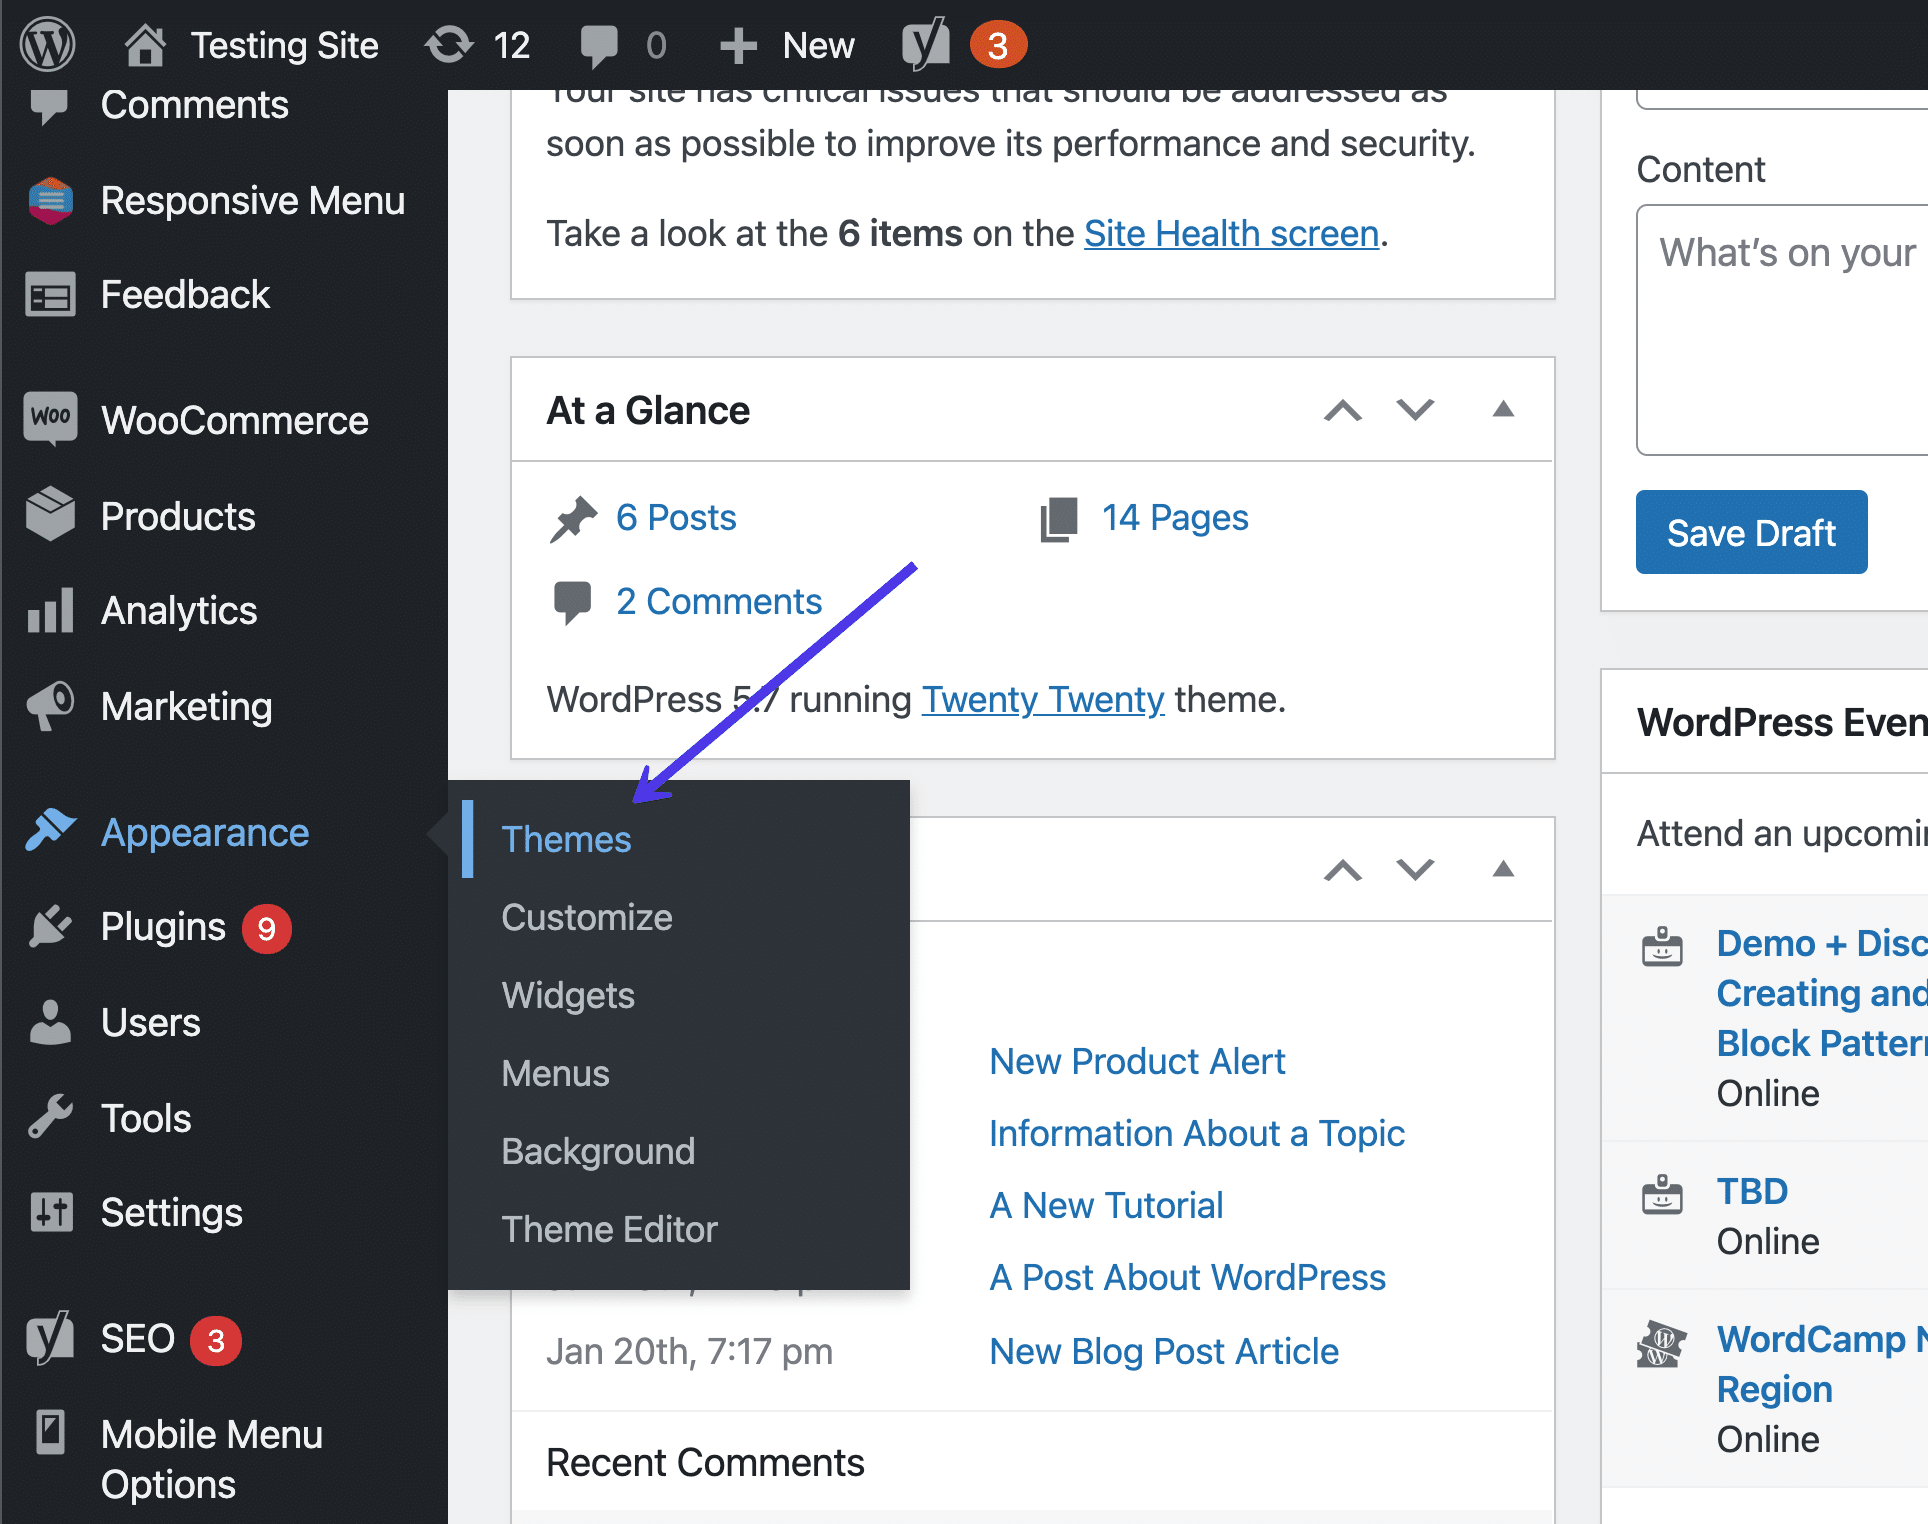
To begin the process, go to the dashboard and click on Appearance and then Themes.
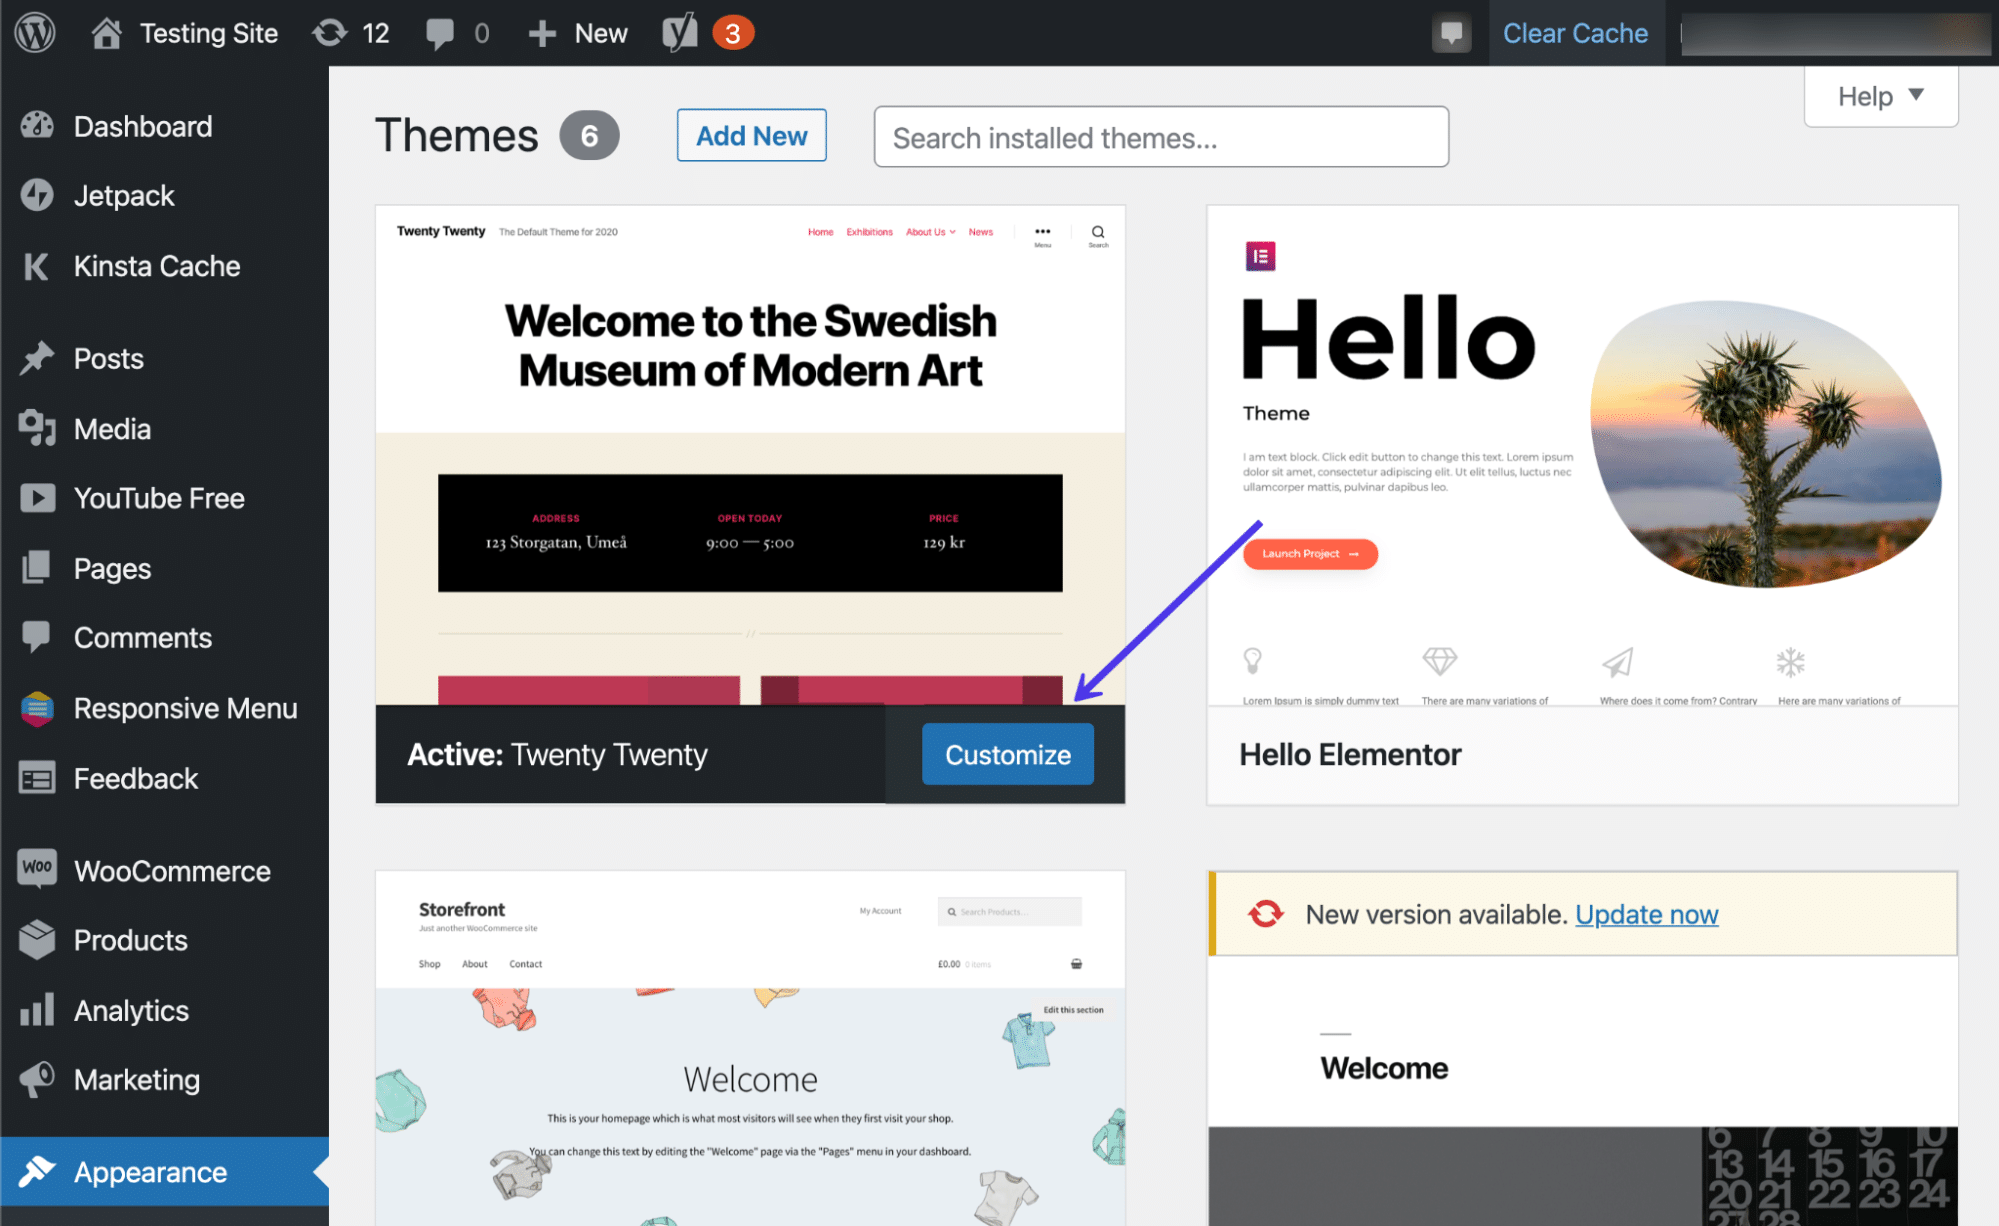
Then, click the Customize push button underneath the currently active theme.
Experience free to swap out themes to see how the footers change from theme to theme.
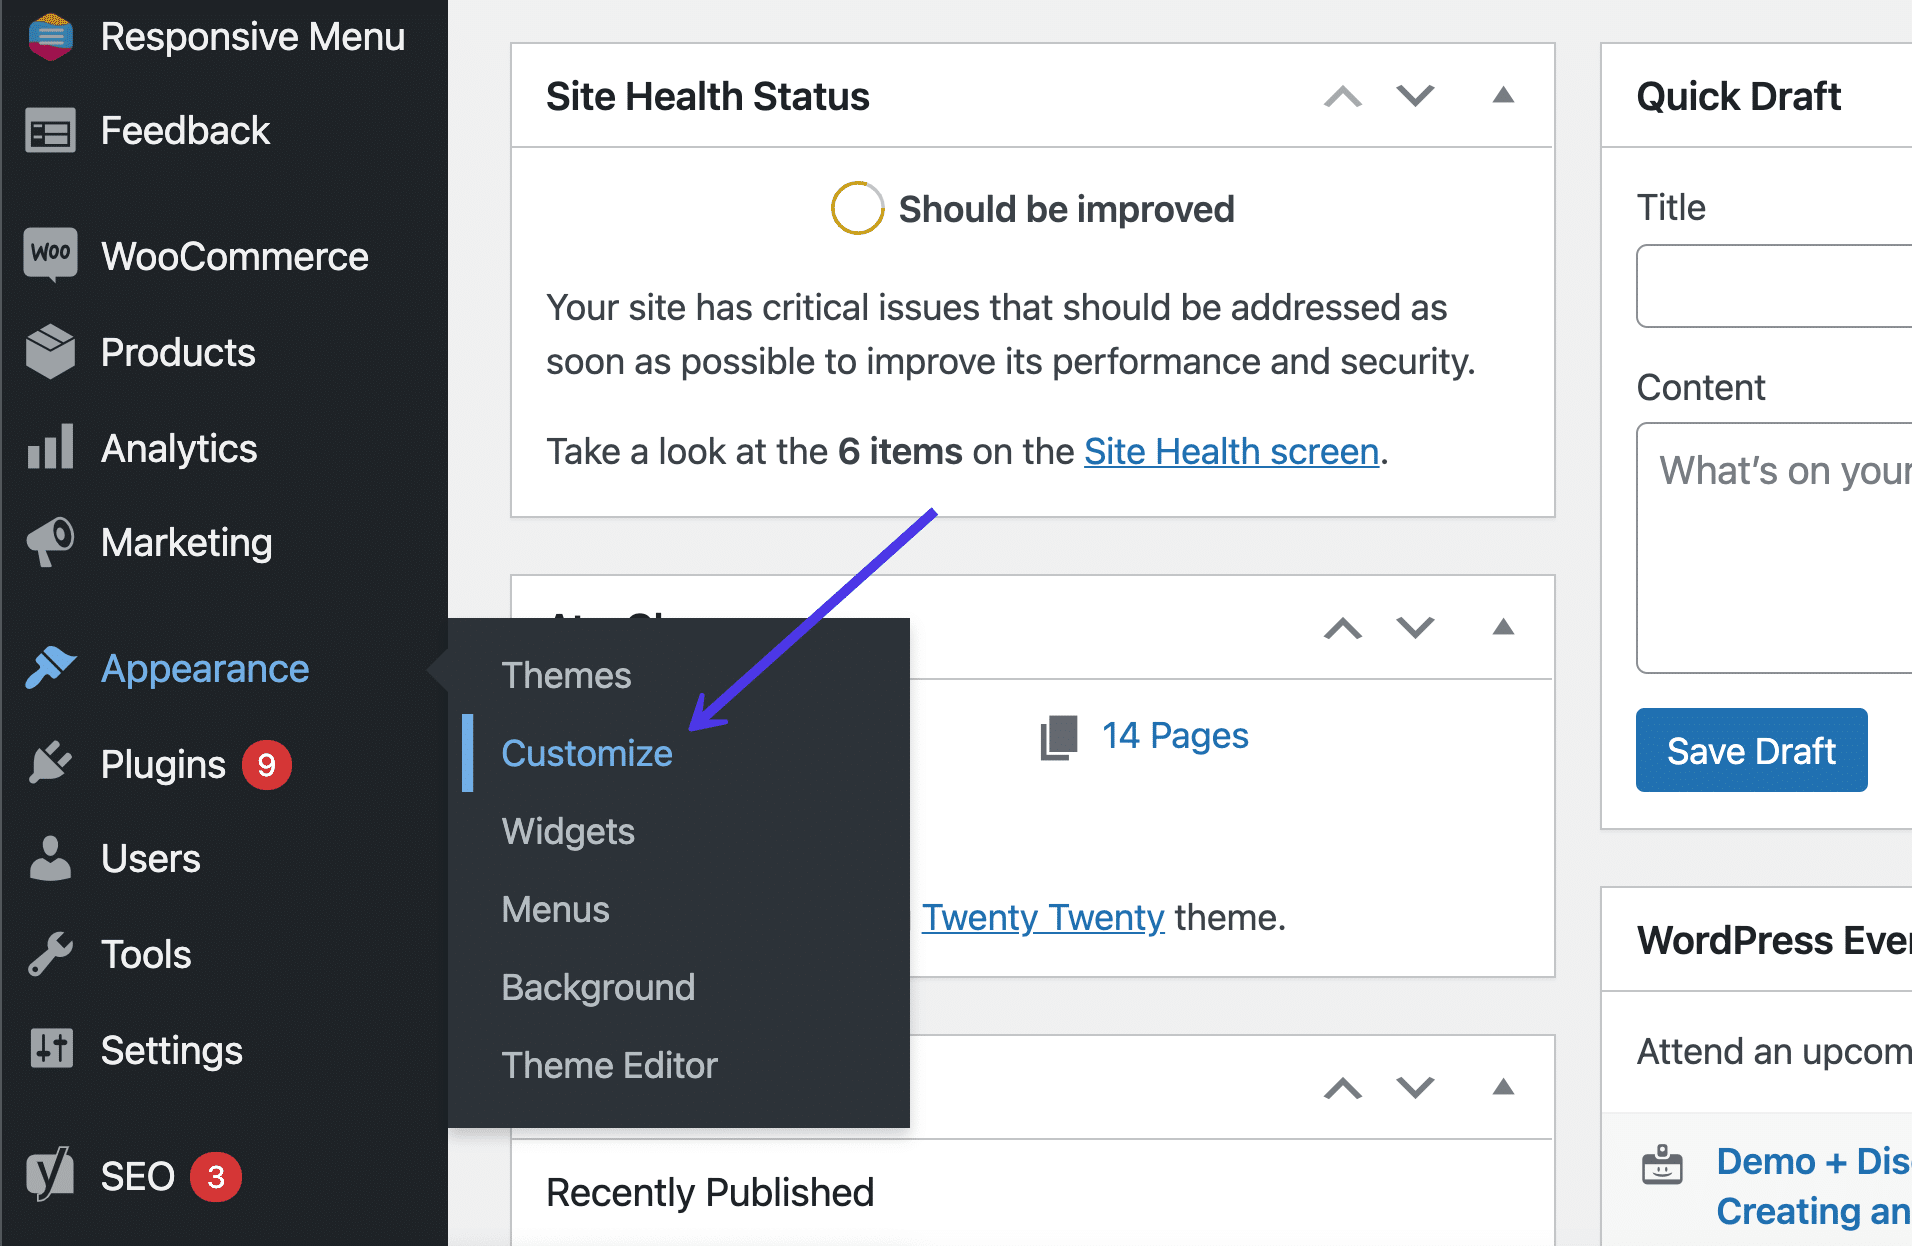
Every bit a slightly faster alternative, y'all tin can also click on Appearance > Customize, which brings you lot directly to the WordPress Theme Customizer for the active theme.
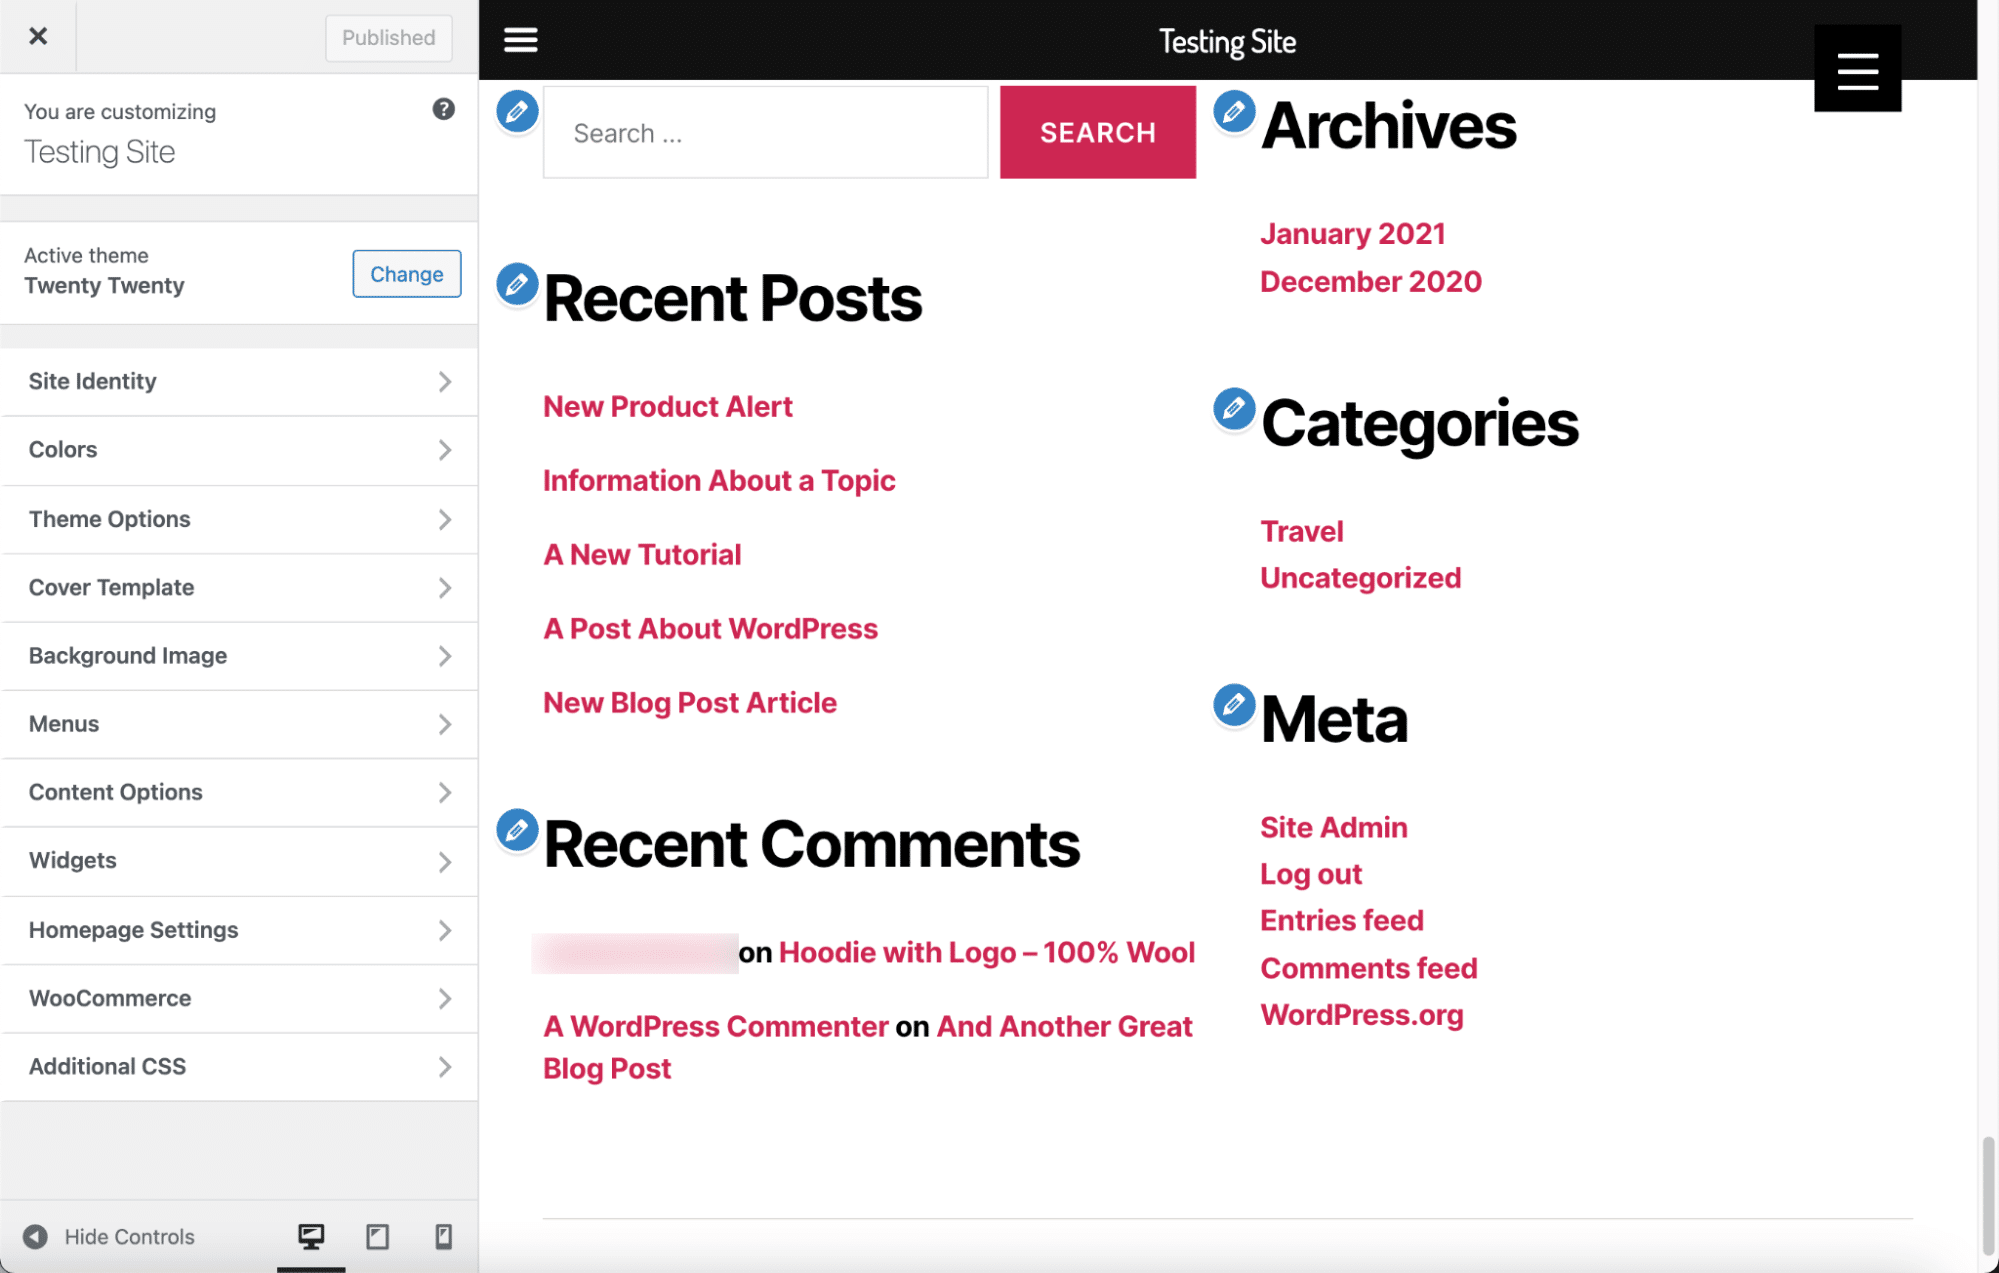
The WordPress Theme Customizer presents a visual of your website on the right side and several menu items on the left that lead to settings and customization tools. Once again, every theme has varying customization options, and then your screen may look a picayune different than what's in our screenshots.
A wonderful place to start with your footer customization is with the colors.
Our electric current theme has a Colors push, making information technology easy to place where we need to go.
Select the Colors button if that's available in your theme.
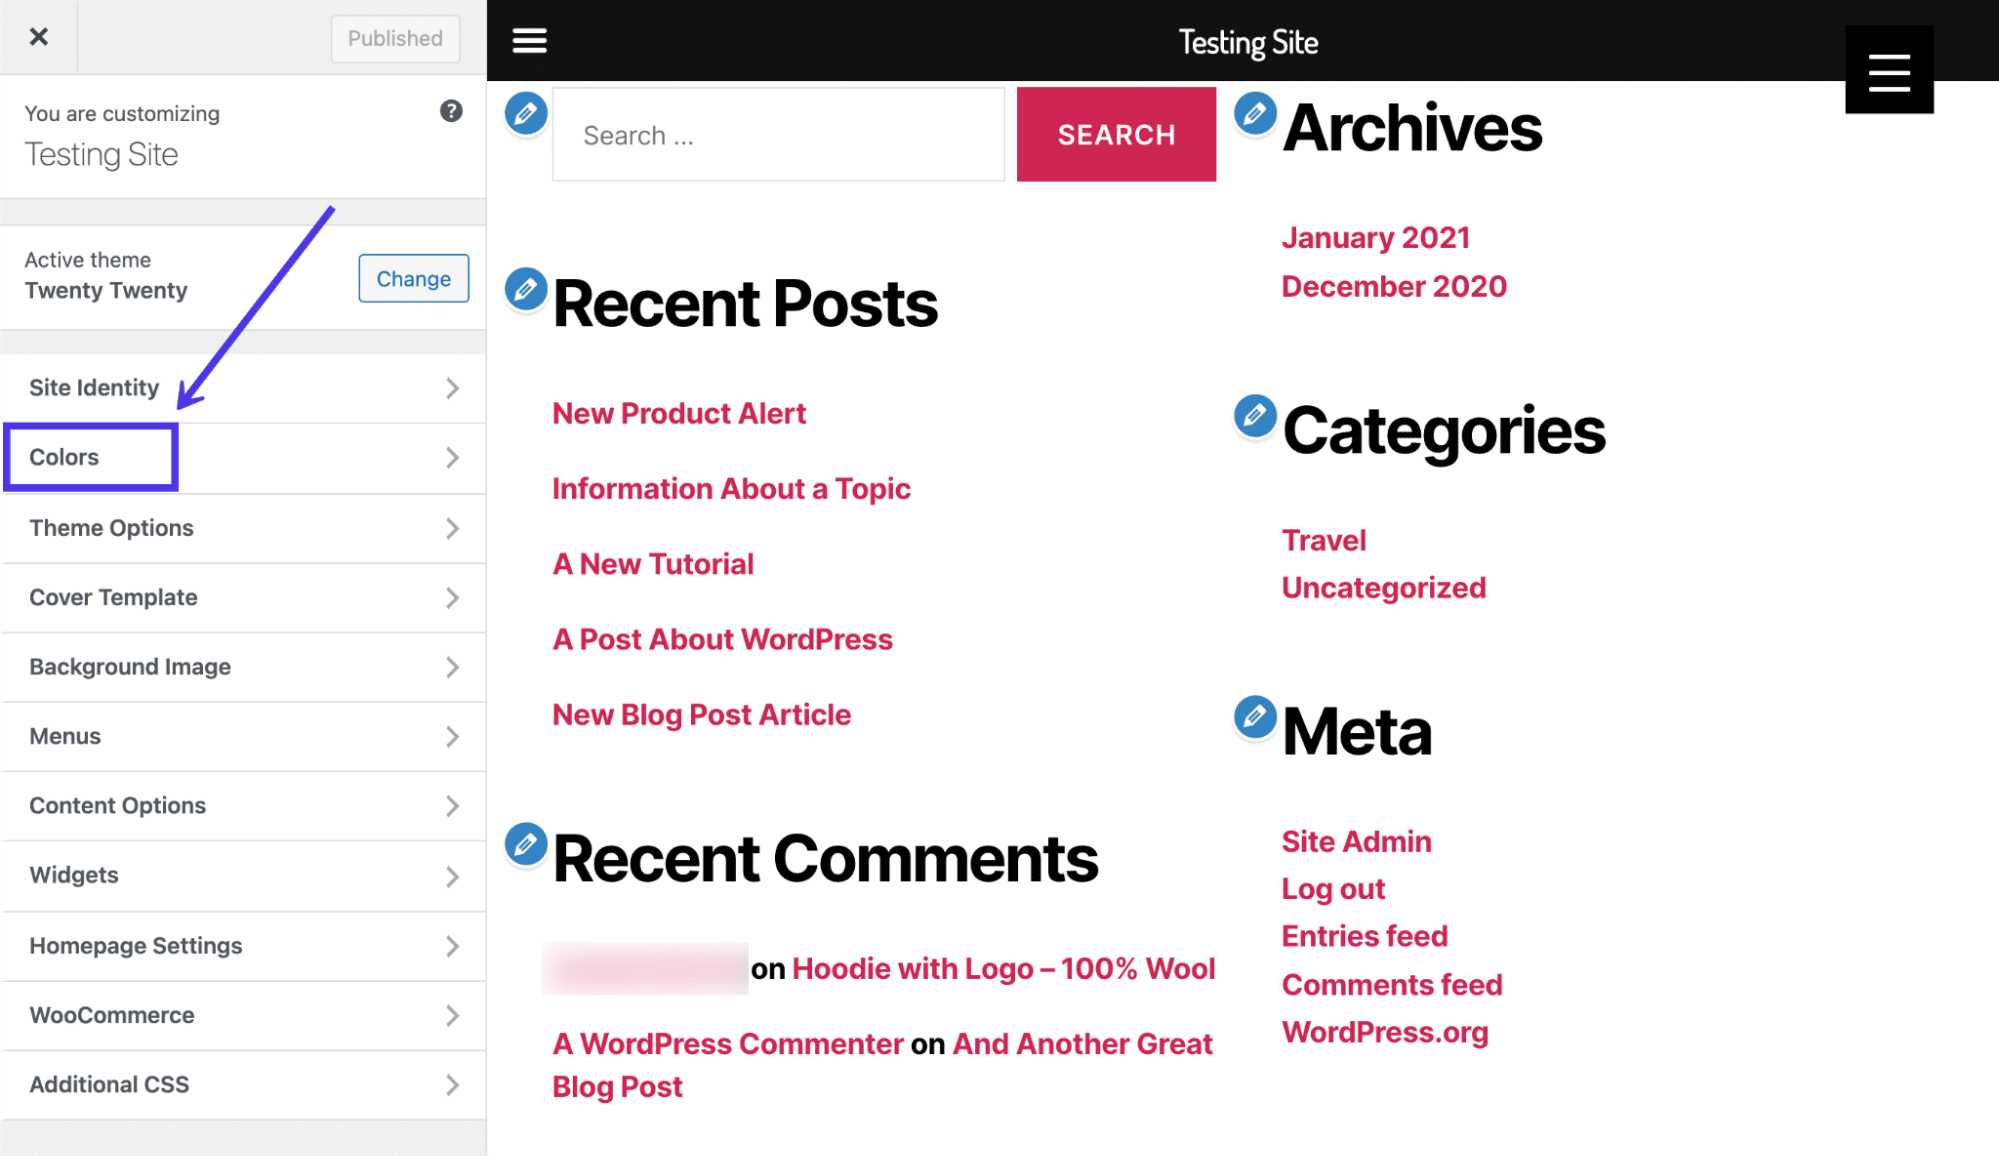
Choose the Select Color push button under the Header and Footer Background Color field.
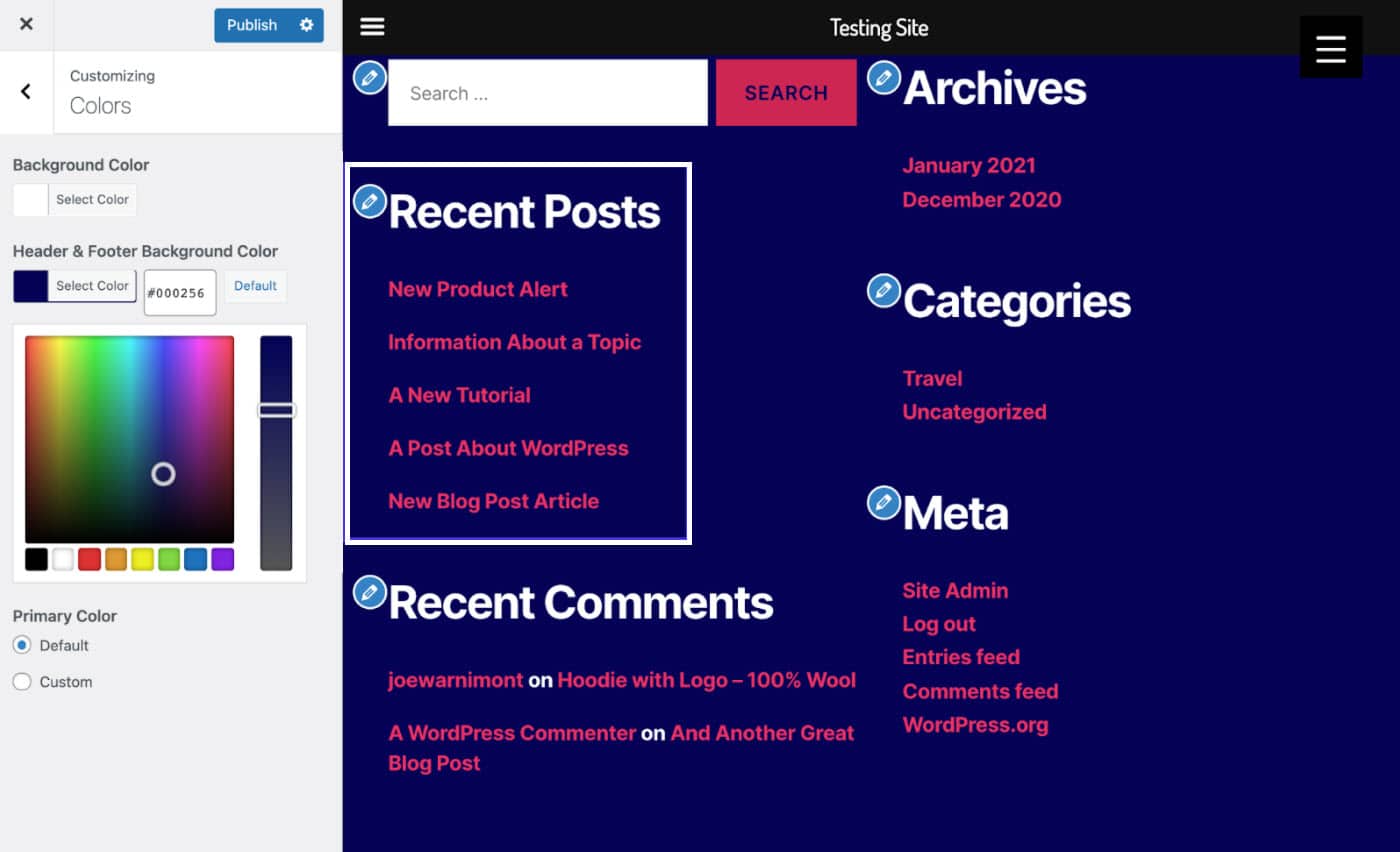
Use the color picker to test all types of colors and see which ones friction match your brand or look good towards the end of your page.
With this particular theme, whatever color modifications actually adjust the font colors likewise, making them look clear regardless of the background color.
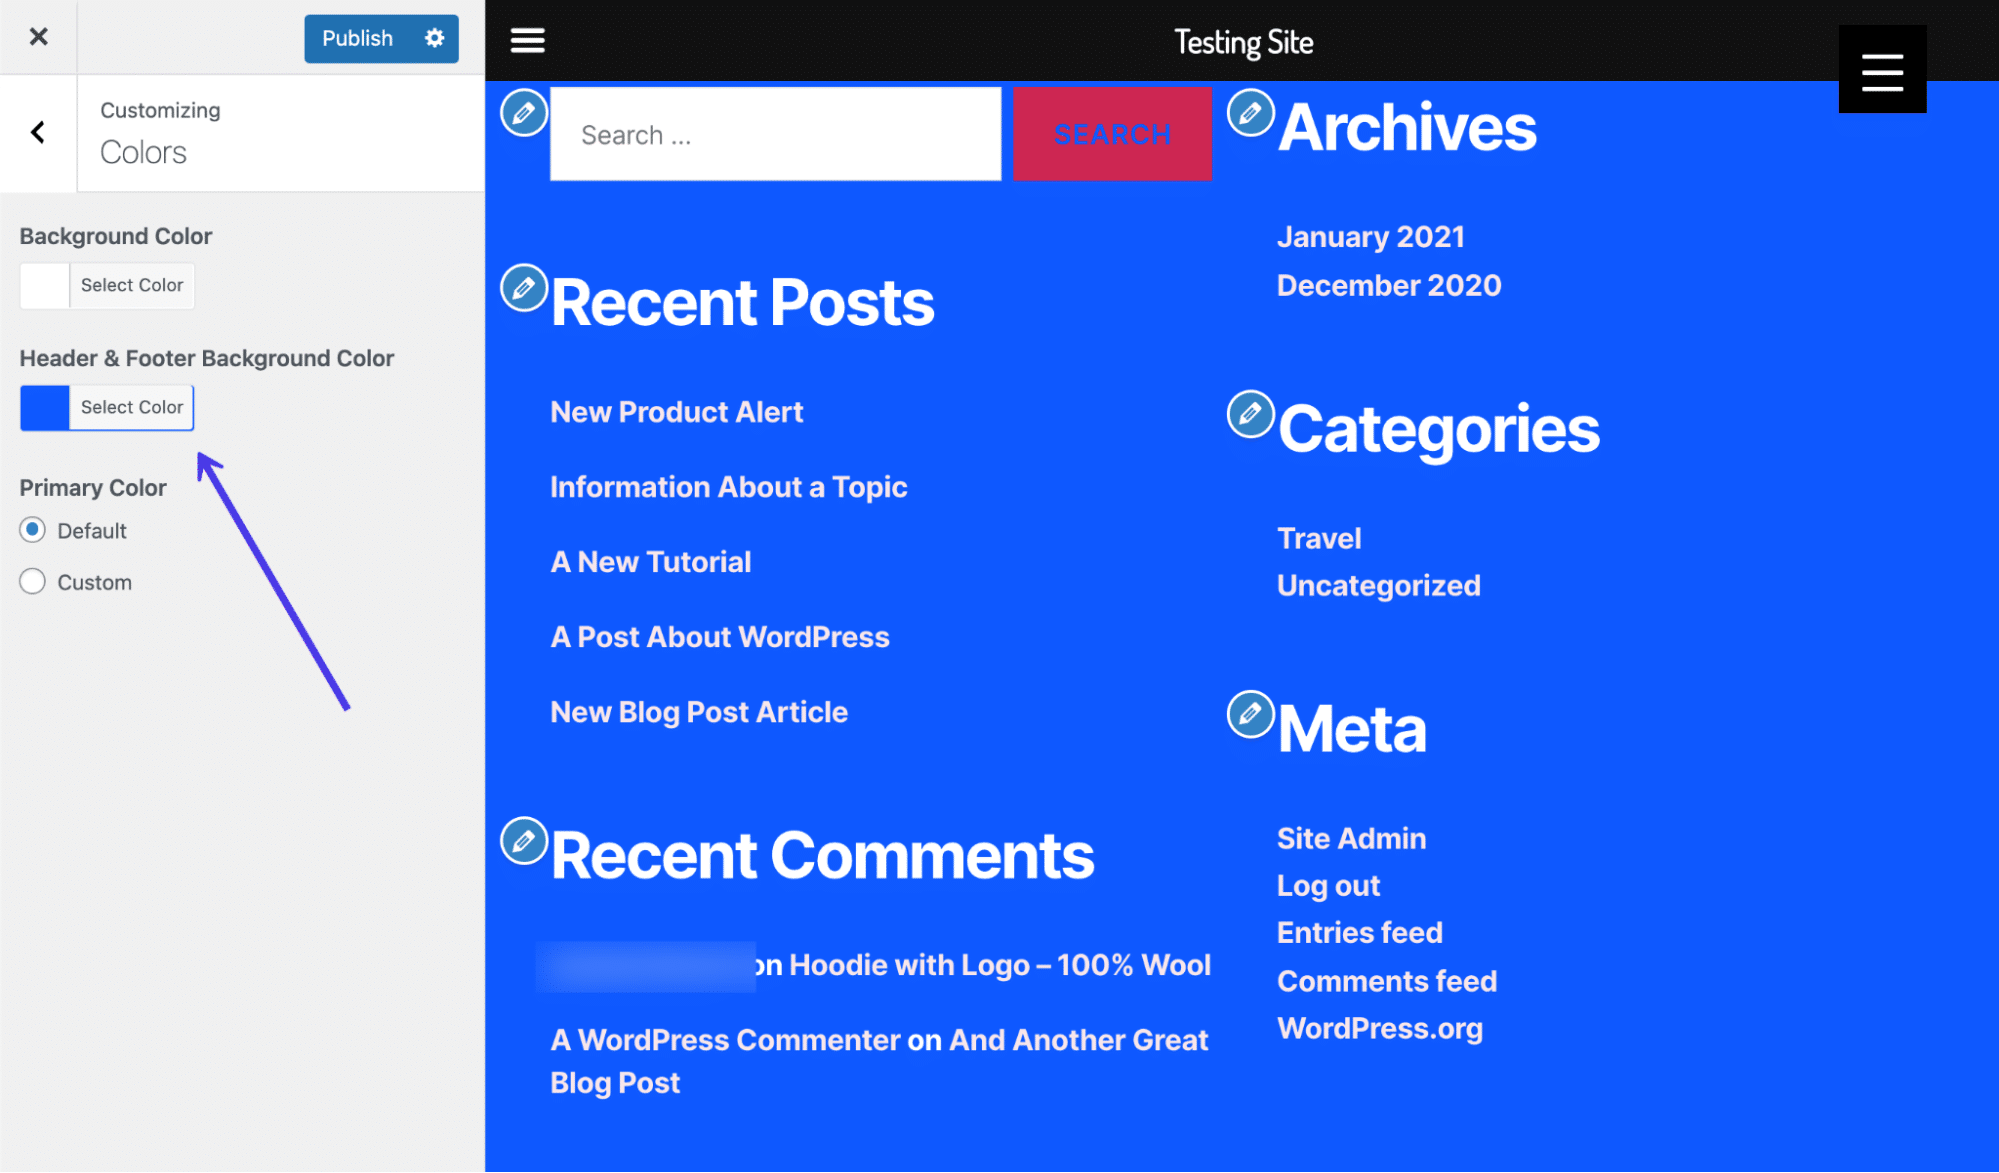
As you tin can see, a darker WordPress footer color automatically changes the font colors for links, headers, and paragraph text, eliminating the need for you to do that on your ain.
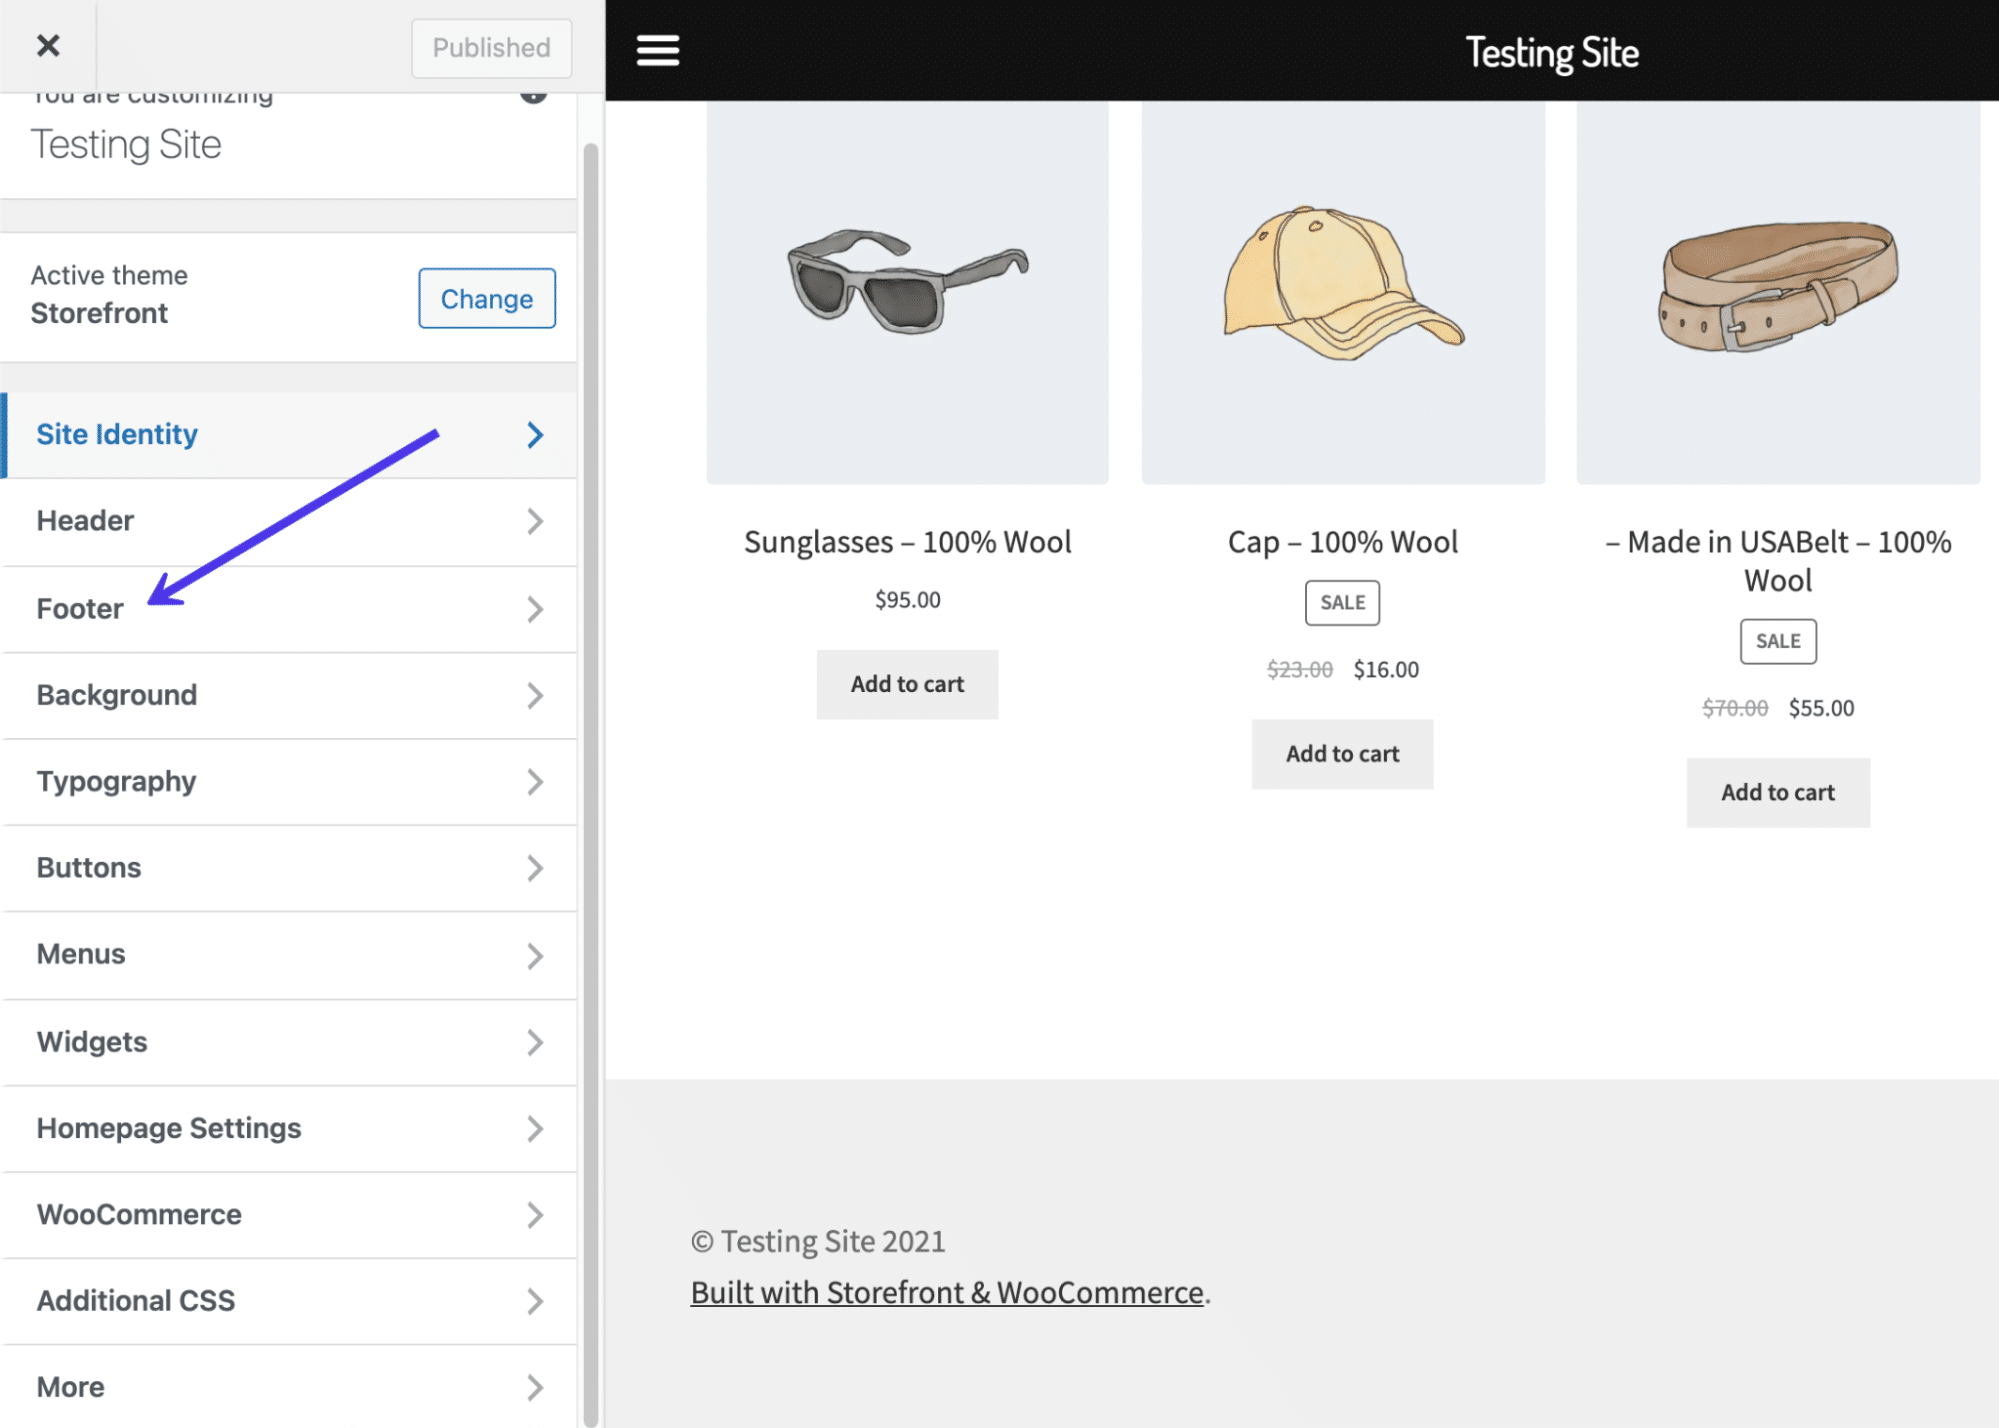
Now let's try another theme. In this case, we've swapped out the Twenty 20 theme for the Storefront theme.
Sure plenty, the WordPress Customizer for the Storefront theme displays buttons not shown in the 20 Twenty theme.
Therefore, your theme dictates how much command you have over the footer in the WordPress Customizer. Some themes are better than others in this respect.
For the Storefront theme, we have a Footer tab. Click on that to see what's available for customizing the footer.
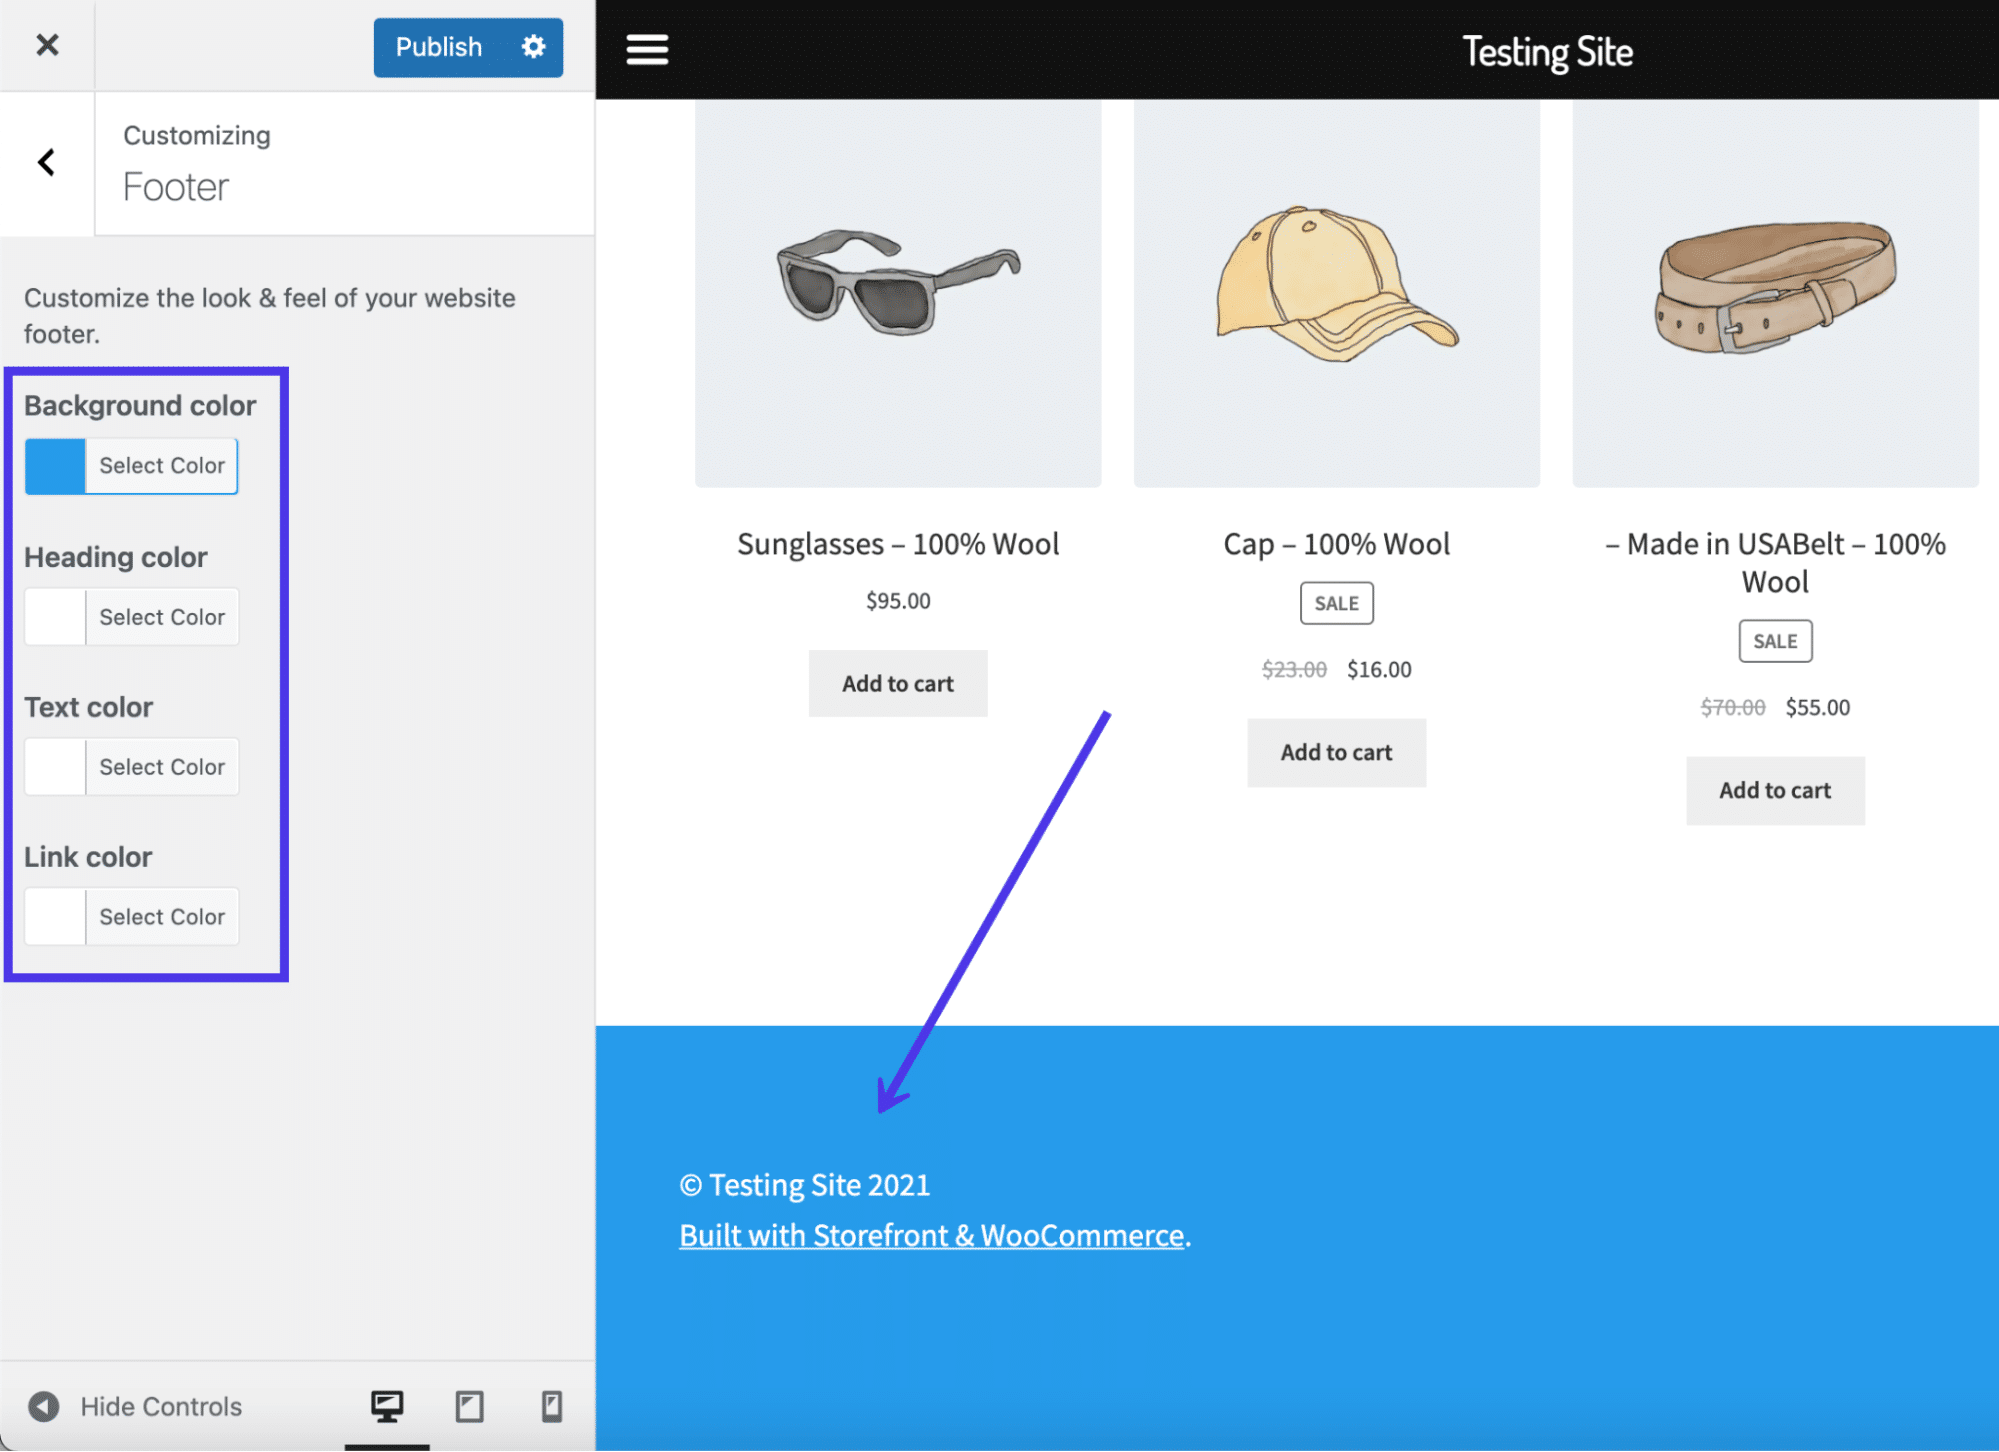
Different the previous theme, Storefront doesn't automatically change text and link colors when you adjust the background colors. Nevertheless, you are able to control all of these colors on their own, with fields for the Groundwork Color, Heading Color, Text Color, and Link Colour.
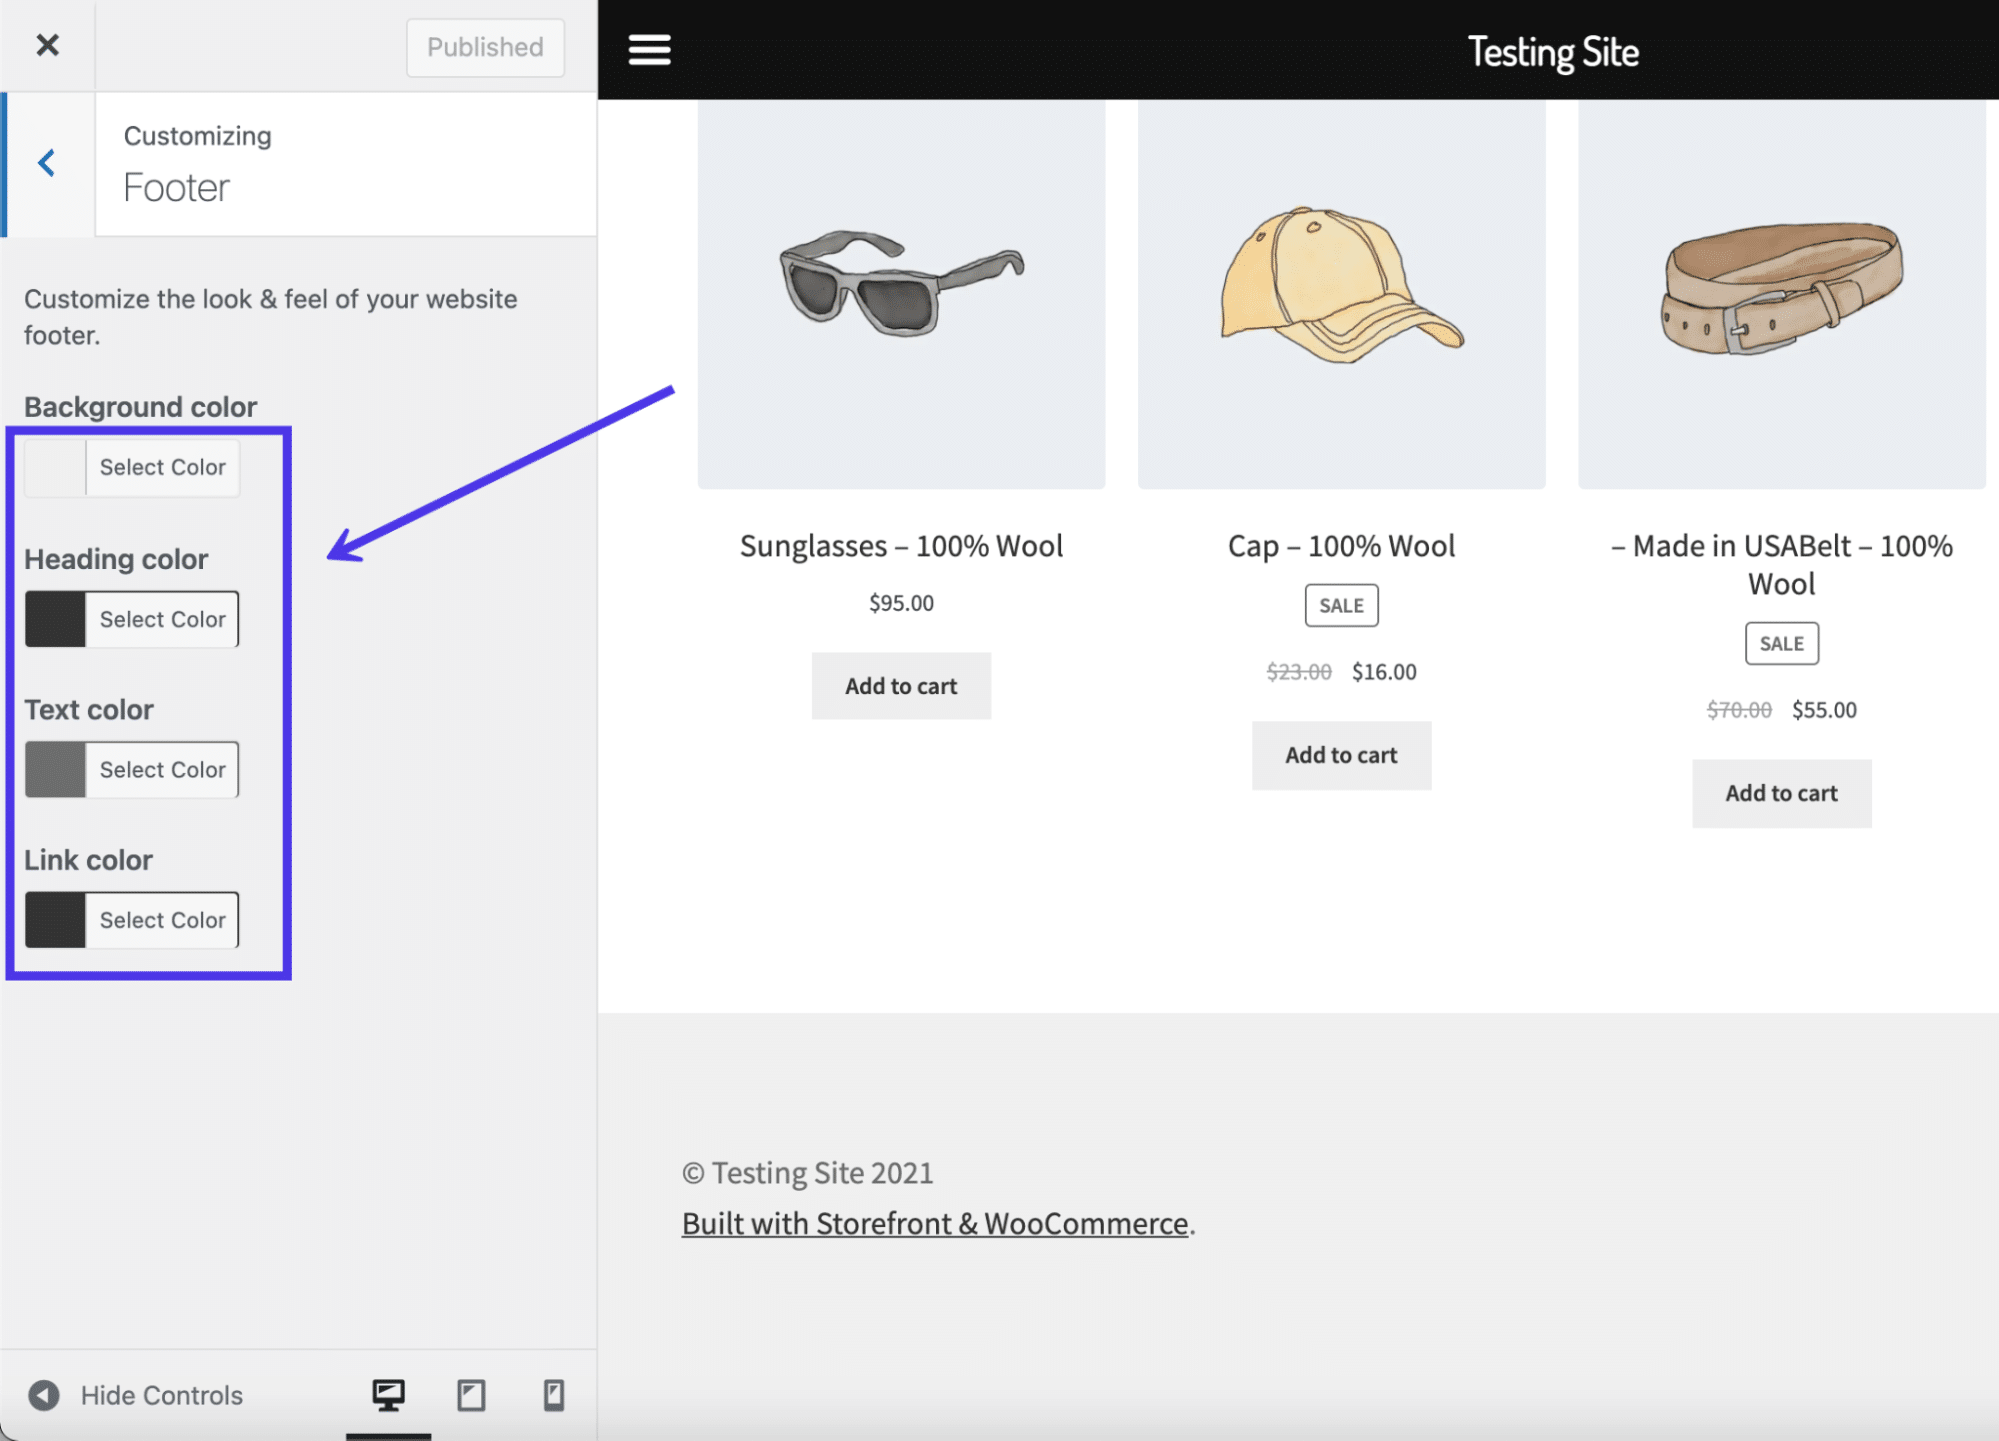
Footer color settings
A quick selection reveals the results in our WordPress footer preview. After this, you lot should click on the Publish push to see the new footer colors on the front end.
Just what about the links and text elements presented by default in the footer?
Once again, the primary method to arrange the footer content is in the WordPress Customizer. In the coming sections, we'll explain how to add and remove text and link content from the footer using two methods: equally menu items and as widgets.
Adding Widgets to Your WordPress Footer
One way to edit the footer content is past adding widgets. WordPress widgets have many functions, along with several locations for them to become, including the sidebar and footer, provided your theme supports that.
Dorsum in the WordPress Customizer, wait for the Widgets tab.

Peruse the listing of areas to place widgets on your website. You lot may see options for regions similar the sidebar, acme menu, and bottom menu. Hopefully, your theme also includes the footer equally an expanse to identify widgets. If non, in that location are other ways to edit your footer, though if you'd rather go with widgets, consider switching to a different theme that allows for widgets inside the footer.
This theme actually provides four widget locations in the footer, arranged in four columns stacked side by side to make a cute format that fits as much content within the footer equally possible.
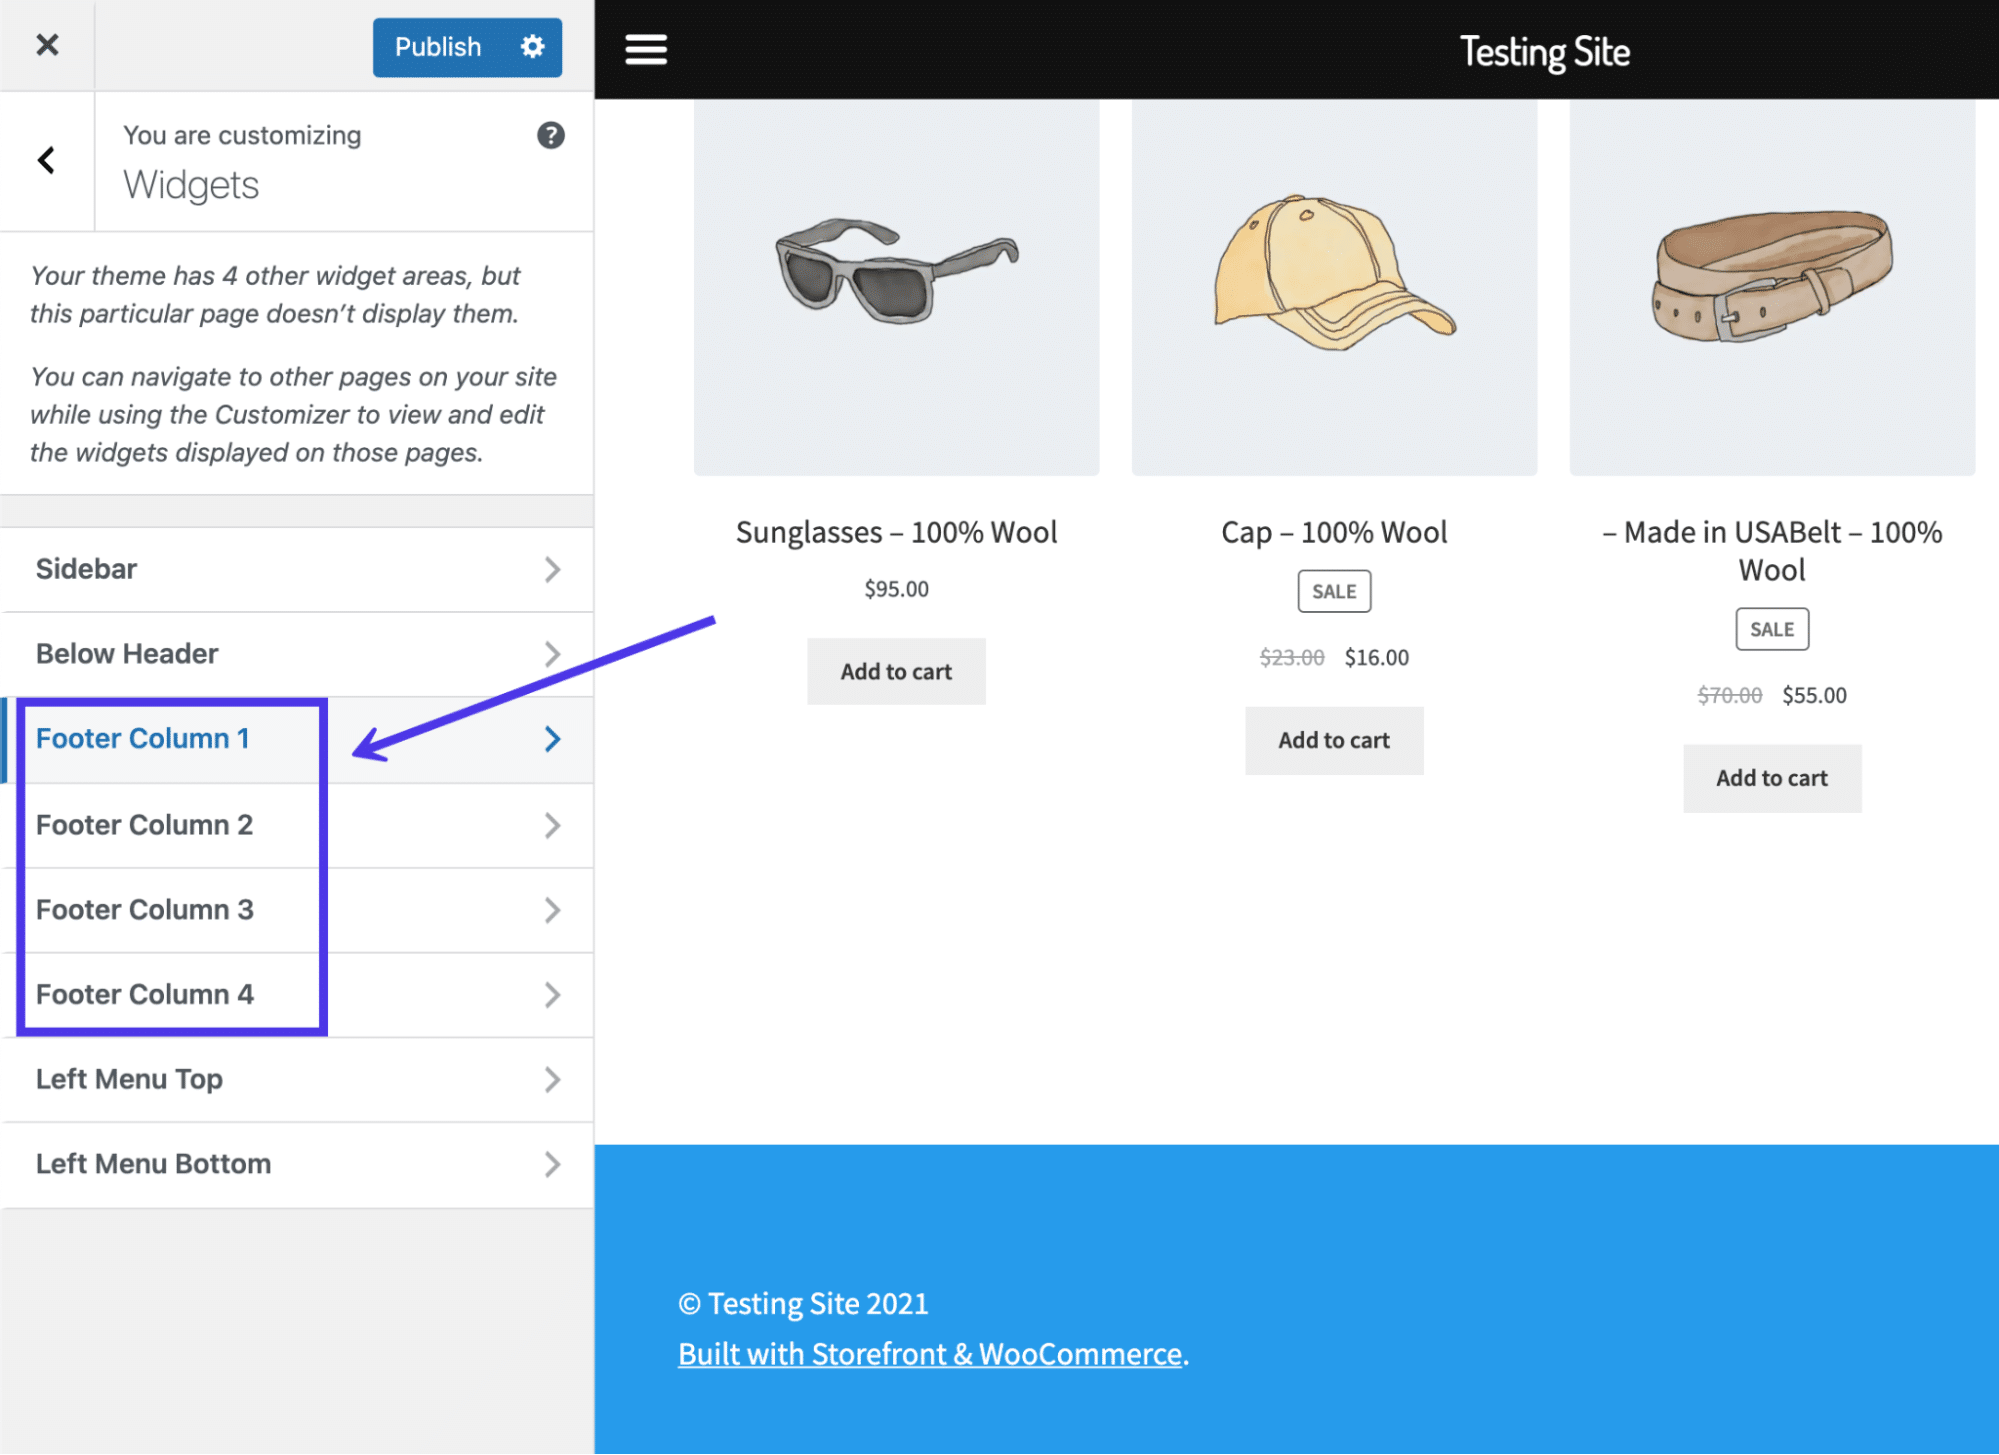
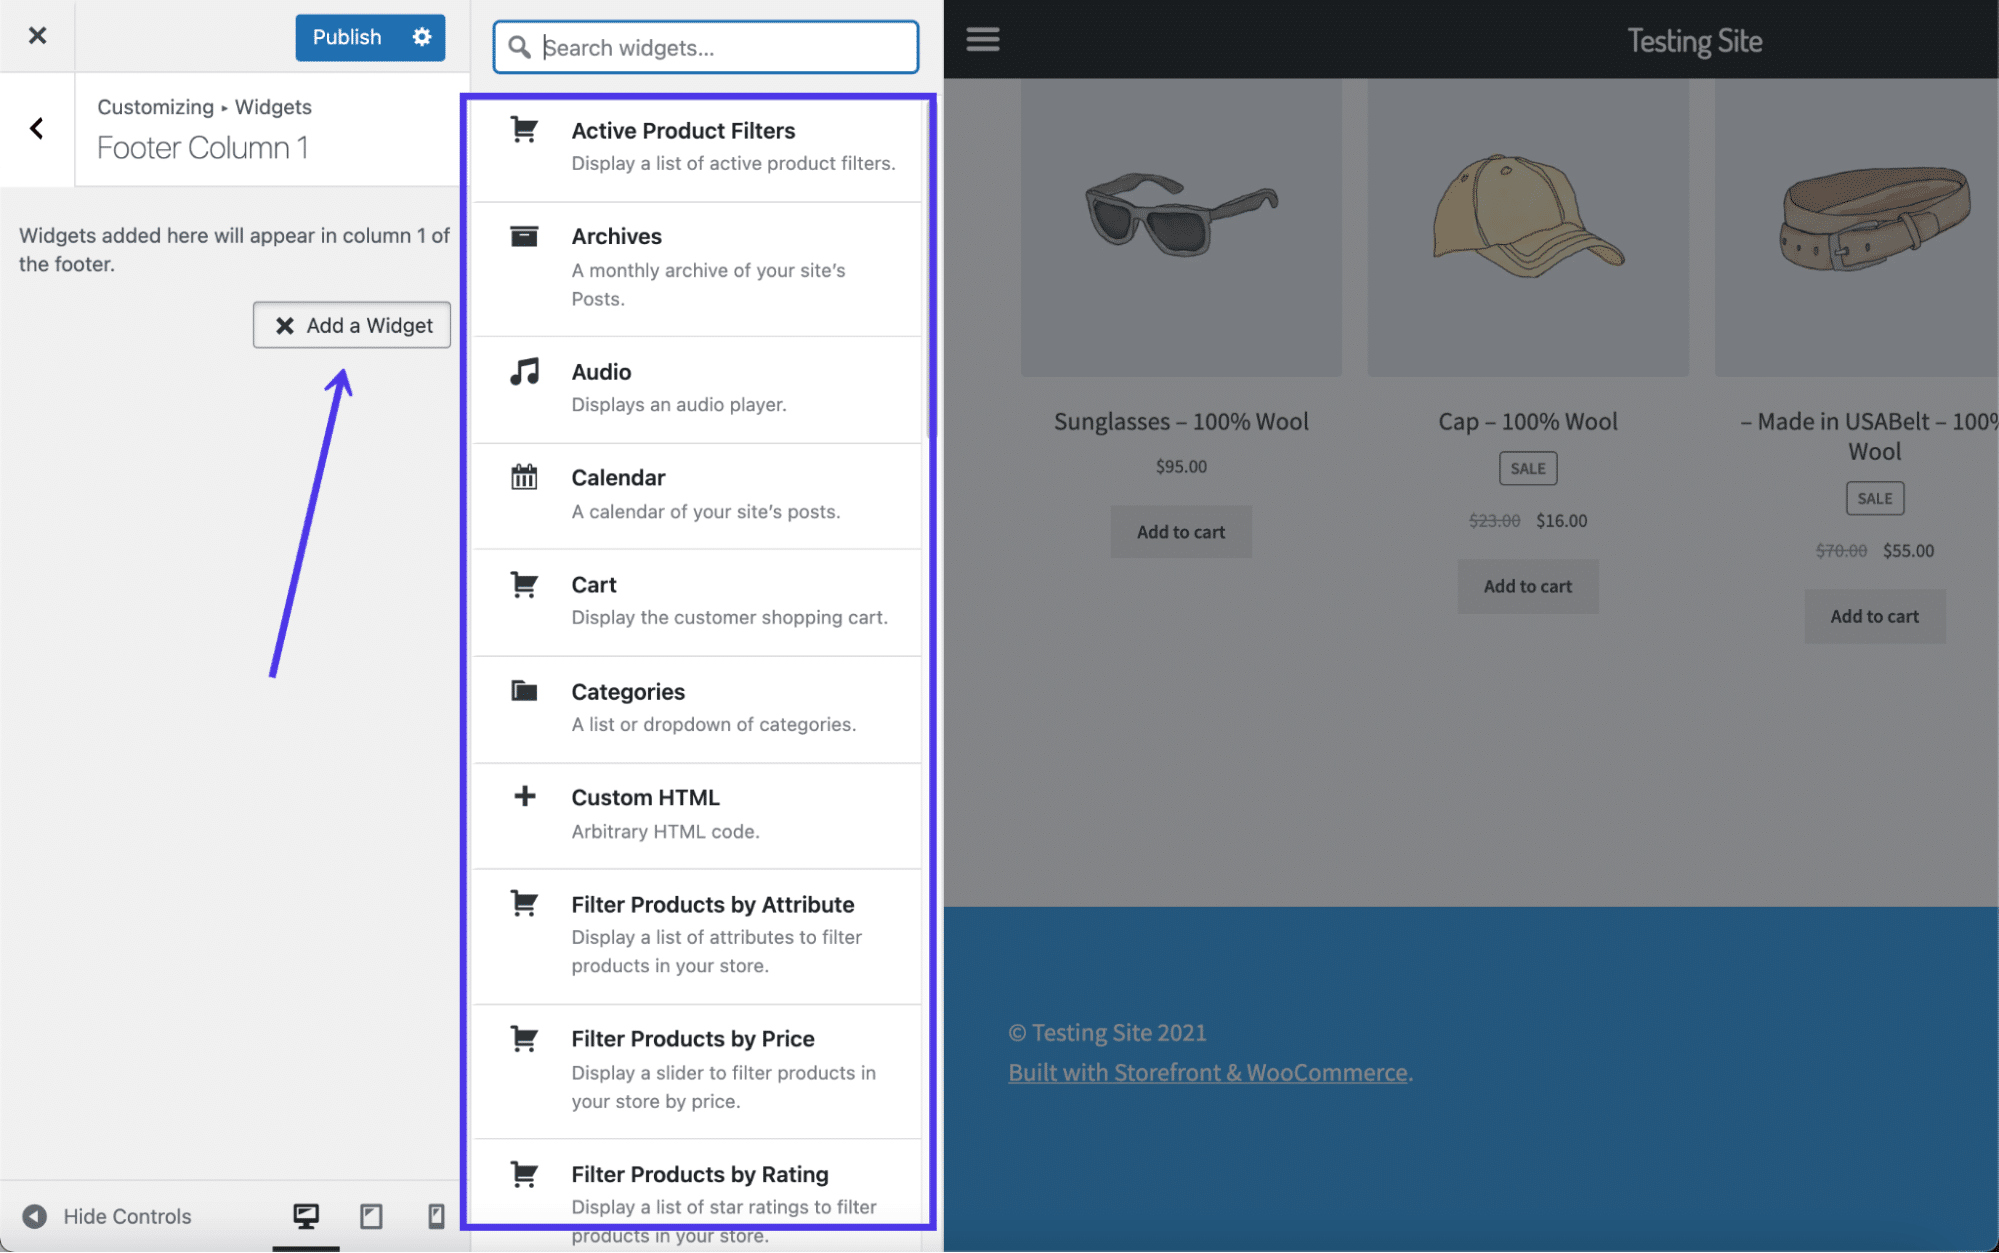
Click on any of the footer widget locations to reveal an area to Add A Widget. Click on that push button to show a slideout view of all available widgets on WordPress and the theme. Once again, y'all may see a completely different fix of widgets, considering some themes include their own widgets, or yous may accept installed an extension or plugin to add together more widgets to your dashboard.
Common widgets range from Archives to Audio and Custom HTML to Production Filters.
All you have to do is select the widgets to add to this particular widget area. They'll prove up on the left-manus side for you to reorganize and configure their individual settings.
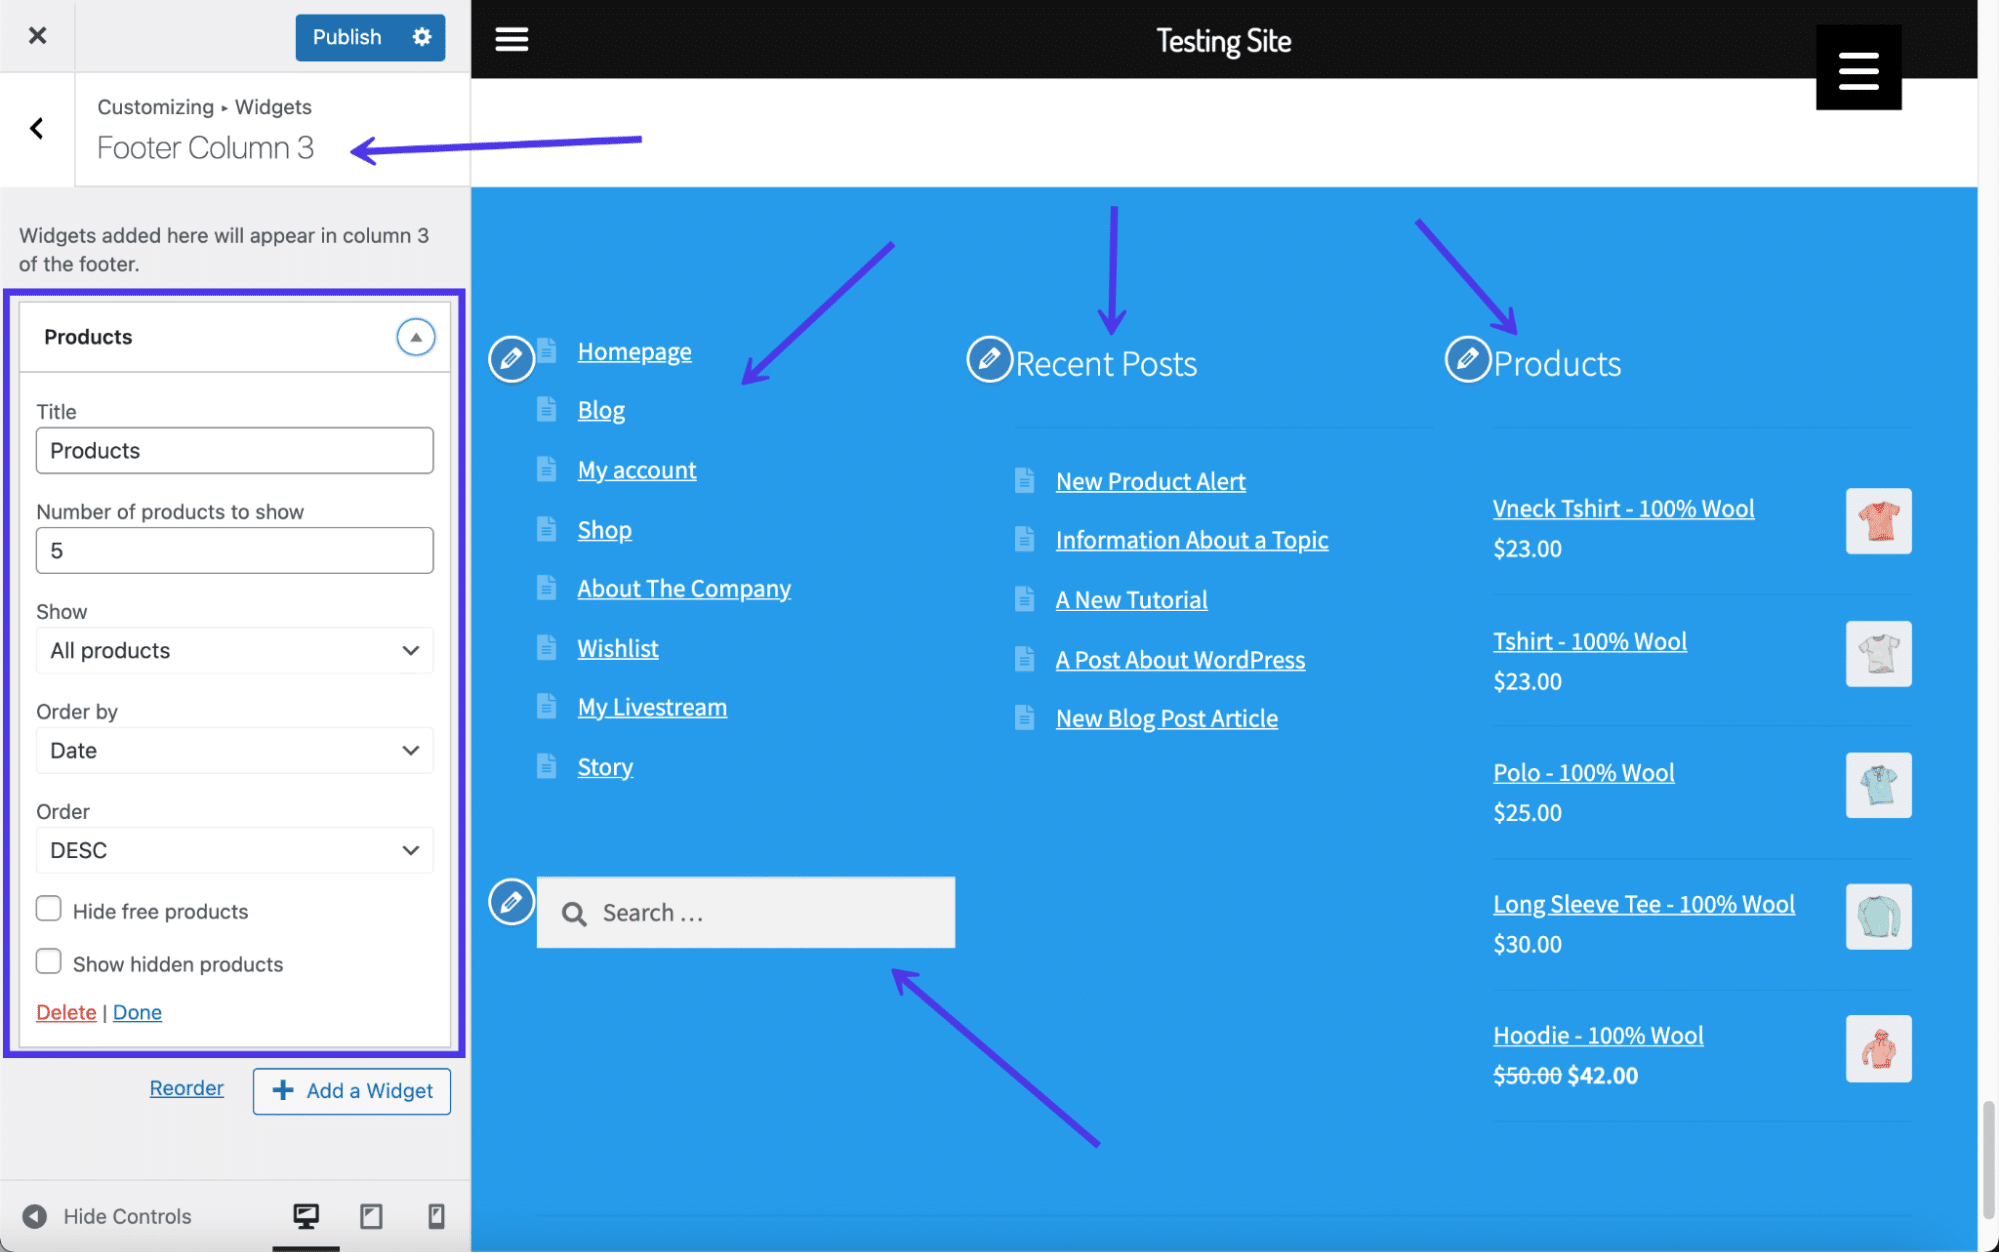
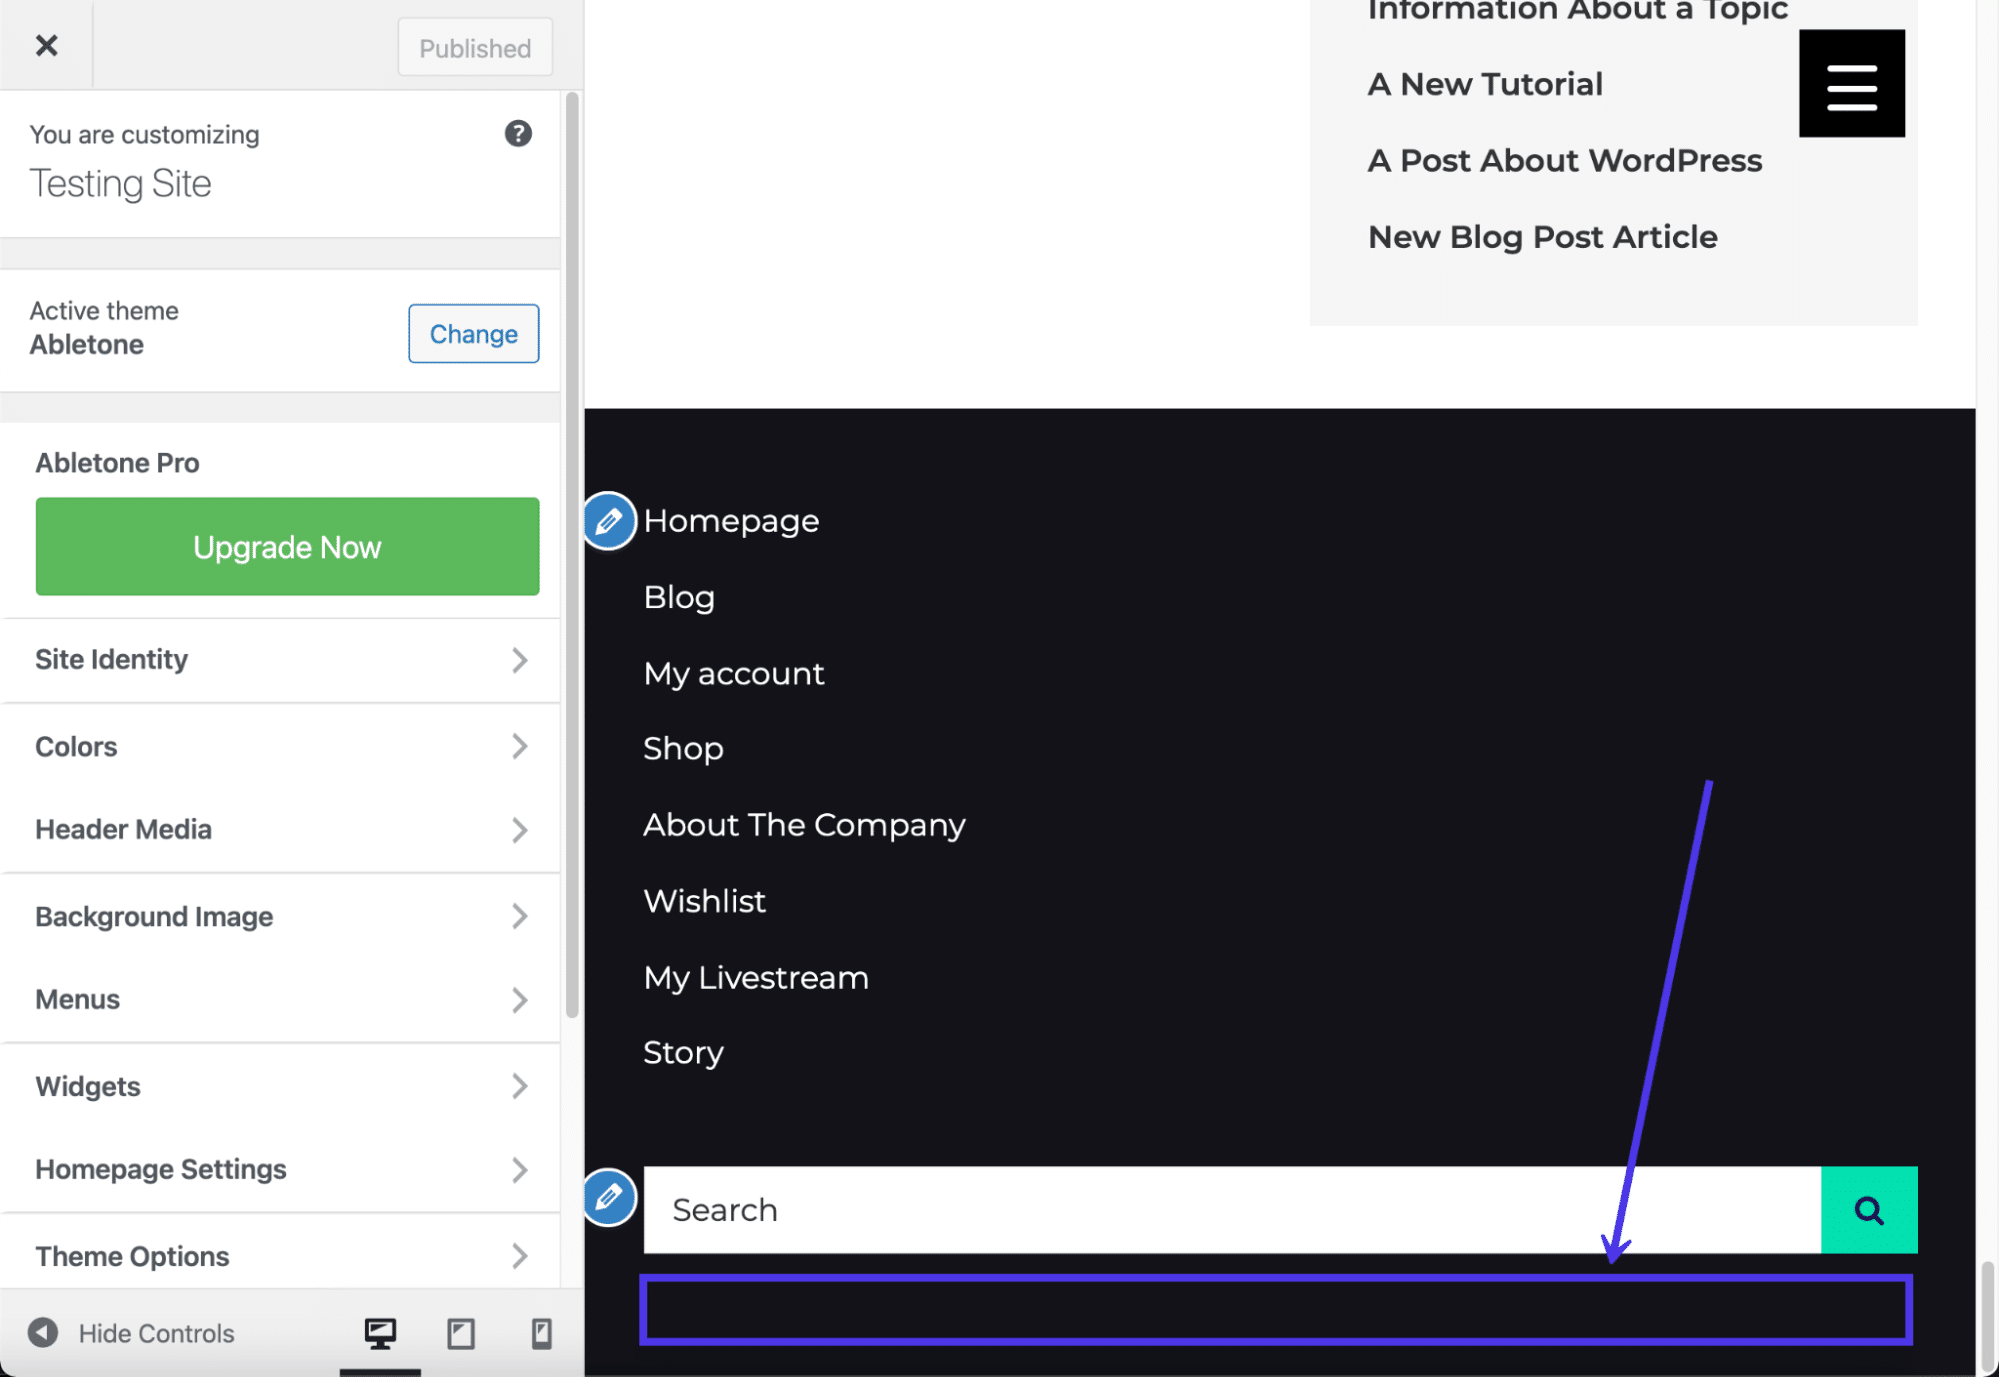
Subsequently some quick work, nosotros've placed several widgets in three of the footer column modules, including a main bill of fare, a list of recent posts, and a few of the products from our shop. You'll also notice nosotros added a search bar to make navigation a footling easier for our users.
One important area to note is the widget settings section. Each widget has its own settings on the left, so be sure to walk through those fields and make them look exactly equally you want.
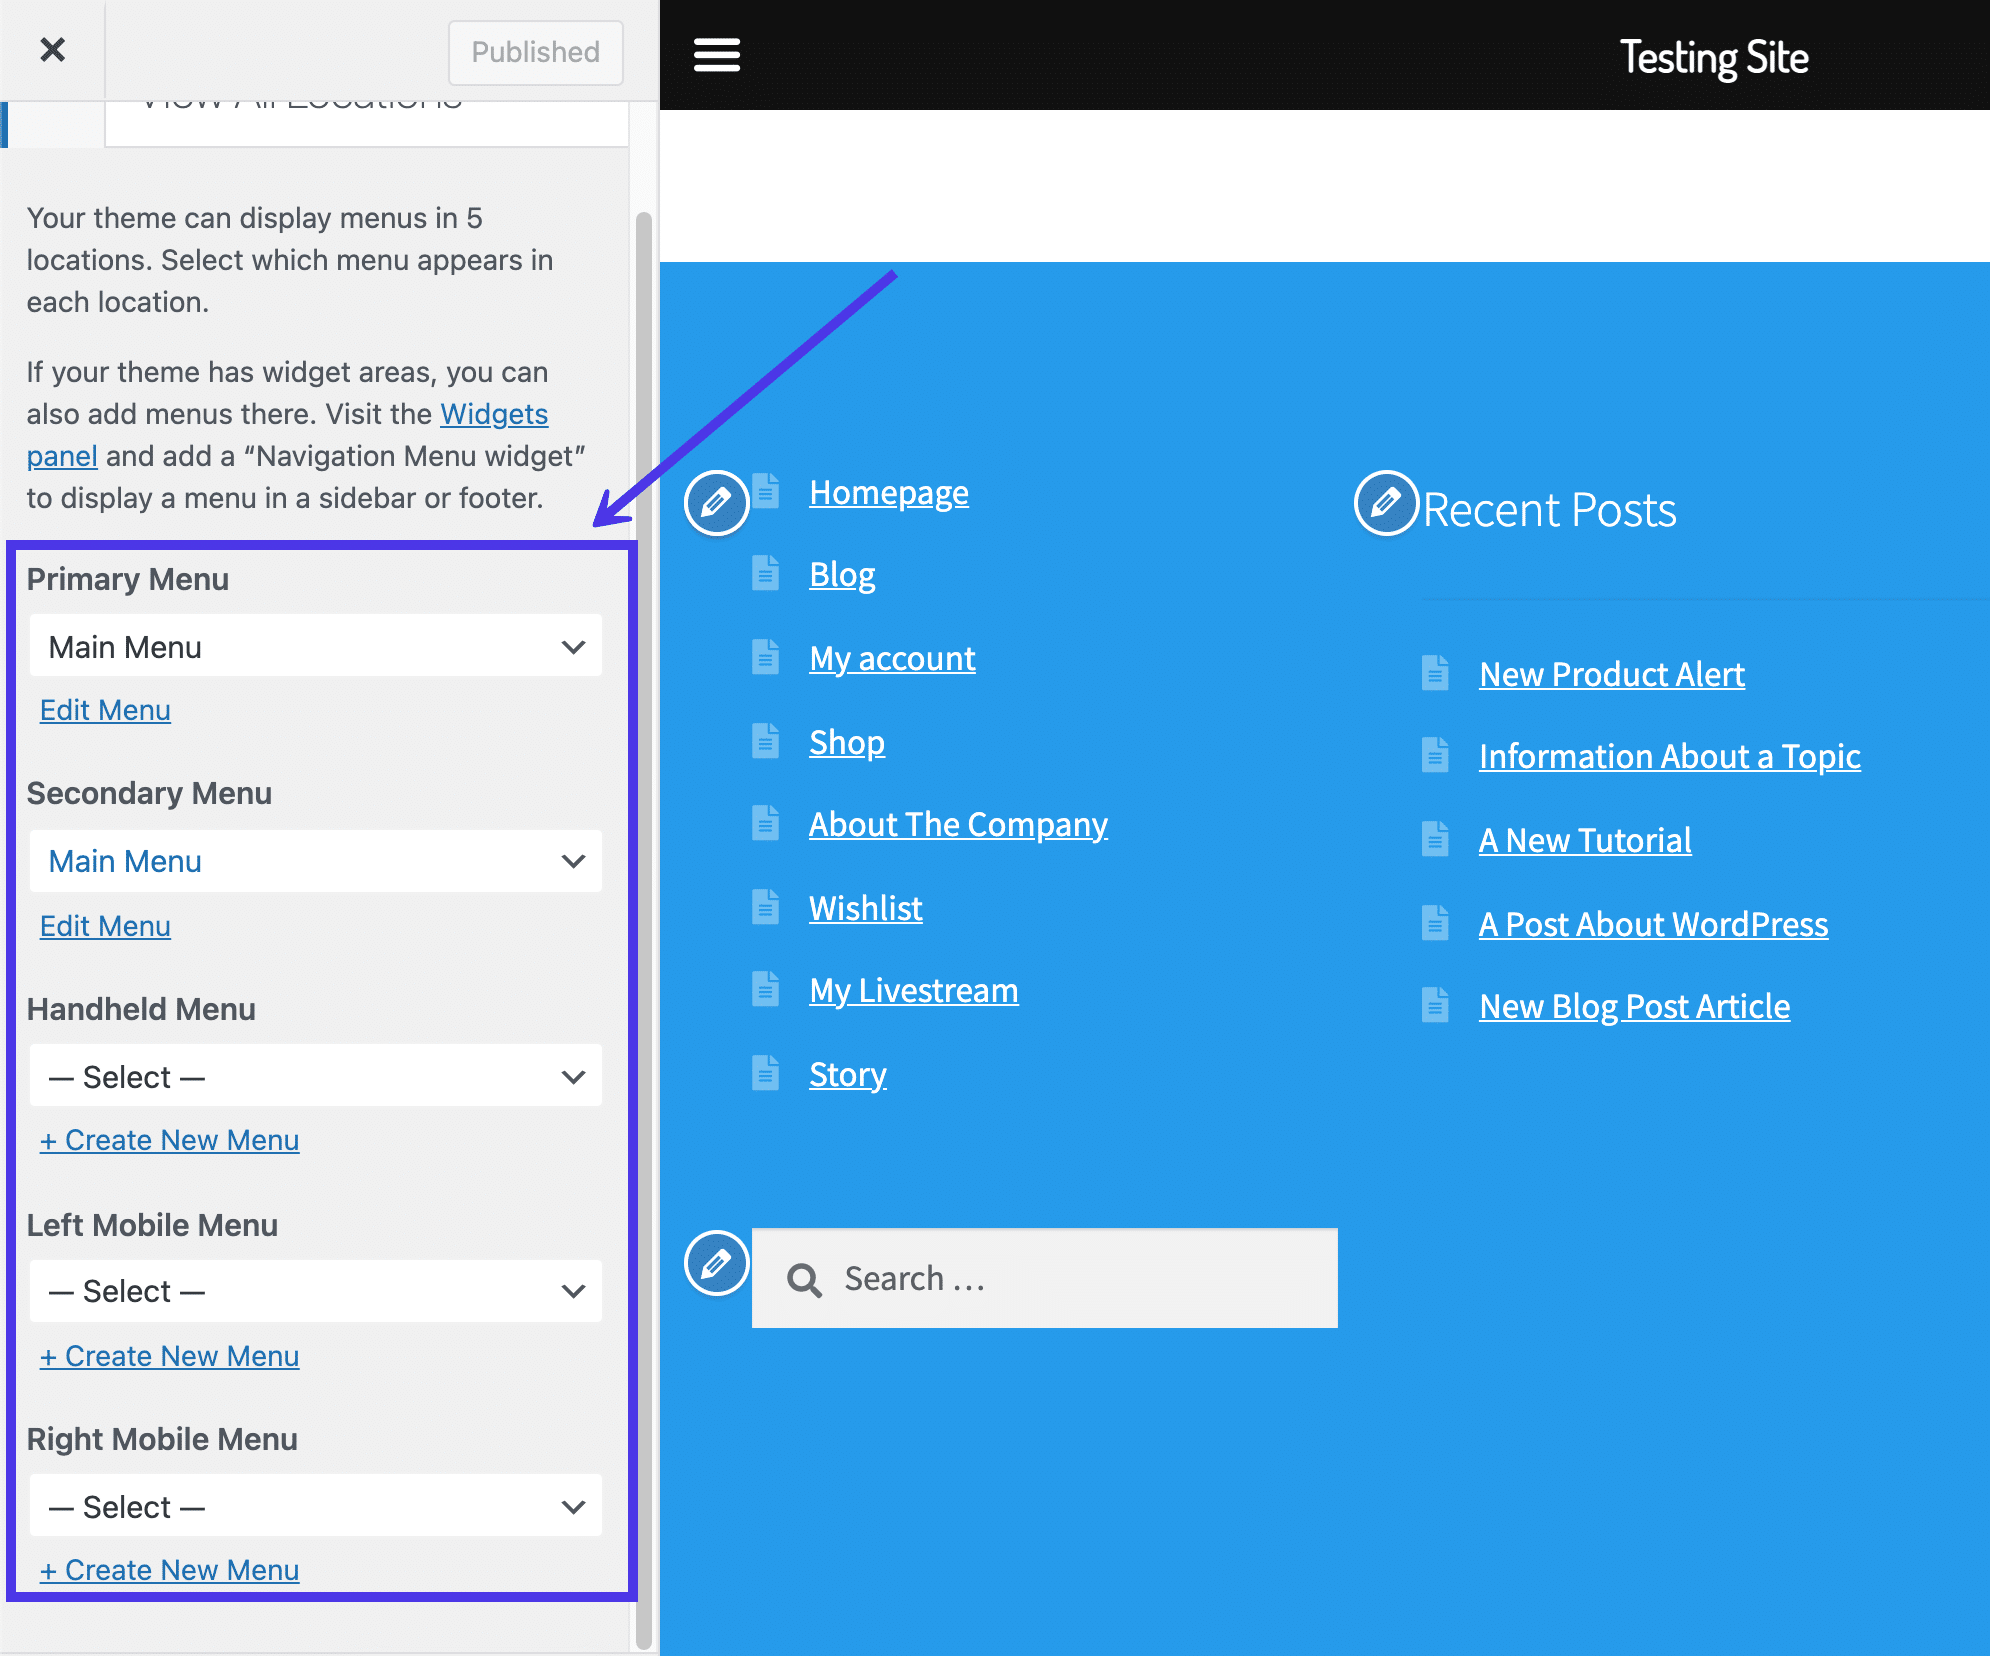
Every bit you may learn while browsing through the theme settings, not all themes have means to add menus directly to the footer area using the standard Add together Menu setting. Our theme here, for instance, has spots to activate menus equally main, secondary, handheld, and mobile menus, merely zilch for footers.
We'll embrace menus in the next department, merely we wanted to explain a quick workaround to add a bill of fare with a widget, just in instance your theme doesn't back up menus in the usual manner.
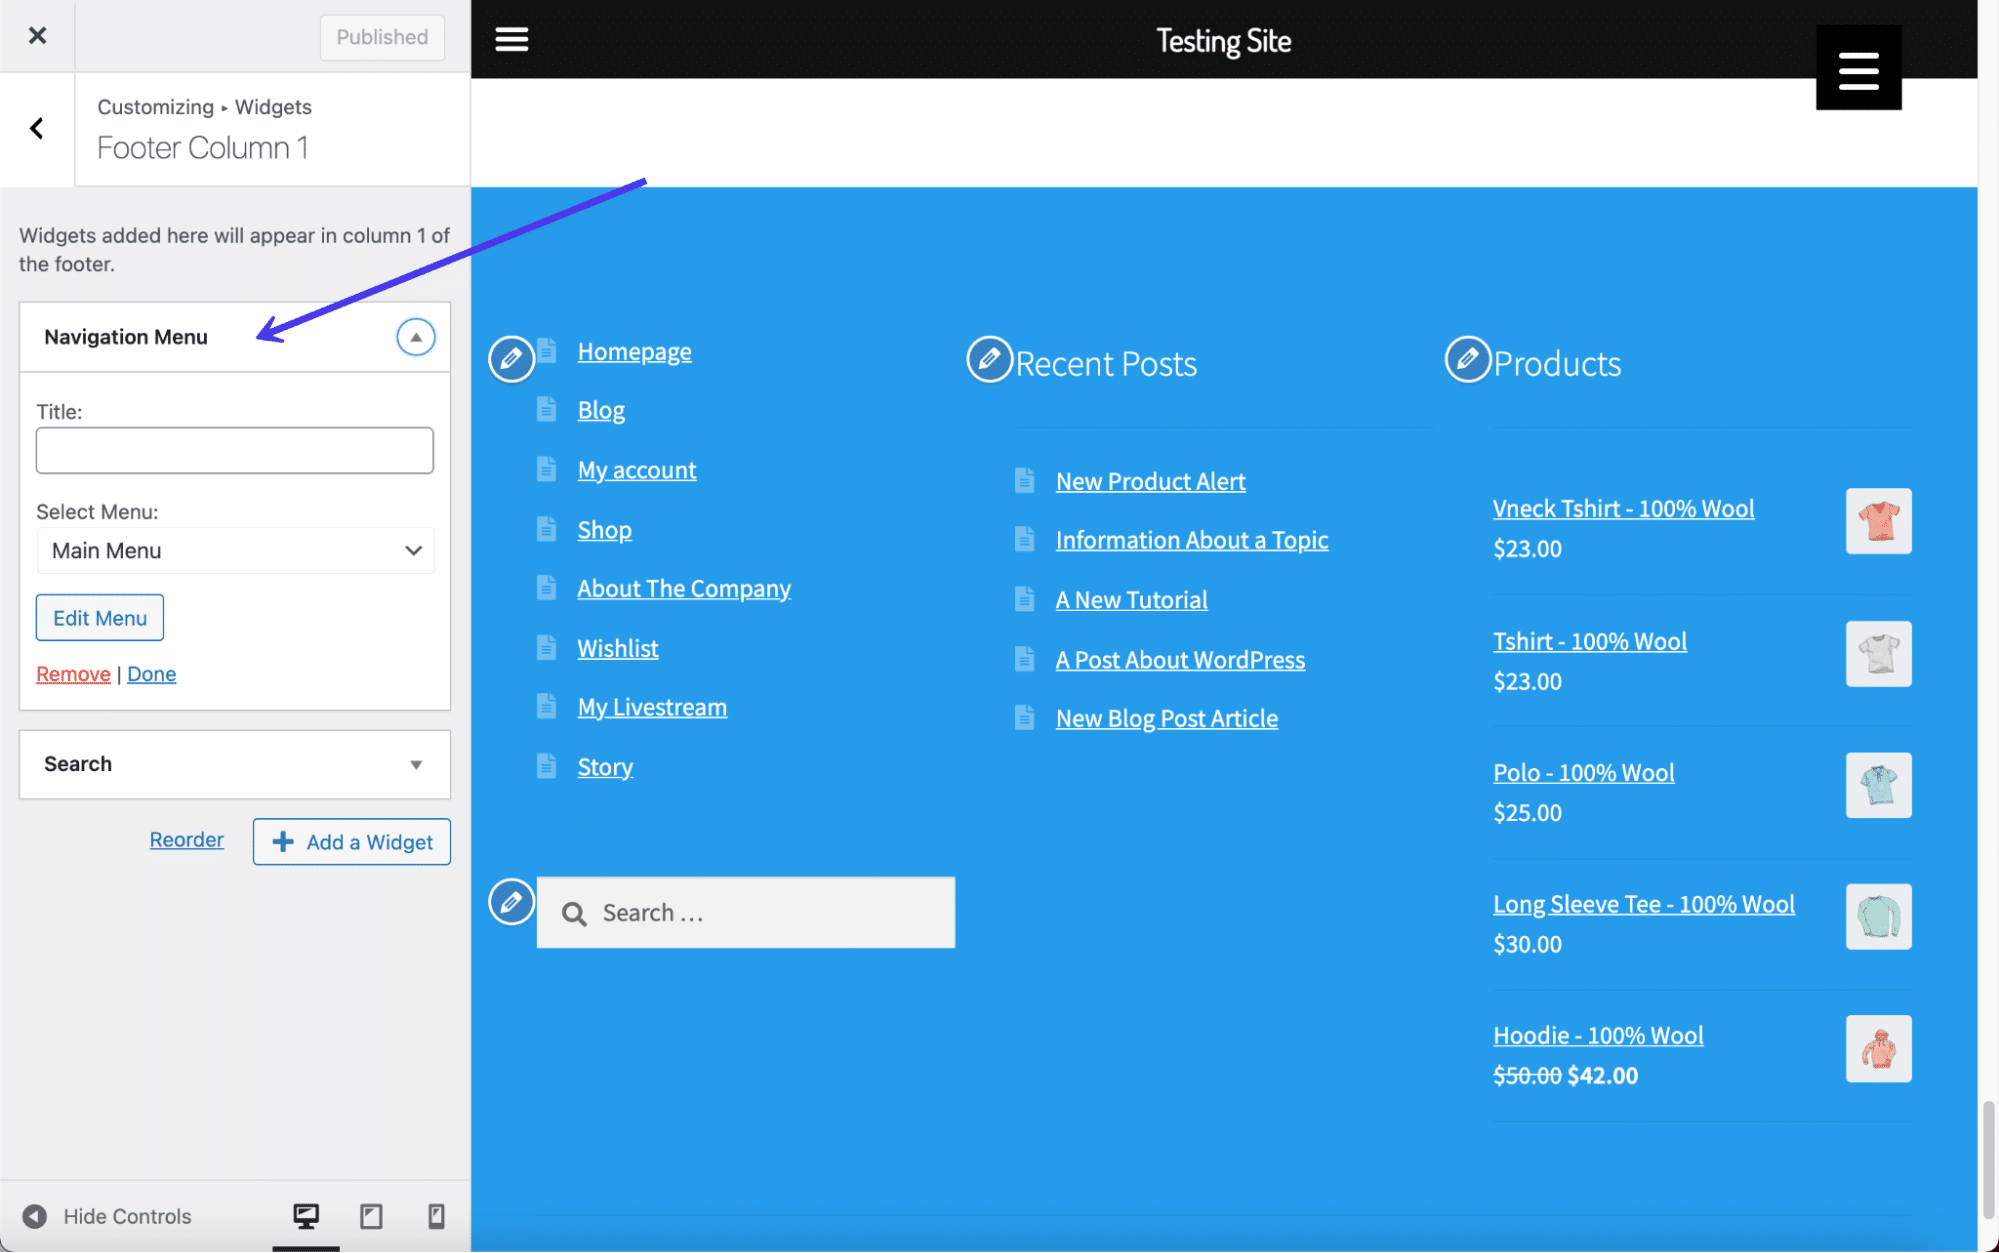
Essentially, all you lot have to practise is go to ane of your widget footer modules and search for the Navigational Menu widget. Here, yous tin click on a dropdown field to view all created menus on your website. Feel complimentary to generate a card specifically for your footer (in the Menus section of the dashboard) and add it as a widget in this section.
As an alternative, opt for the main menu, or whatever menus y'all've created. They should all show up in the menu widget dropdown.
Later that, the menu of your pick shows up in the footer, as long equally you've added the Navigational Menu widget in the correct footer area and clicked the Publish button. You can even blazon in a title for that menu if you'd similar to explicate what the following links contain.
How To Insert Custom Text, Images, and Lawmaking as Footer Widgets
Many WordPress widgets offer pre-configured lists of content, like the Contempo Posts widget or the Search Bar.
Even so, sometimes you may want to edit the WordPress footer to include entirely custom content, such as simple text, images, or a bit of code, to create something completely new.
WordPress provides a widget for each of these.
All that's required is to go to the Theme Customizer > Widgets. Then, cull the widget area that reflects where you want the widgets to go in the footer.
Click on the Add A Widget button and search for "image".
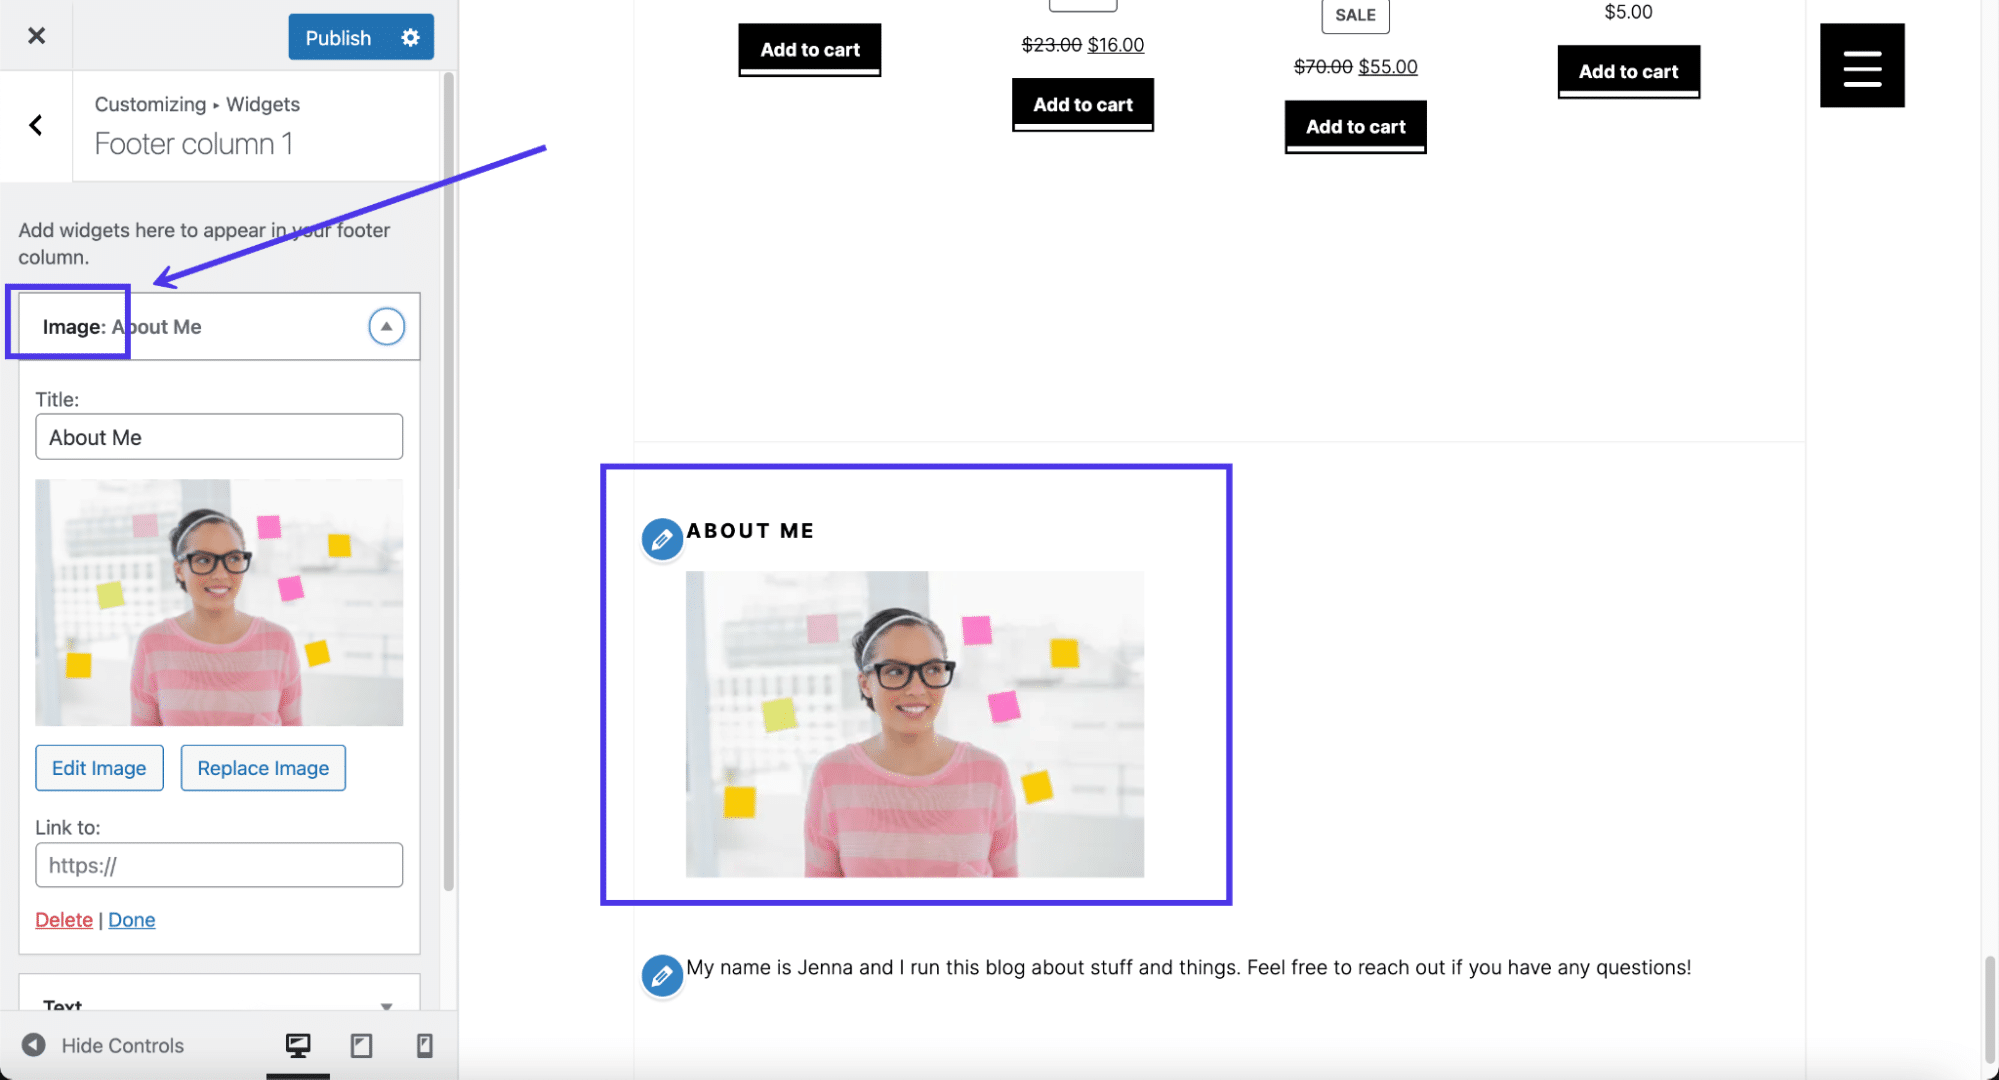
Add the Image widget and customize the title. Click on Add Prototype, then consider including a link to the image as well. Y'all can edit the paradigm size by clicking on Edit Image.
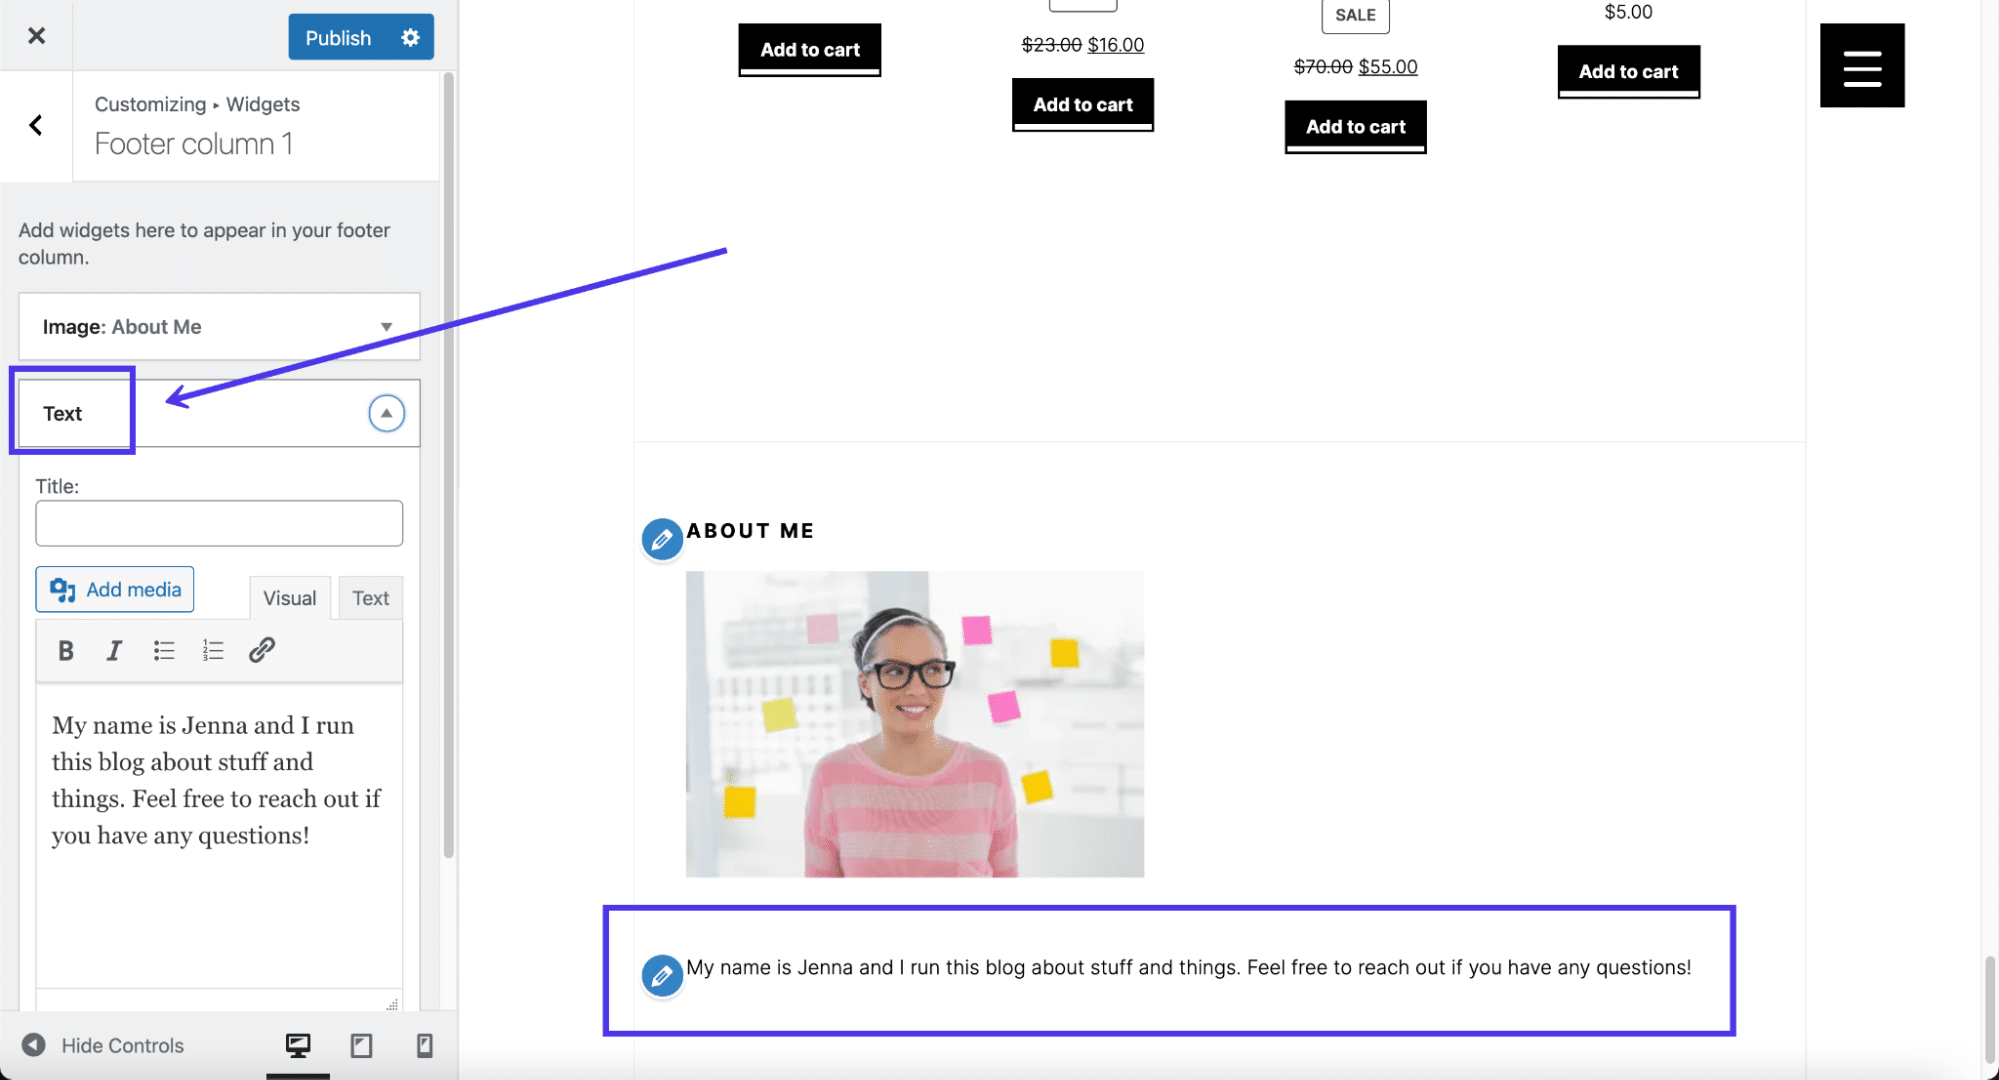
Next up, search for "text" in the widget library.
Add the Text widget to your footer and type in annihilation y'all want. It too has a title field along with a visual editor, much similar you receive when making a weblog post or page in WordPress. We've tried inserting images through the Text widget (since it's technically possible) but many themes don't permit it.
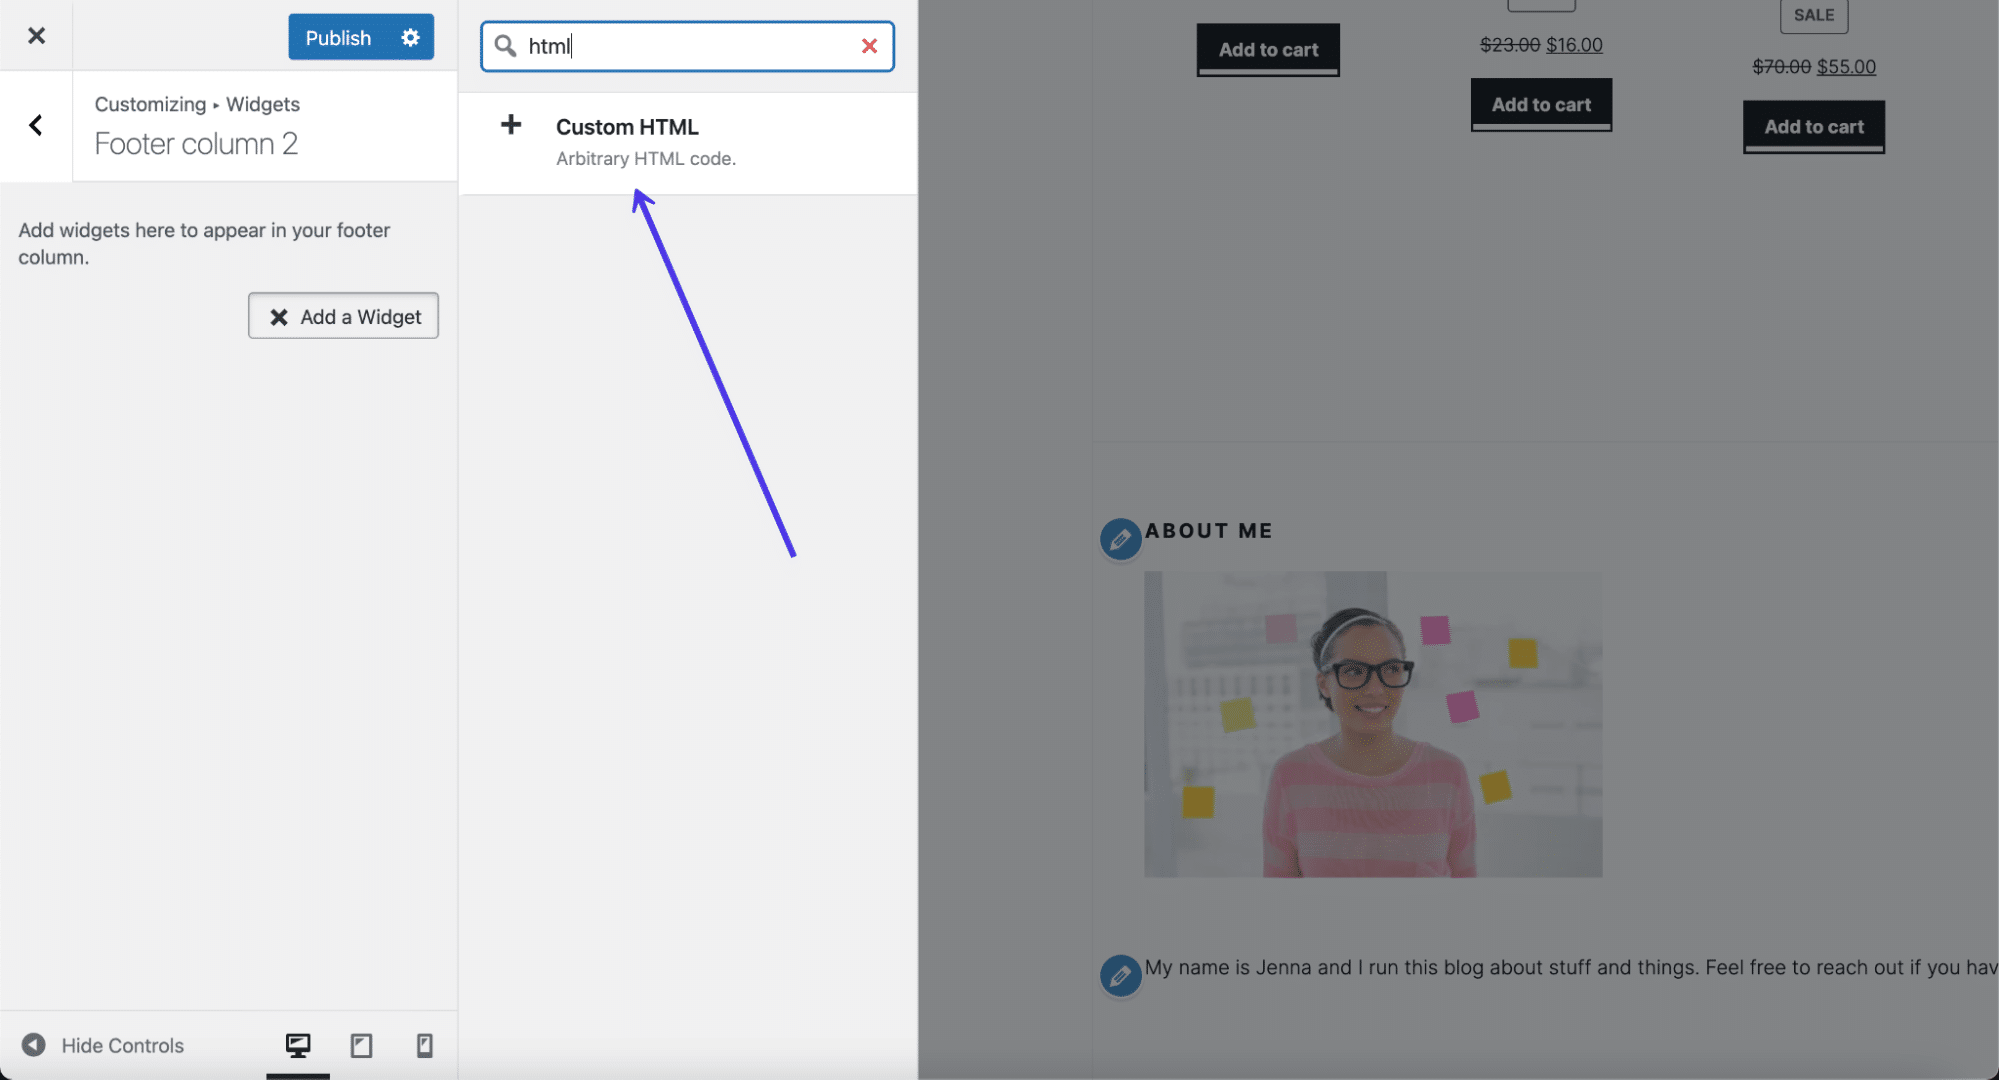
Finally, yous may observe that using a Custom HTML widget is the best form of action, especially if you lot desire full control over the footer design or to incorporate a unique design for something like an electronic mail signup grade.
For that, search for "HTML" in the widget library and choose the Custom HTML widget.
Paste or type in your custom HTML and keep an eye on the right-side preview to ensure information technology looks the manner it'south supposed to. Y'all may too have to add some CSS styling to make it appear the way yous want.
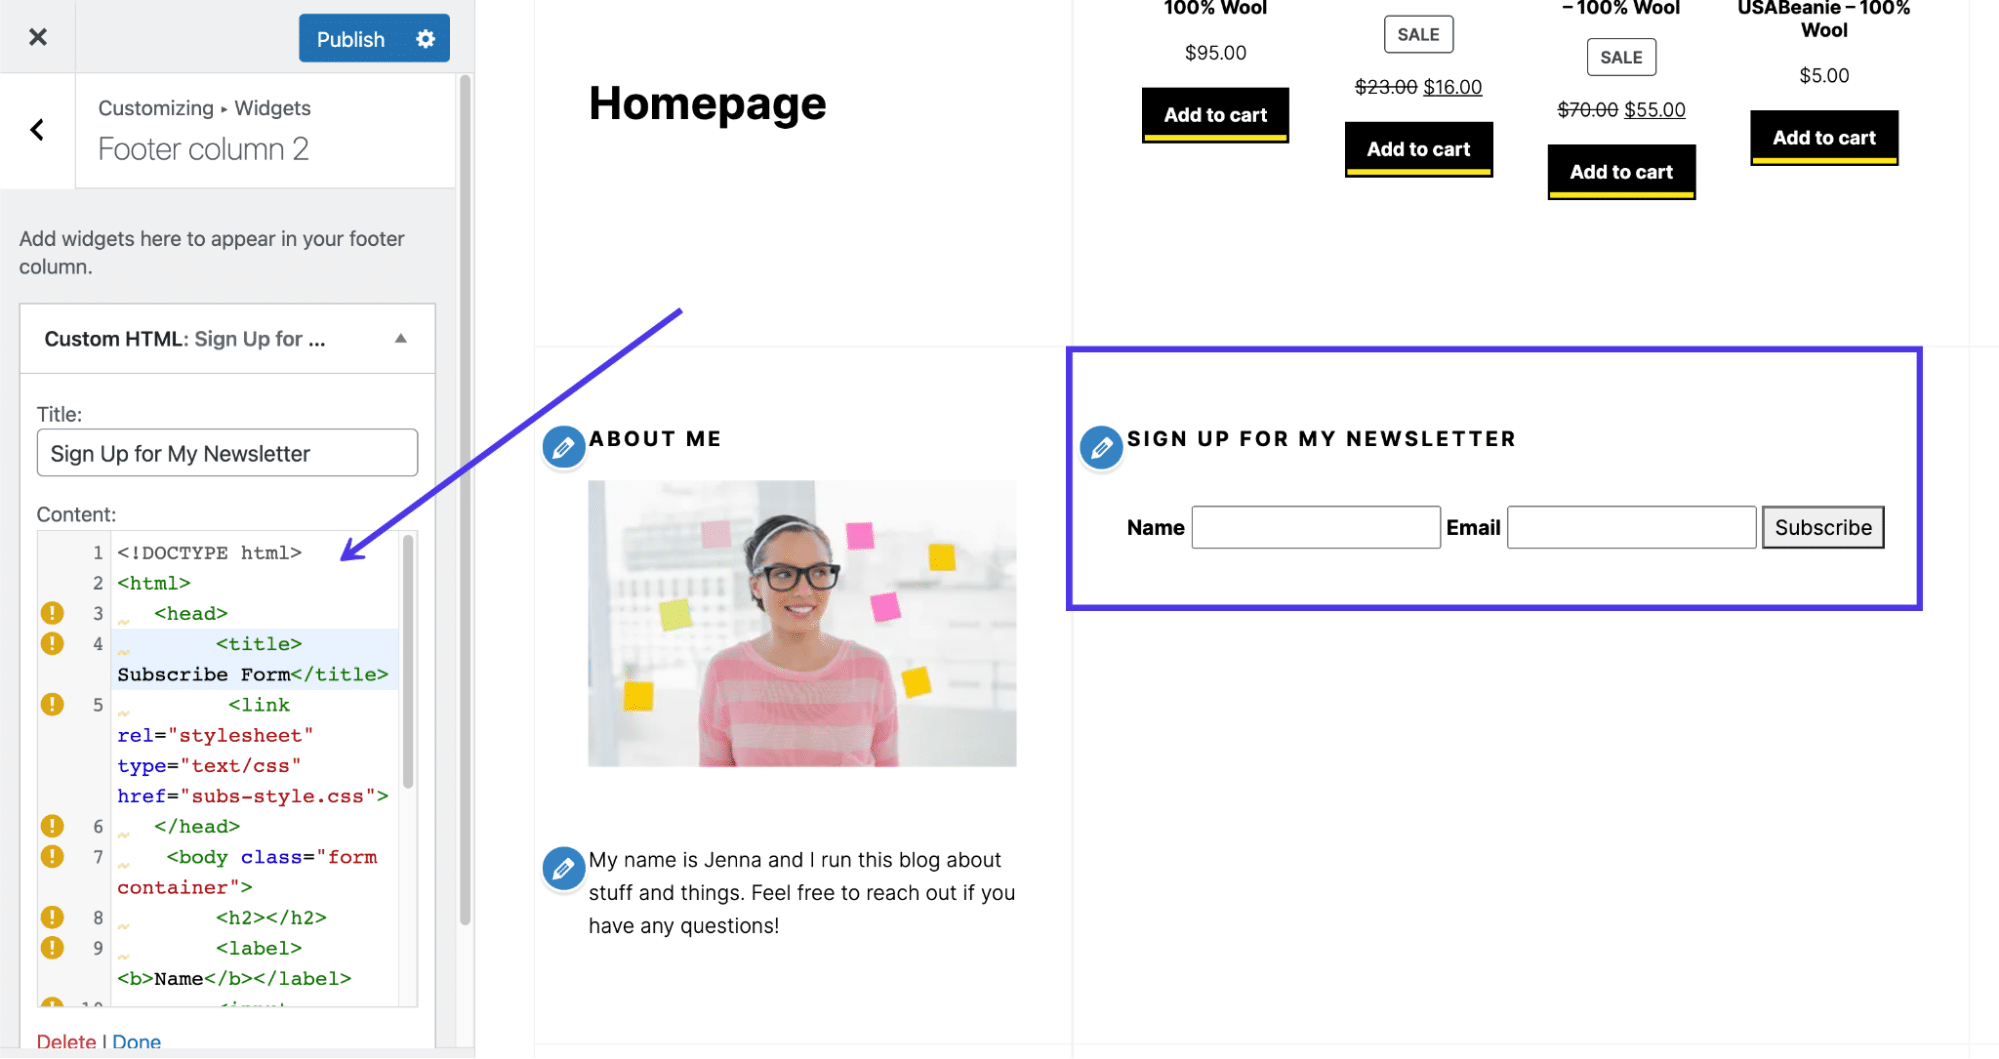
As ever, remember to click the Publish button at the cease.
Adding Menus to the WordPress Footer
You brand menus in WordPress by going to Appearance > Menus. One time you lot've established a menu, it's ready to add, at least the locations supported by your chosen theme.
It'southward also possible to create your carte du jour within the WordPress Customizer, so it but depends on where you feel nearly comfortable adding new pages and links to your menus.
Check Out Our Video Guide to Adding Menus to the WordPress Footer
Equally a reminder, not all WordPress themes permit for menus within the footer. In fact, some of them only have i or ii menu locations, and then you lot'll have to cheque to run into if your theme supports menus. If not, refer dorsum to the previous section for a workaround that uses a widget to incorporate a card in the footer.
If using a theme that allows for menus in the footer, get to the WordPress Customizer and click on the Menus tab.
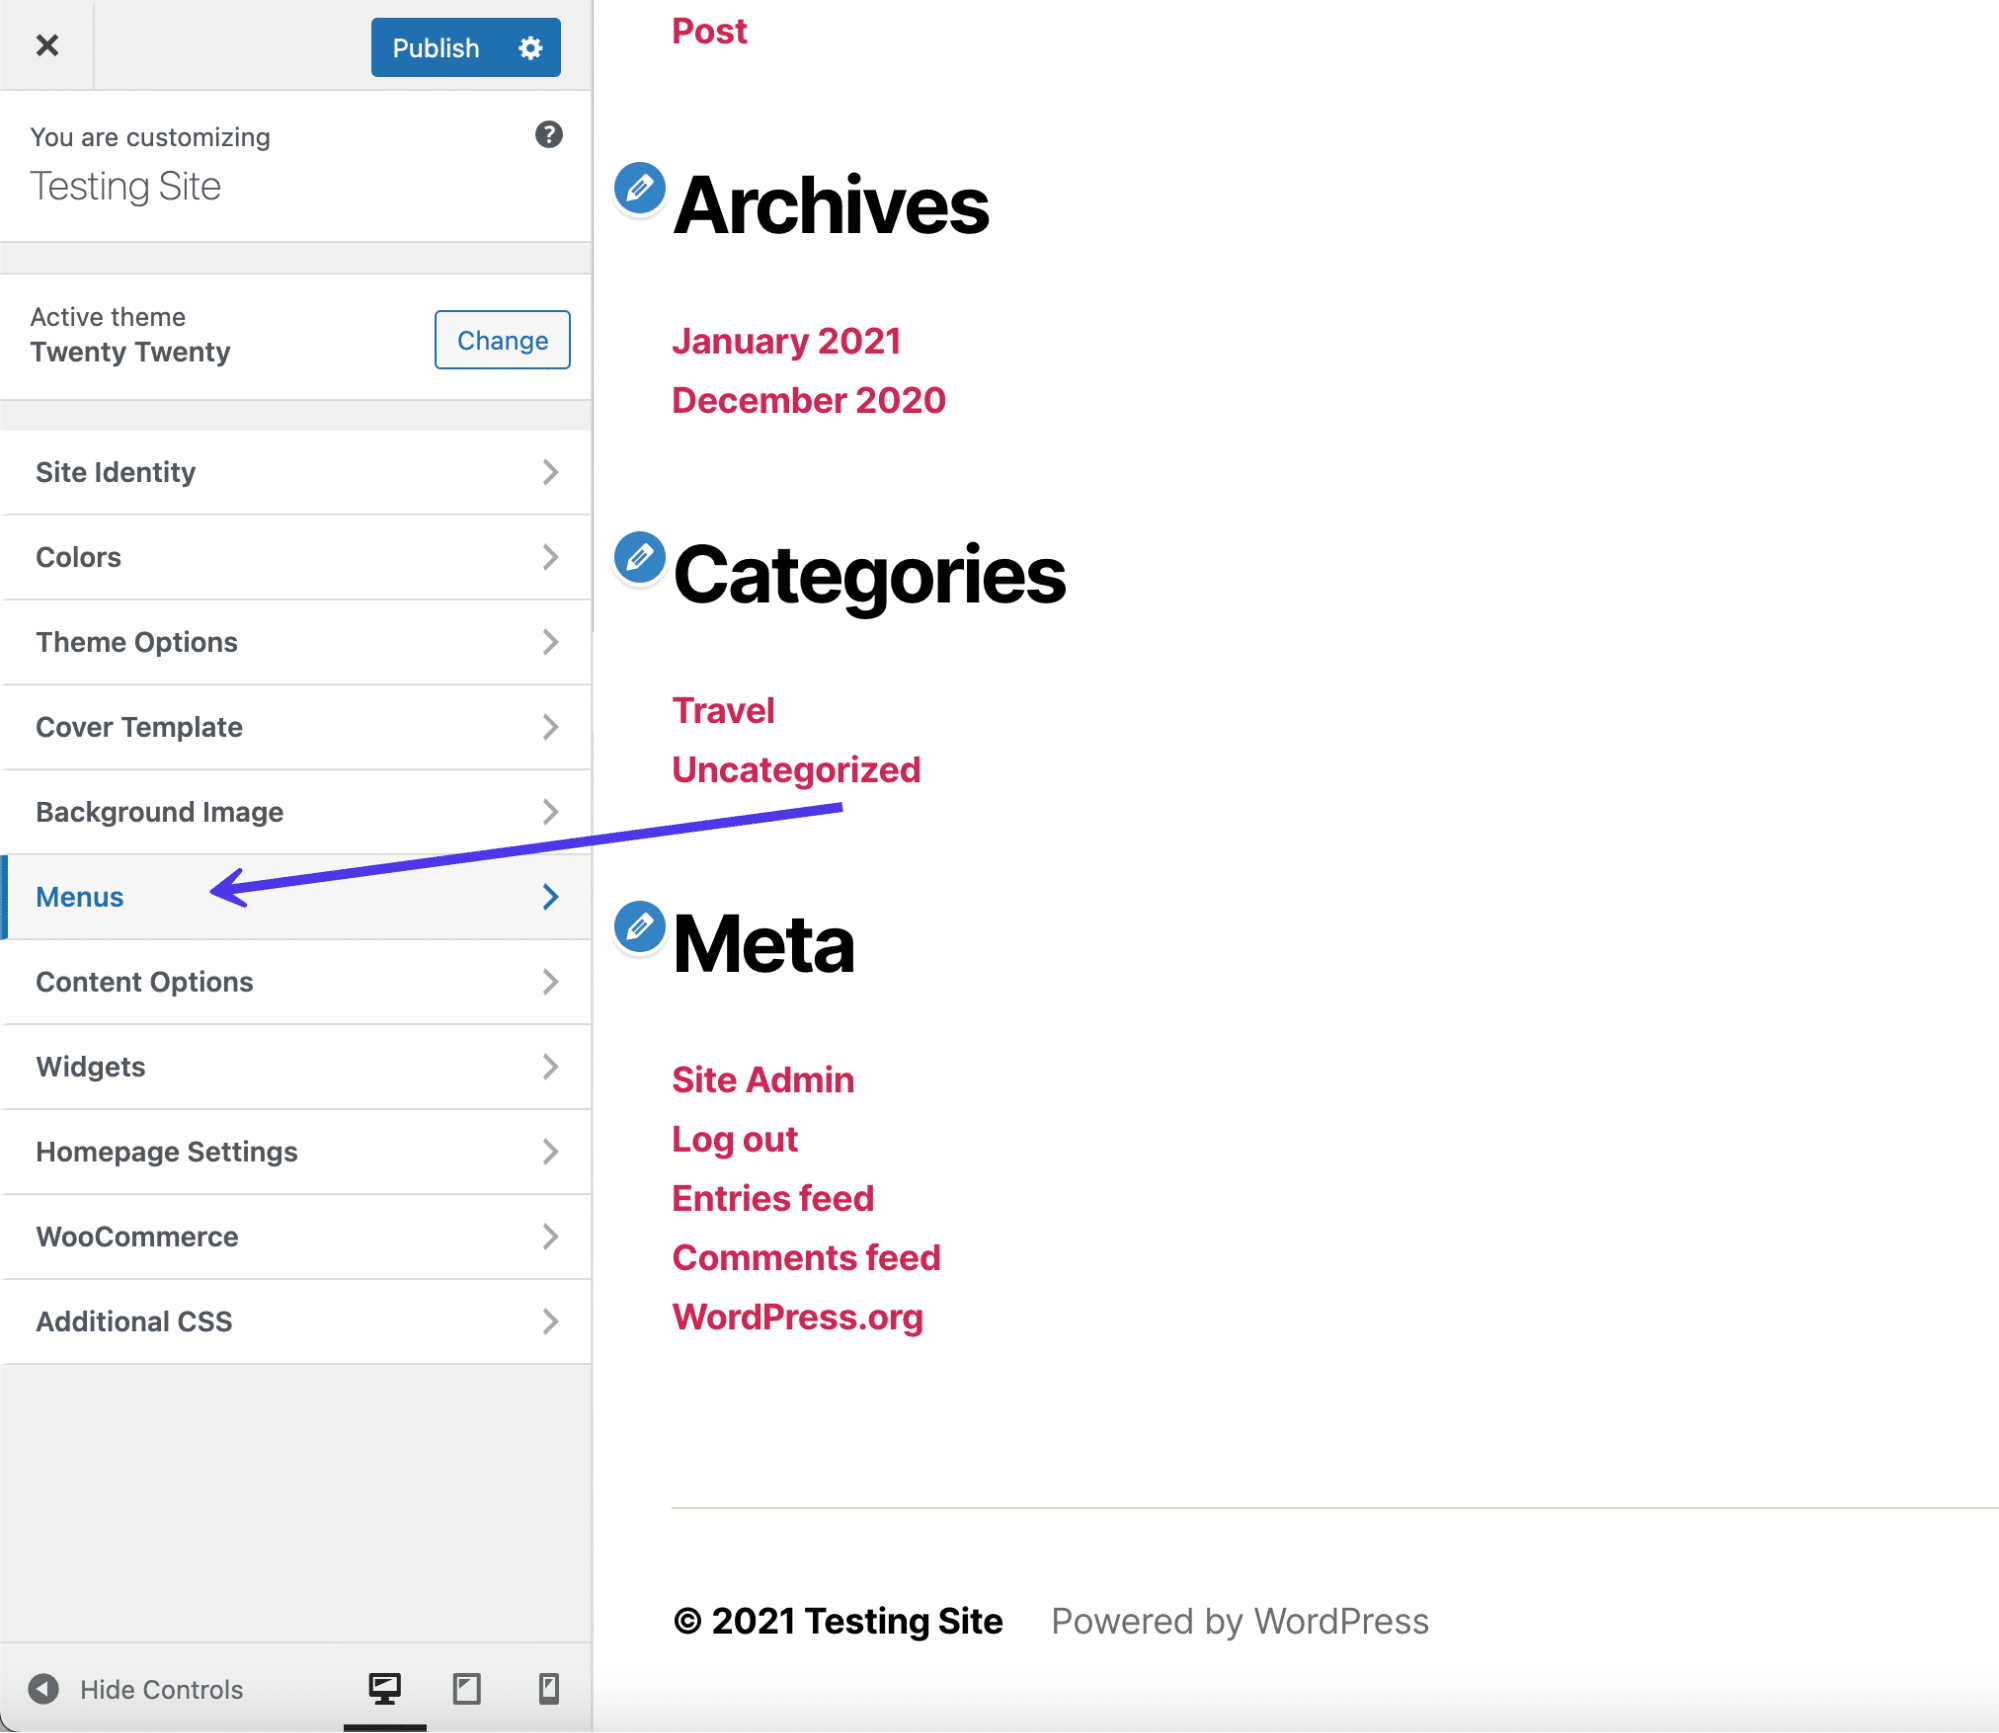
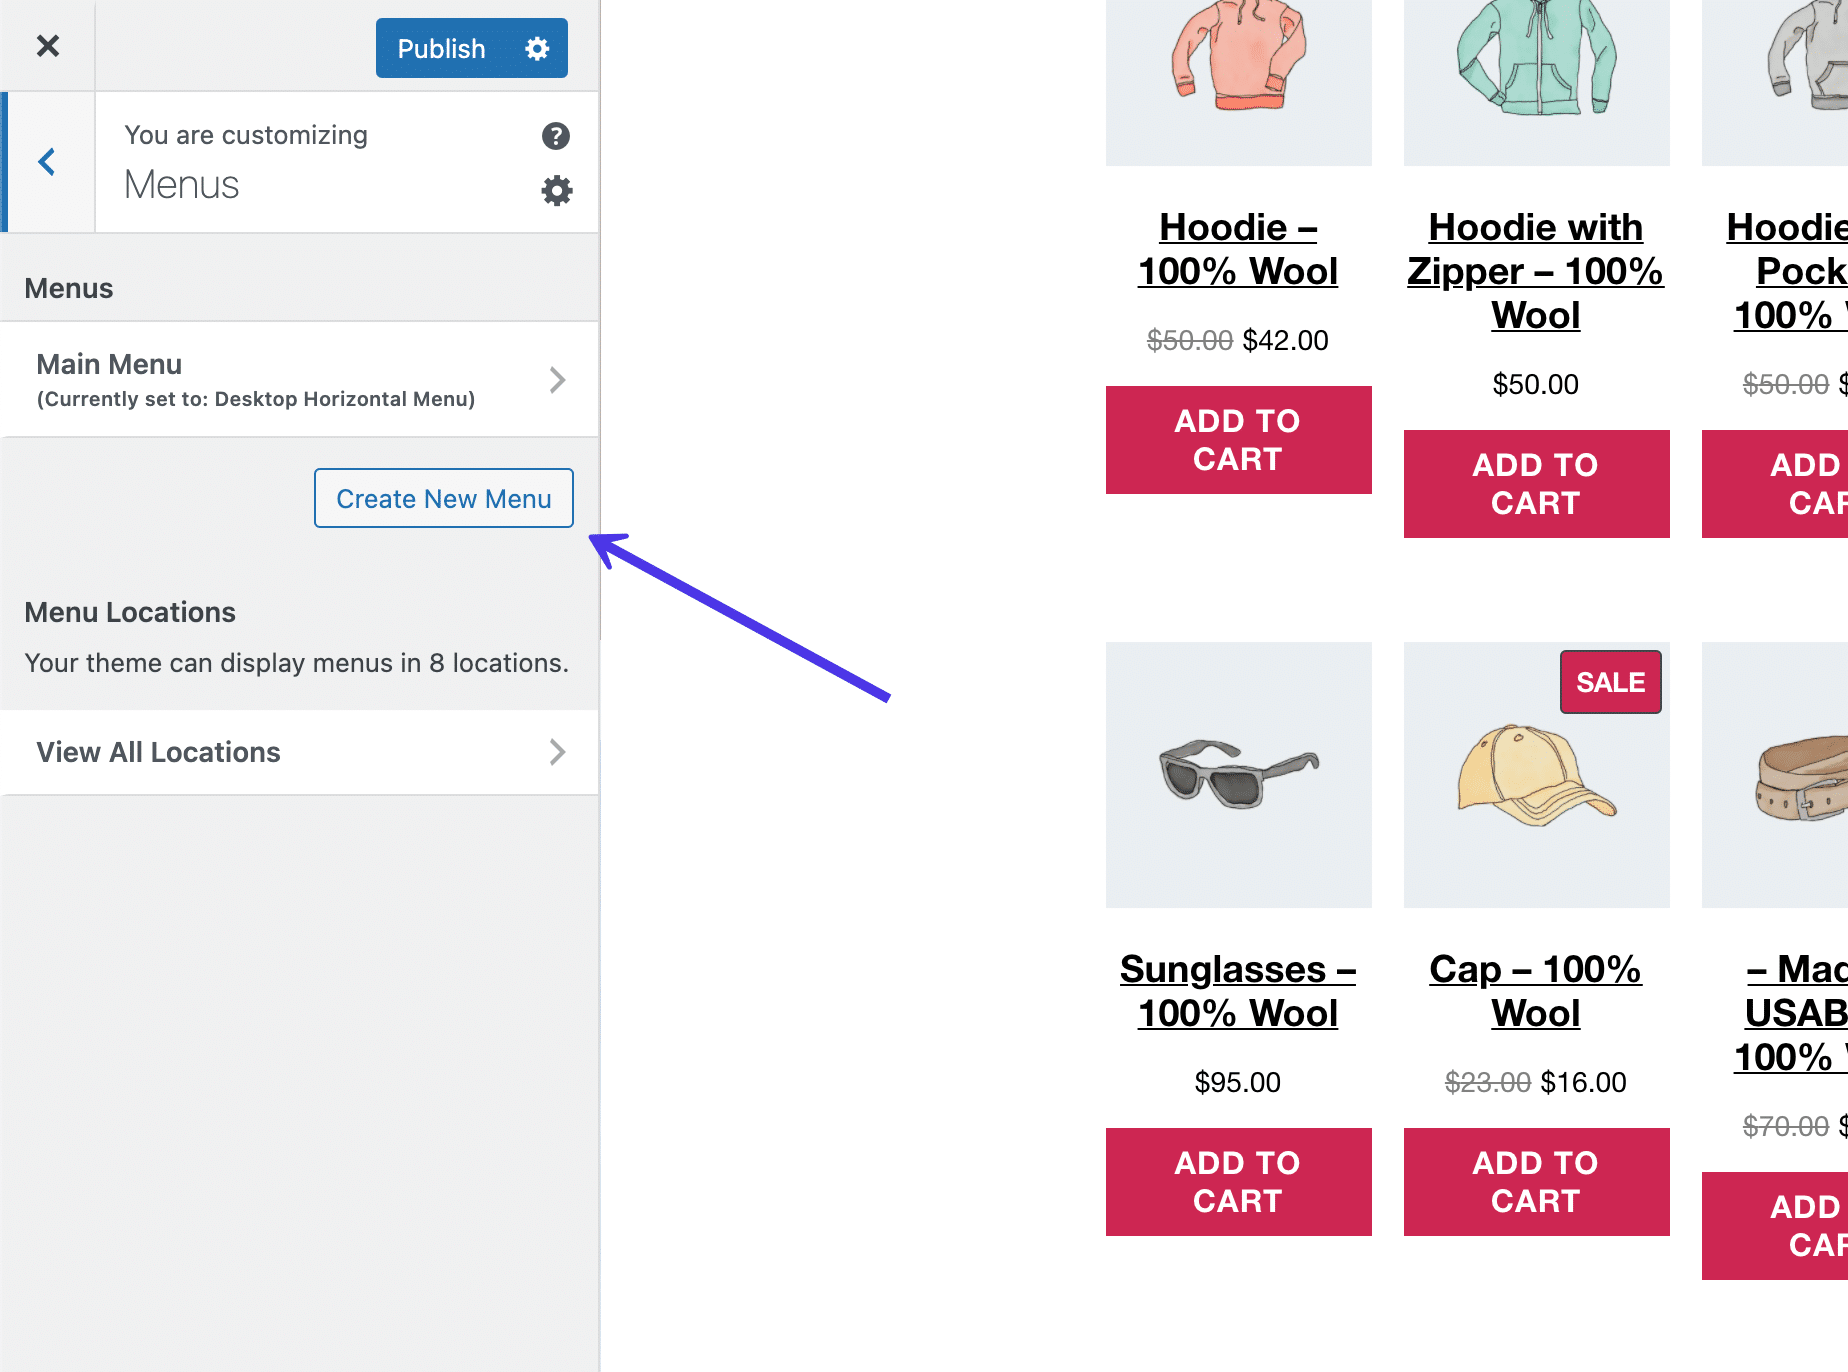
You'll most probable see an empty card folio with several buttons to decide on. One of the buttons lets you select which menus to reveal and where to bear witness them. The View All Locations tab shares where menus are supported on your theme.
Finally, the Create New Menu button works much like the standard menu cosmos panel in the dashboard, except it doesn't require you to exit out of the Customizer.
Click on the Create New Menu push button. If y'all already have a card ready to go, you can add information technology to the footer past going to View All Locations.
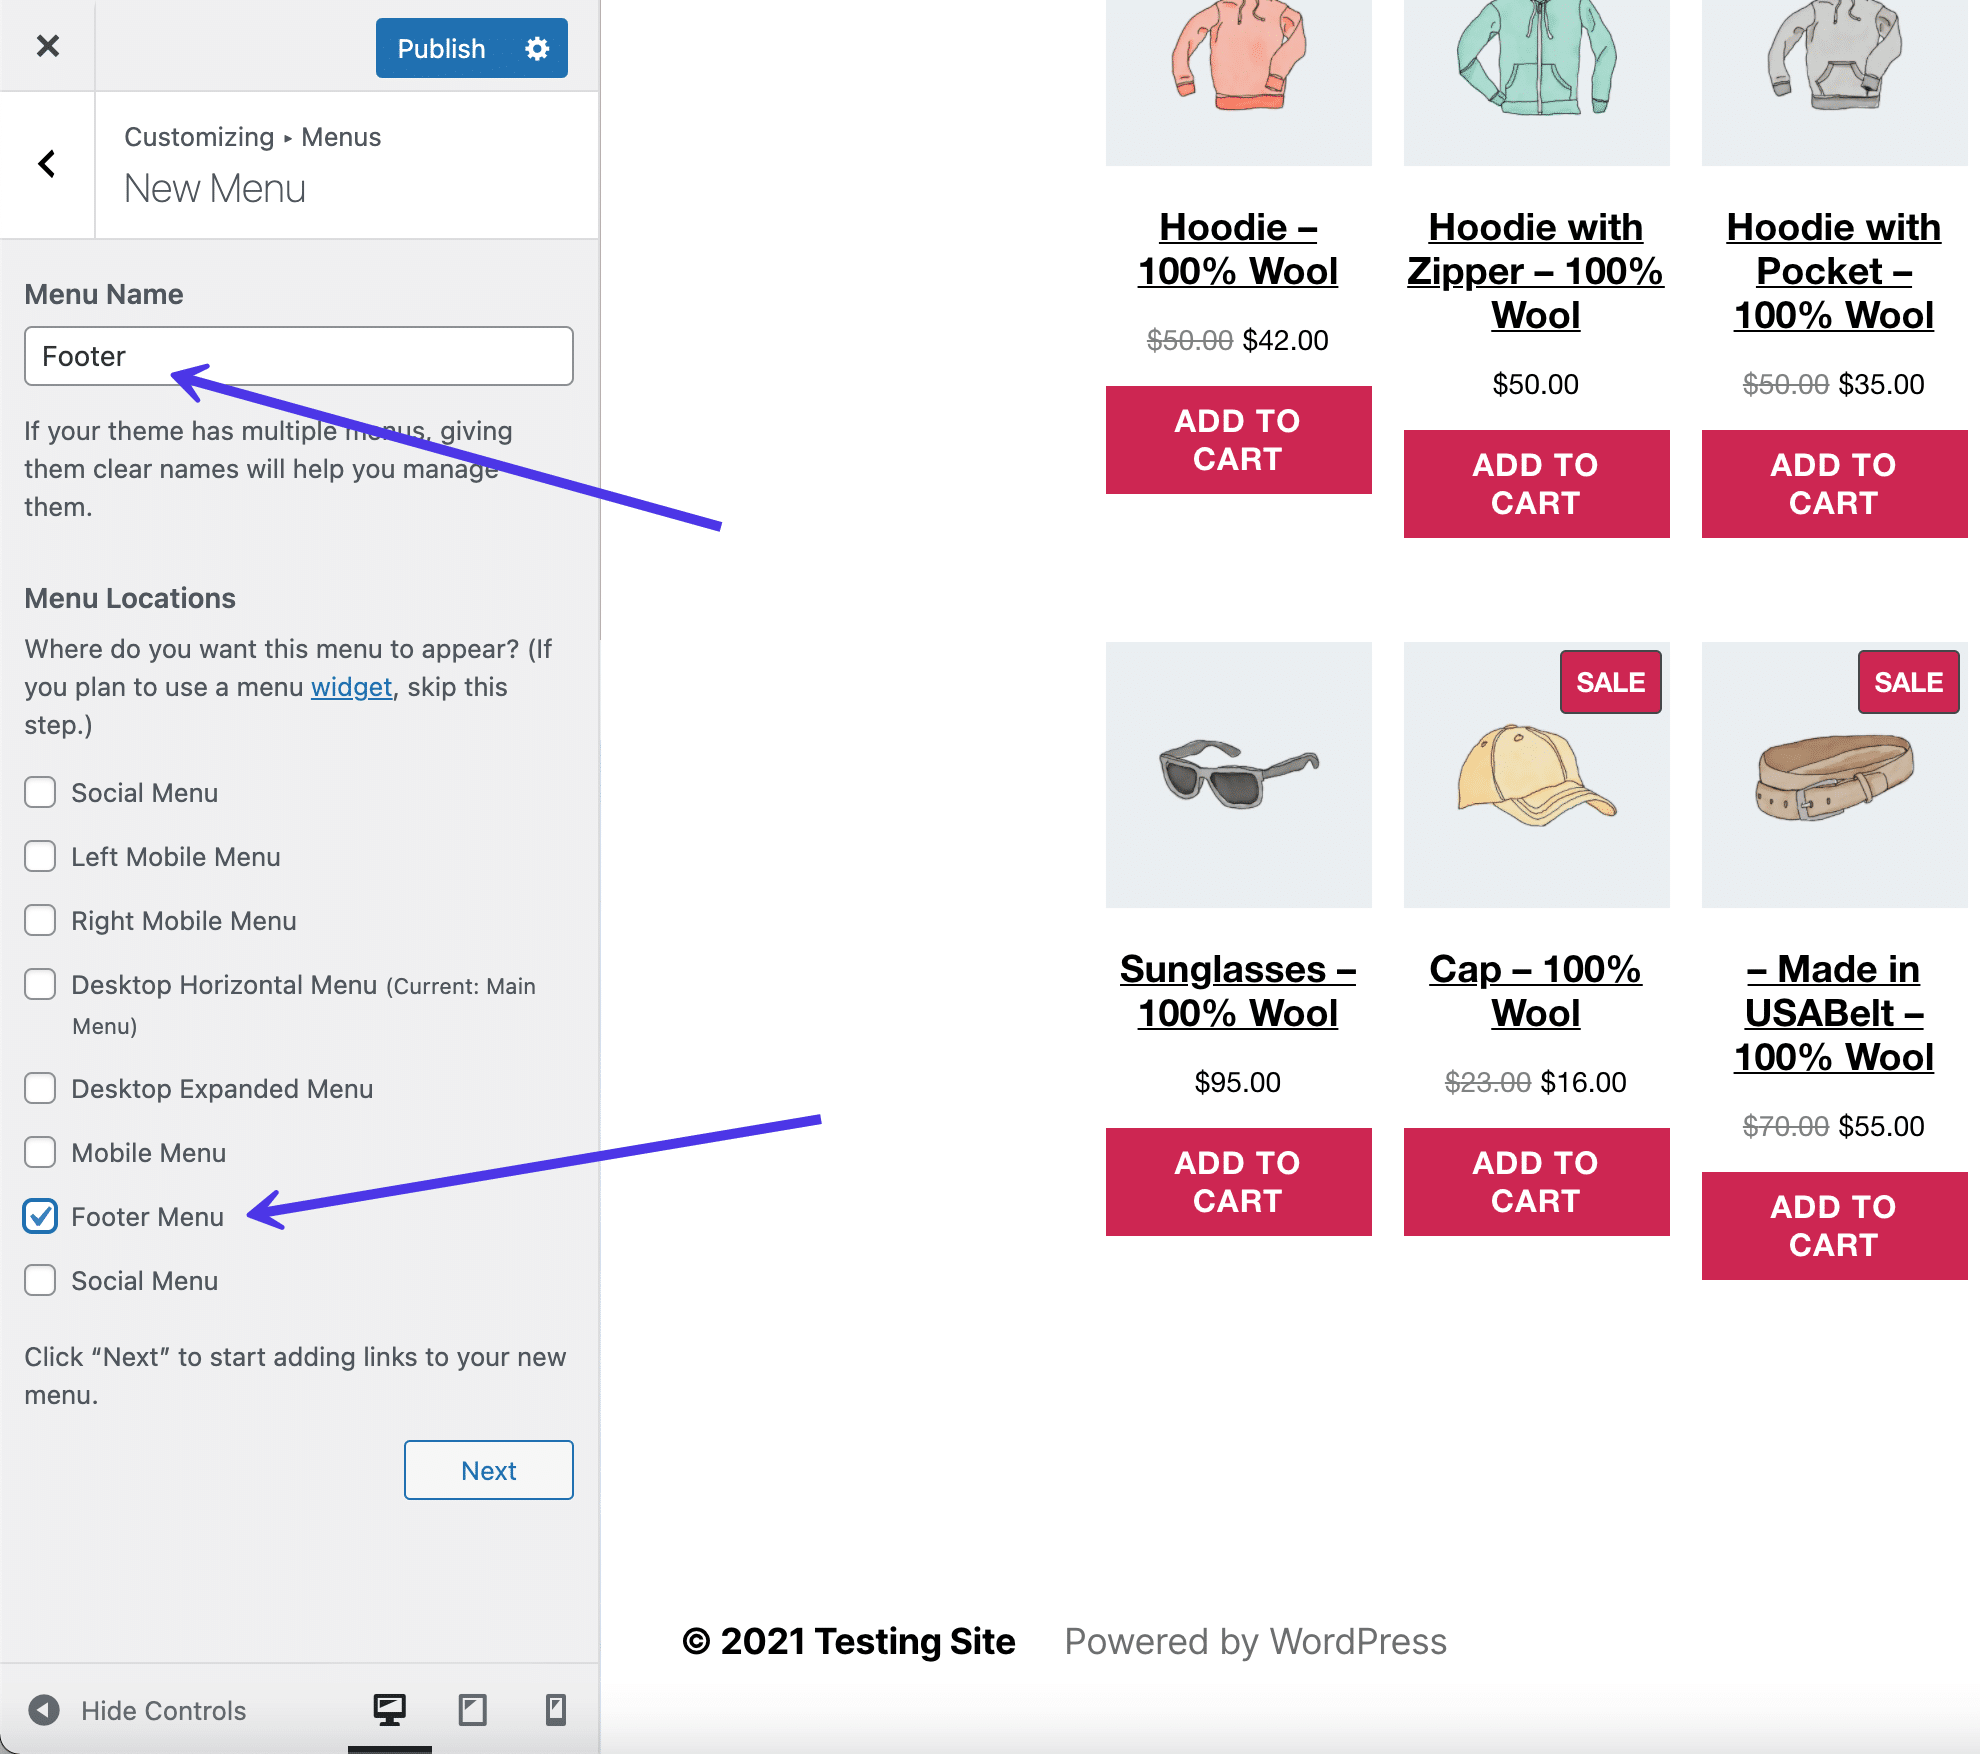
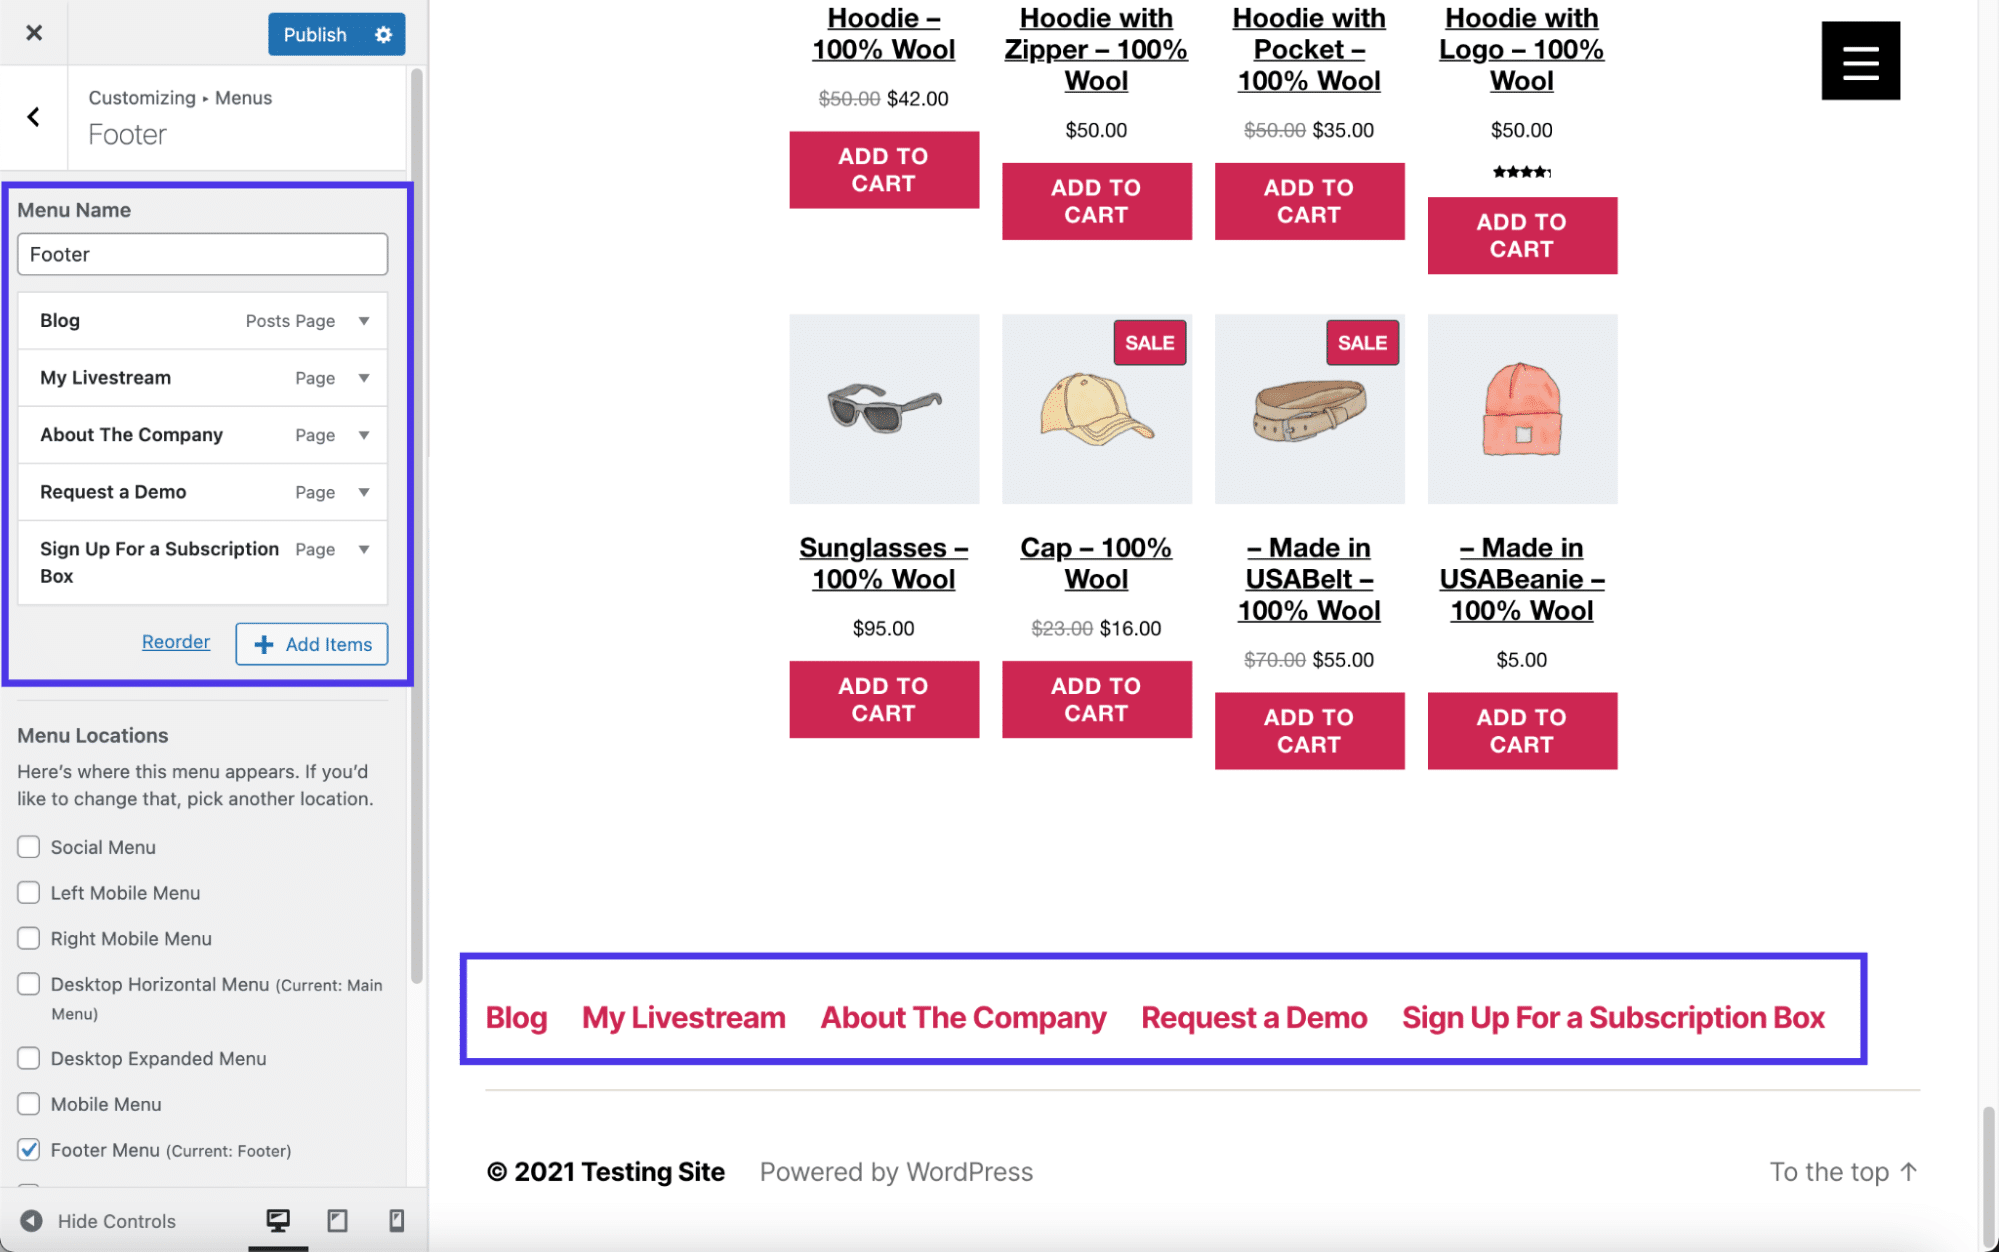
Name your menu (in this case nosotros'll become with the obvious Footer proper name) and check the box called Footer Menu. This tells WordPress y'all desire the Footer menu you lot create to bear witness upwards in the Footer location. They're carve up things; one is the actual menu and the other is the region of your website where the bill of fare goes. You lot're more than than welcome to switch the name of your footer menu if you find it a scrap confusing.
Click on the Next button at the lesser of the panel to proceed.
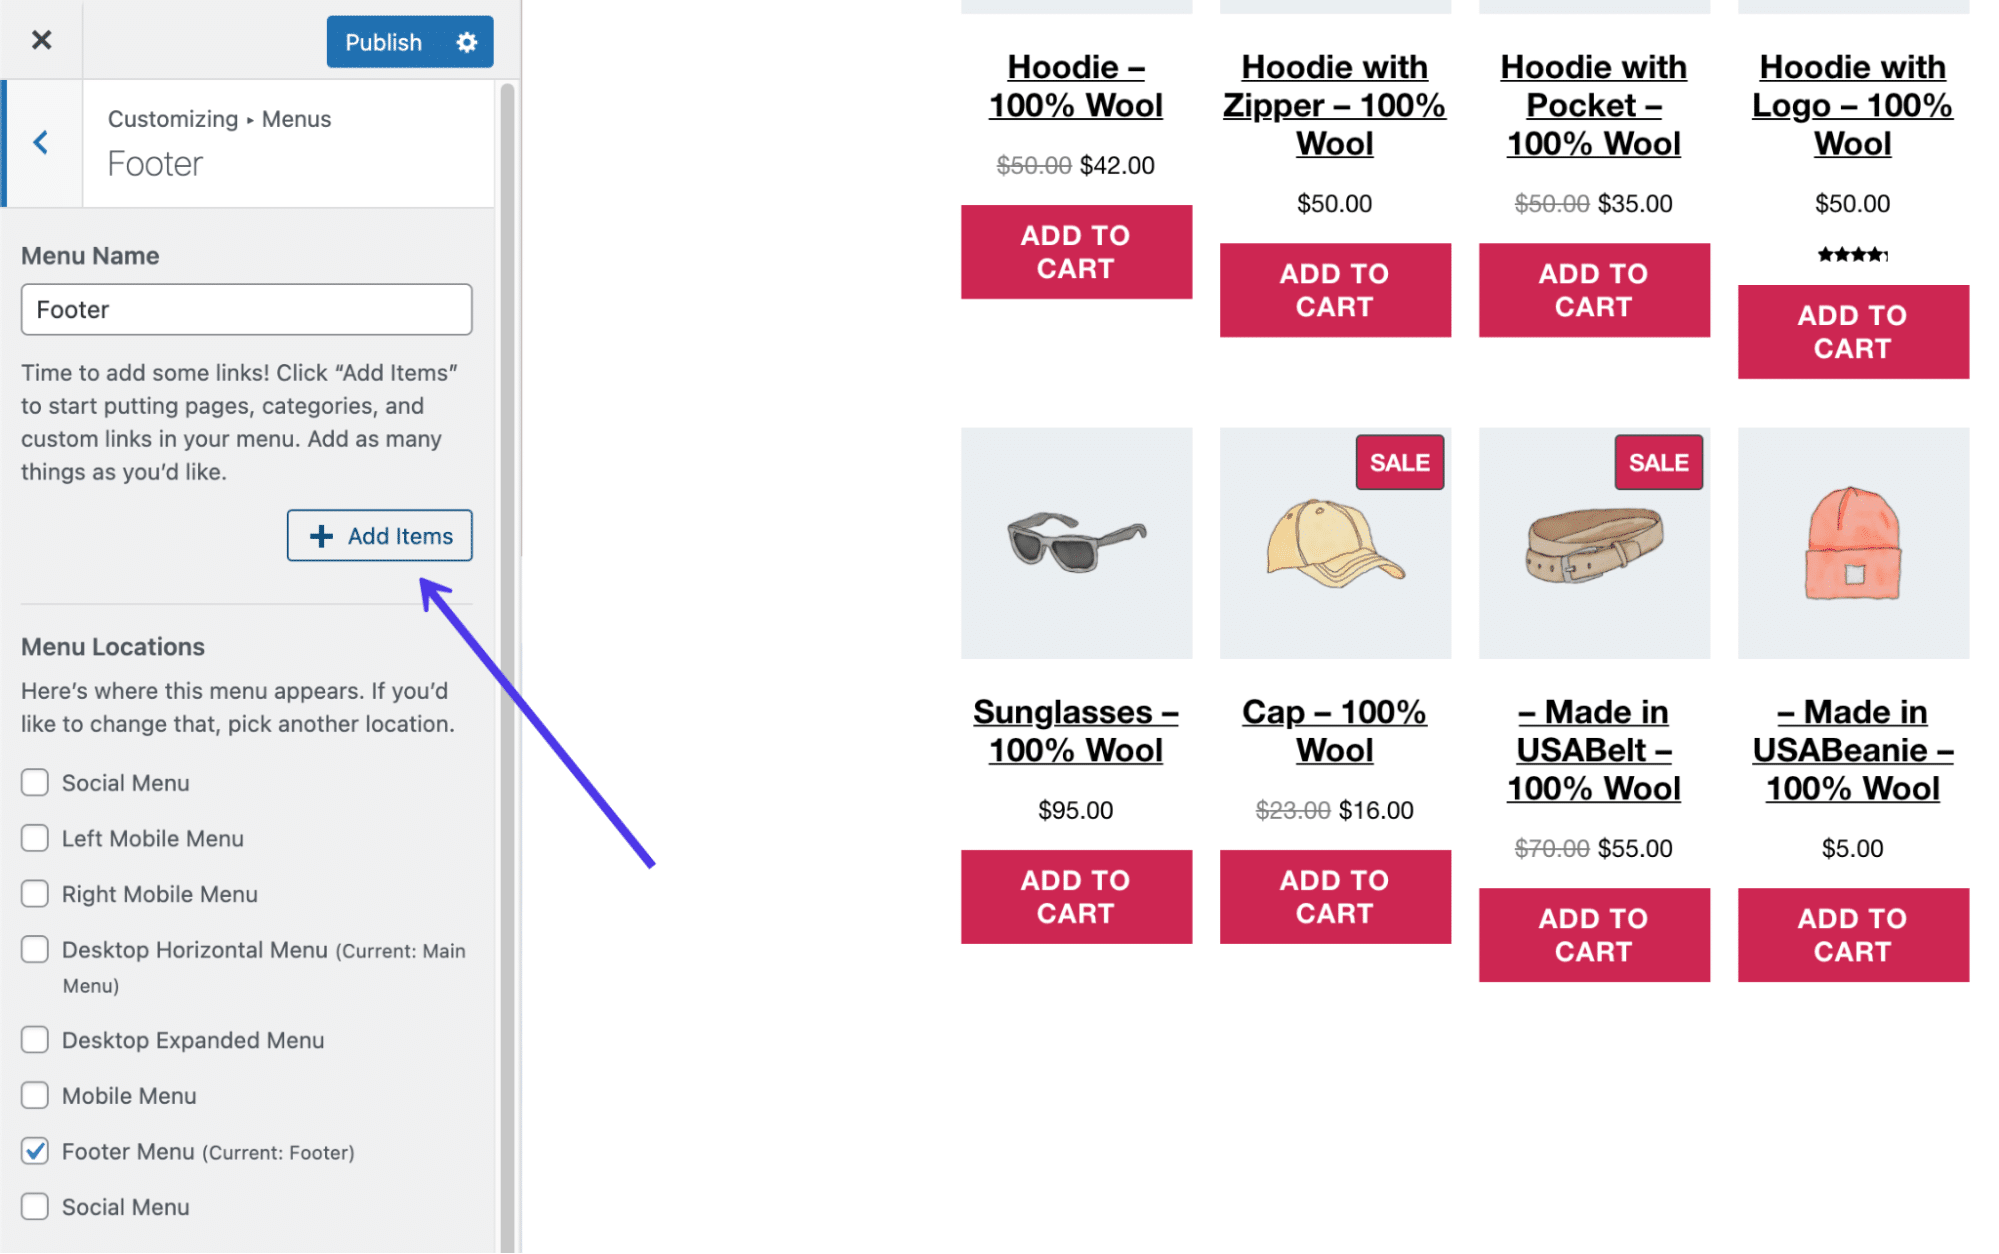
Now yous have a card named Footer, merely information technology lacks whatever buttons or links to make it a truly functional carte.
Click the Add Items push to start placing links and buttons to pages in your menu.
A new slideout panel appears with all the options to add together to your menu. For instance, you can include custom links to internal or external pages, posts from your blog, pages from your own site (already created pages), products, tags, and categories, along with whatever other types of content pages you may have.
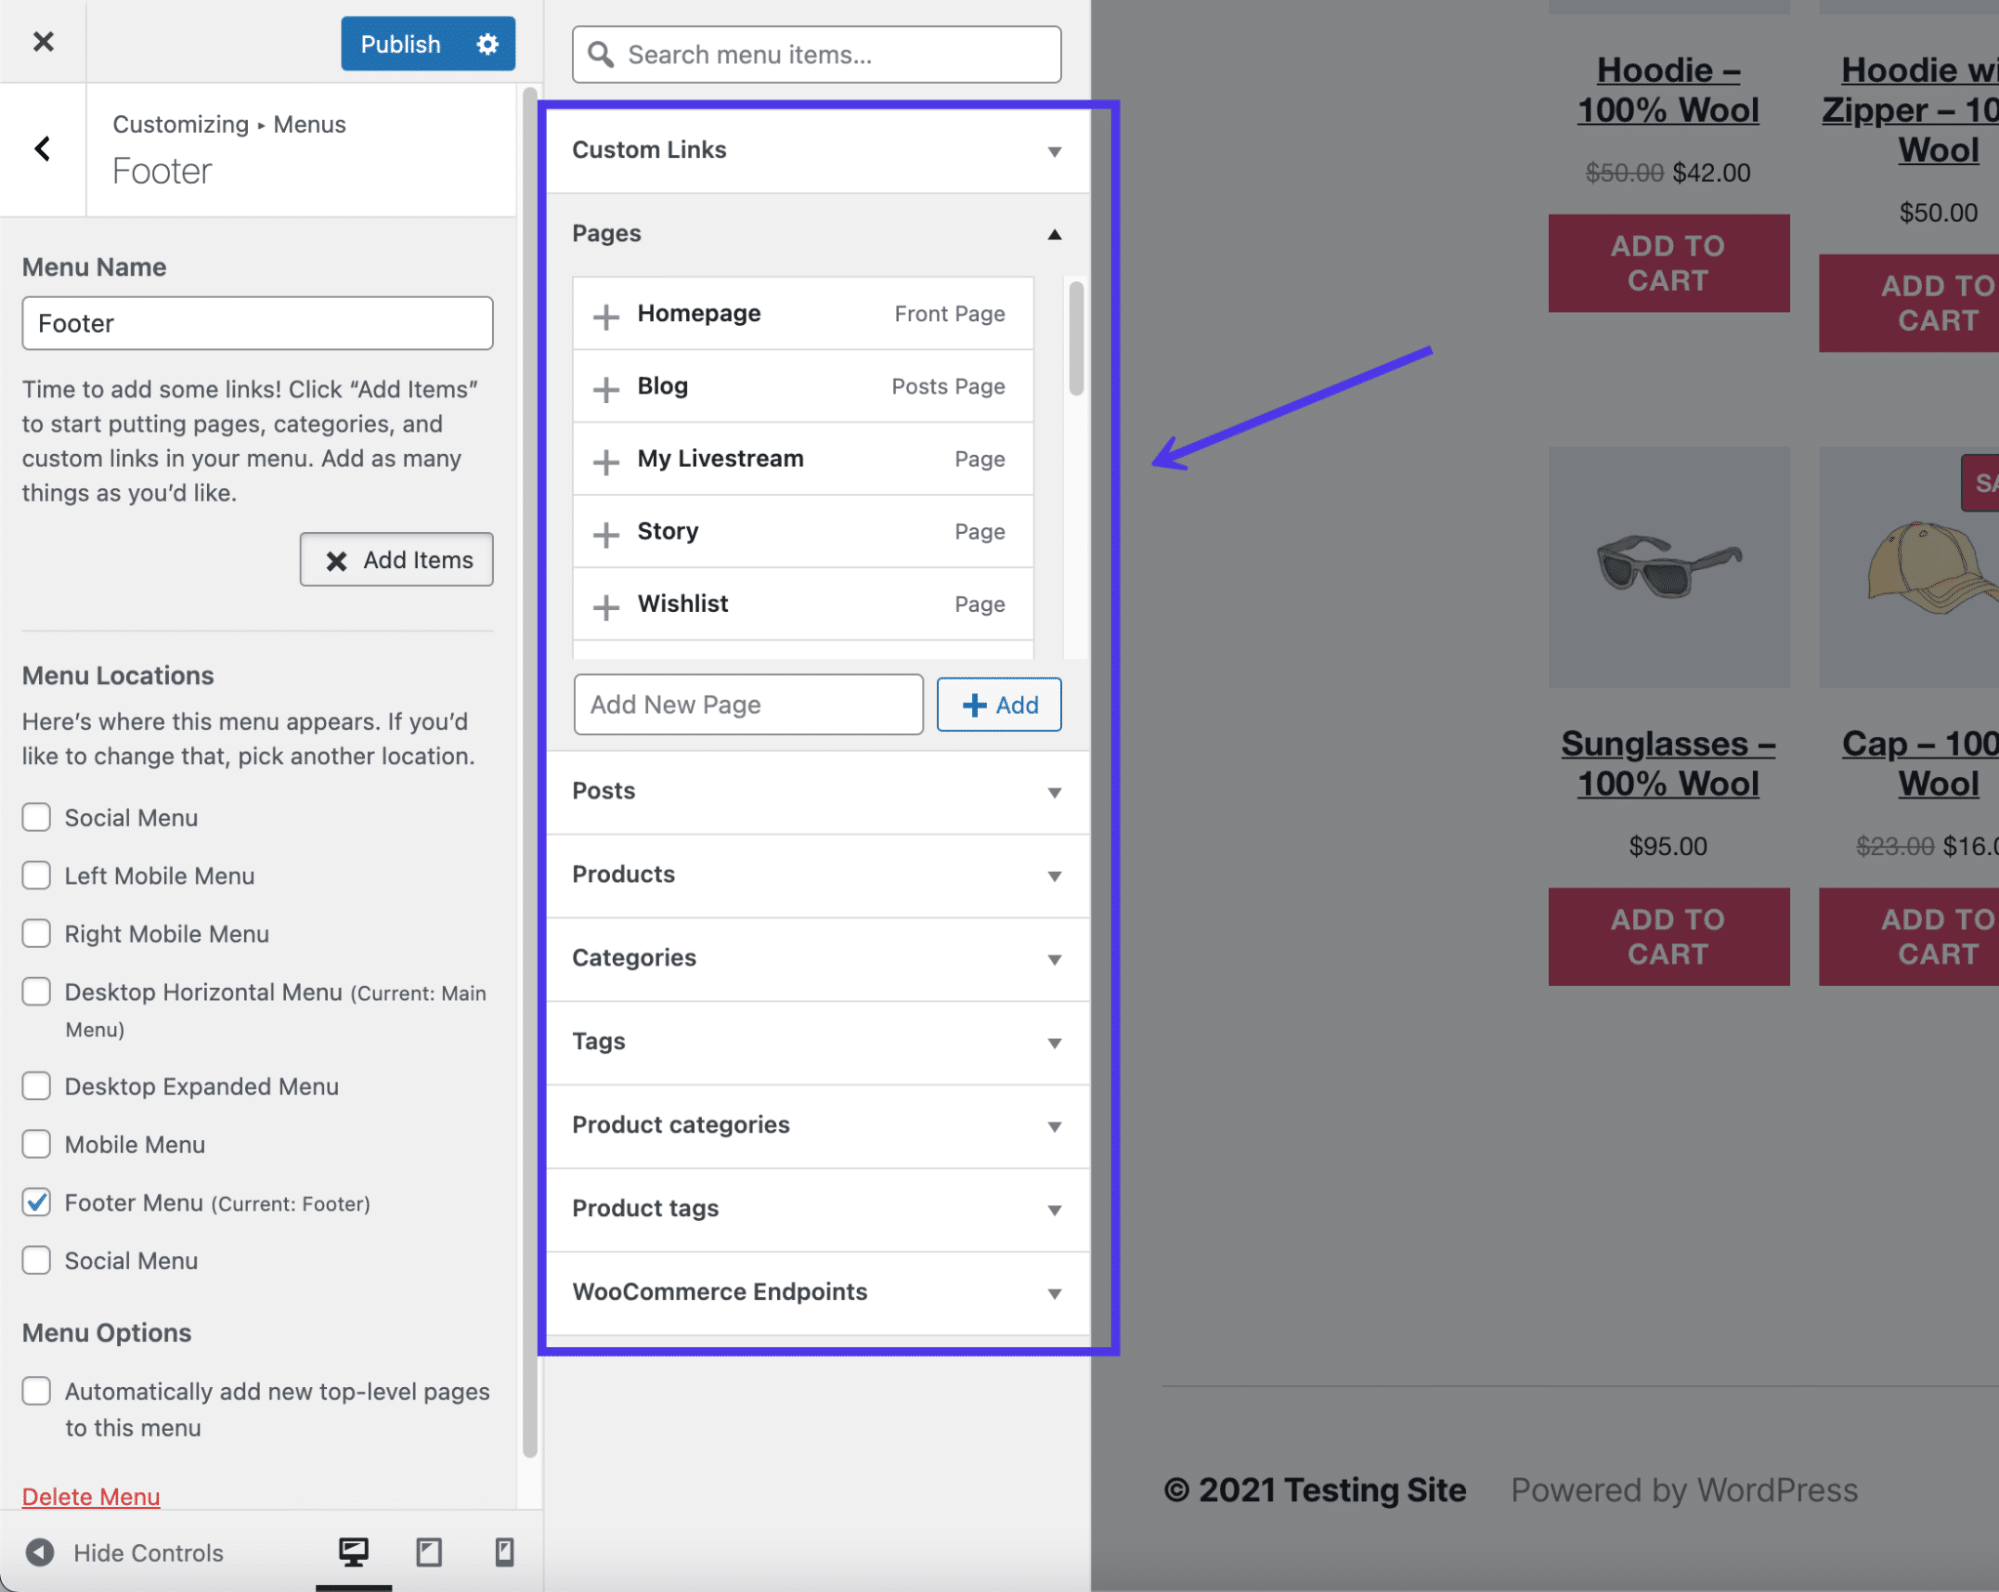
Each menu item you choose gets placed and shown in the menu panel, where you're able to reorganize them and click on each one to edit their individual settings. For this case, we've added v links to pages throughout our website, including the blog, a livestream page, and an About The Company page.
Refer dorsum to our listing at the outset of this commodity for ideas on what to include in your footer.
Edit Footer in WordPress With Plugins
WordPress already has built-in tools to alter your footer, but the extent to which you tin edit your detail site's footer relies on your theme of pick and whether or not you want to mess with whatsoever code.
Equally you'll learn farther downwardly in this article, removing the default "Powered By" text requires you to tap into the footer.php file and remove some lawmaking. Therefore, it'due south clear several aspects of footer editing may be out of your reach if you don't have the experience or willingness to mess with code or find a new theme.
That's where WordPress plugins come into play. Quite a few plugins offer footer editing and expansion features to remove the demand to edit code manually and sometimes to make quick changes to your footer, like with colors and columns.
WordPress footer plugins we recommend include the following:
- Footer Mega Grid Columns — This plugin fixes any issues you take with a theme where the footer lacks a grid format with three columns. Some themes but offer one or two columns, while other times a footer gets entirely stripped from the theme. Footer Mega Filigree Columns adds a footer widget to not only display three columns just boosted ones if needed.
- Remove Footer Credit — Use this plugin to completely remove the footer credit placed there past WordPress or your theme developer. You as well have the option to type in your own HTML code to create a footer credit or a bit of content that'due south more than suitable for your site.
- Header Footer Code Manager — This plugin has a slight learning curve, only it's an ideal solution for intermediate WordPress users who would rather have access to footer and header coding areas in the dashboard, equally opposed to opening up the site files. You lot can add an unlimited number of styles and scripts to the footer, which ofttimes comes in handy for showing information later on every blog post or folio.
- Footer Doodle — Use this plugin to insert a widget for copyright information or for your trademarks. This is a rather useful solution for placing details nigh your company in the footer area, including things like links, business concern hours, phone numbers, and more.
- Footer Text — Every bit i of the simplest ways to alter your WordPress footer, the Footer Text plugin activates a frontend and backend editing panel to change what's in your footer. It comes with a WYSIWYG (What You Run into Is What You lot Become) editor, then information technology's possible to format your text and potentially add items similar pictures.
In the following sections, we'll explore how to use some of these plugins for tasks similar adding social media buttons or inserting custom code into the WordPress footer.
Manually Edit the WordPress Footer With Code
A more technical style of editing your WordPress footer involves tapping into the footer.php file and editing its contents.
You lot must take experience with coding — or be eager to acquire — in order to make this method useful for you, just there are some minor tweaks that all beginners can handle (mainly just removing preset text in the footer). Take a wait at our guide to adding header and footer code for the most detailed information.
To admission the footer.php file, link to your WordPress site files by using an FTP client. We also recommend checking out this article on how to use SFTP to link to WordPress equally SFTP is more secure than FTP.
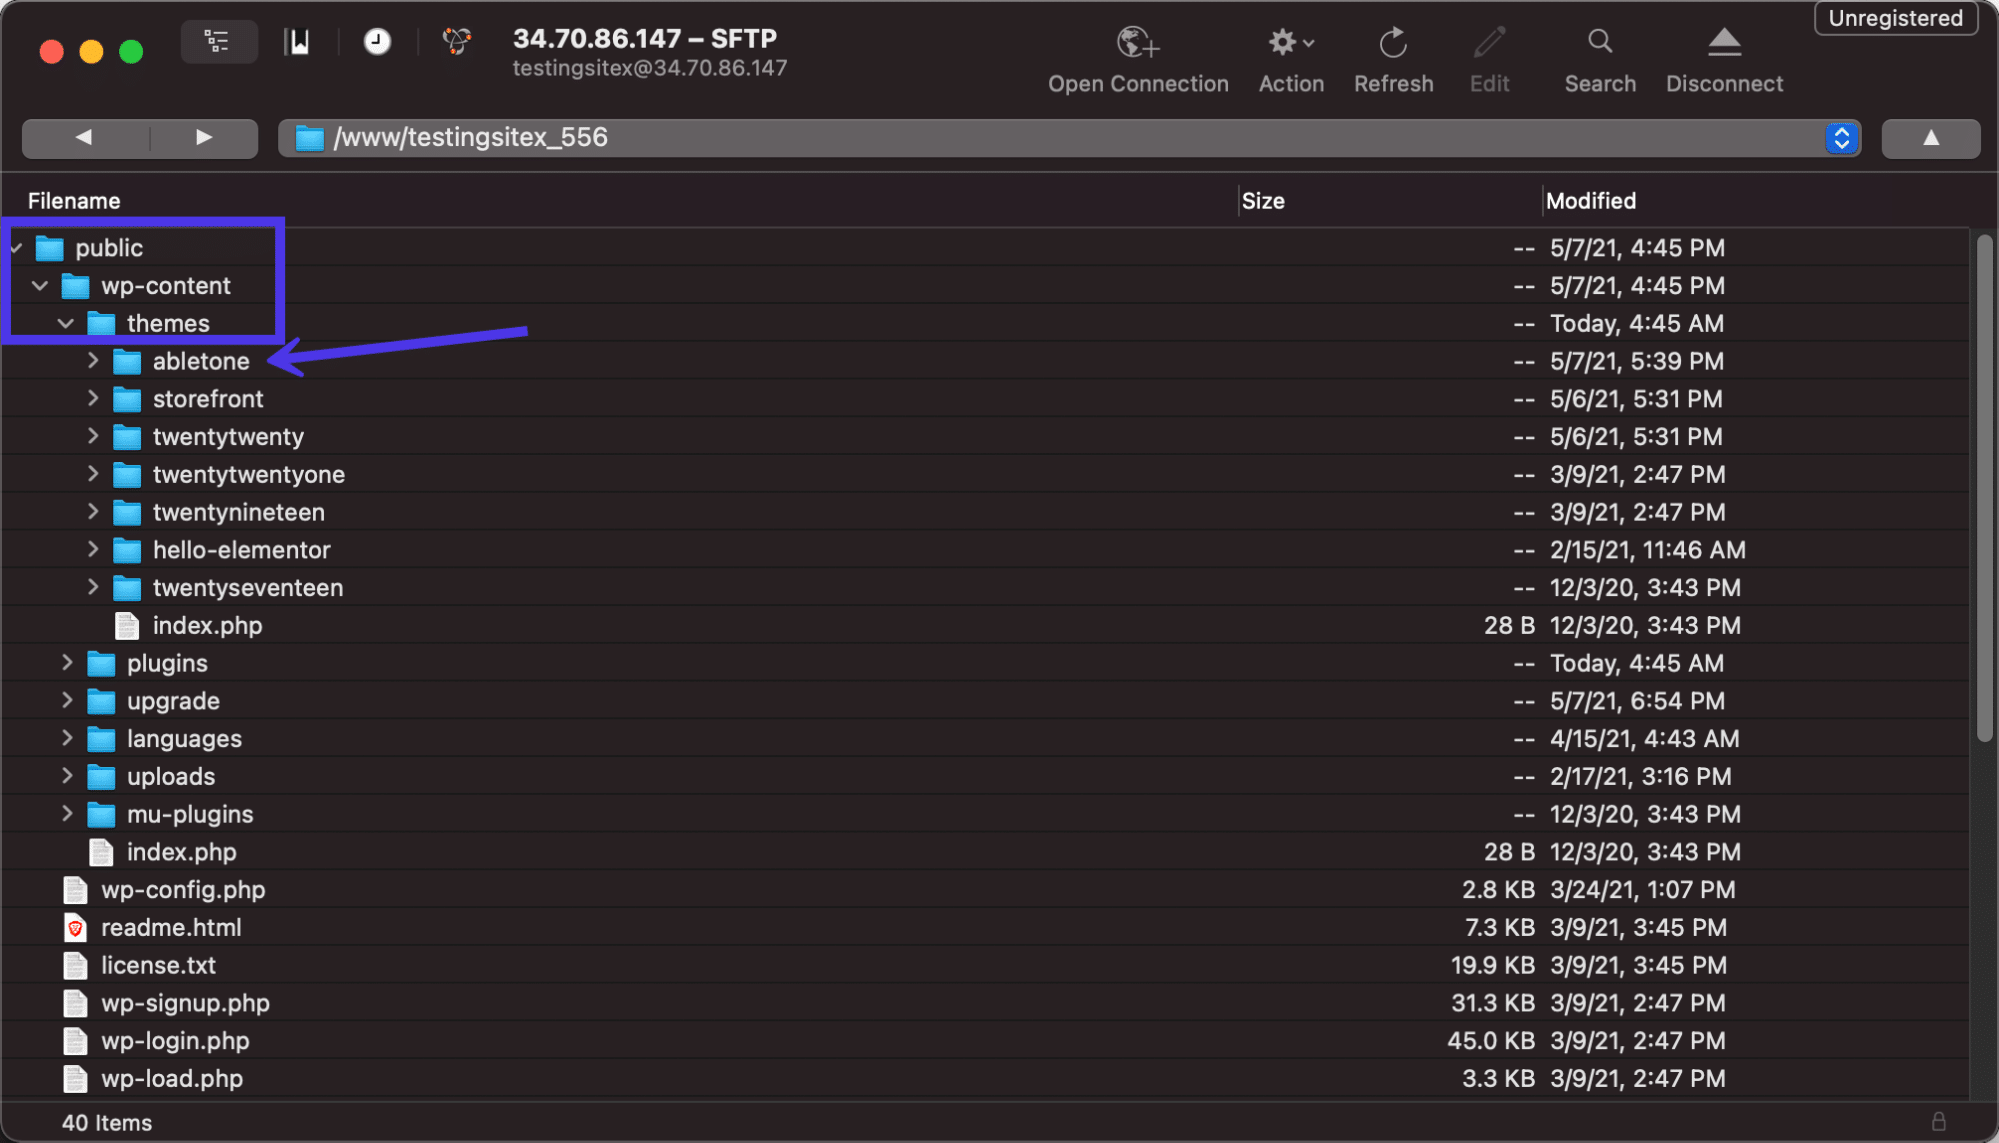
Once connected to your WordPress site files through your FTP client, locate the /public folder. Click on /wp-content then /themes to reveal all themes currently installed on your WordPress dashboard. Note which theme is active on the site and open the binder for that one.
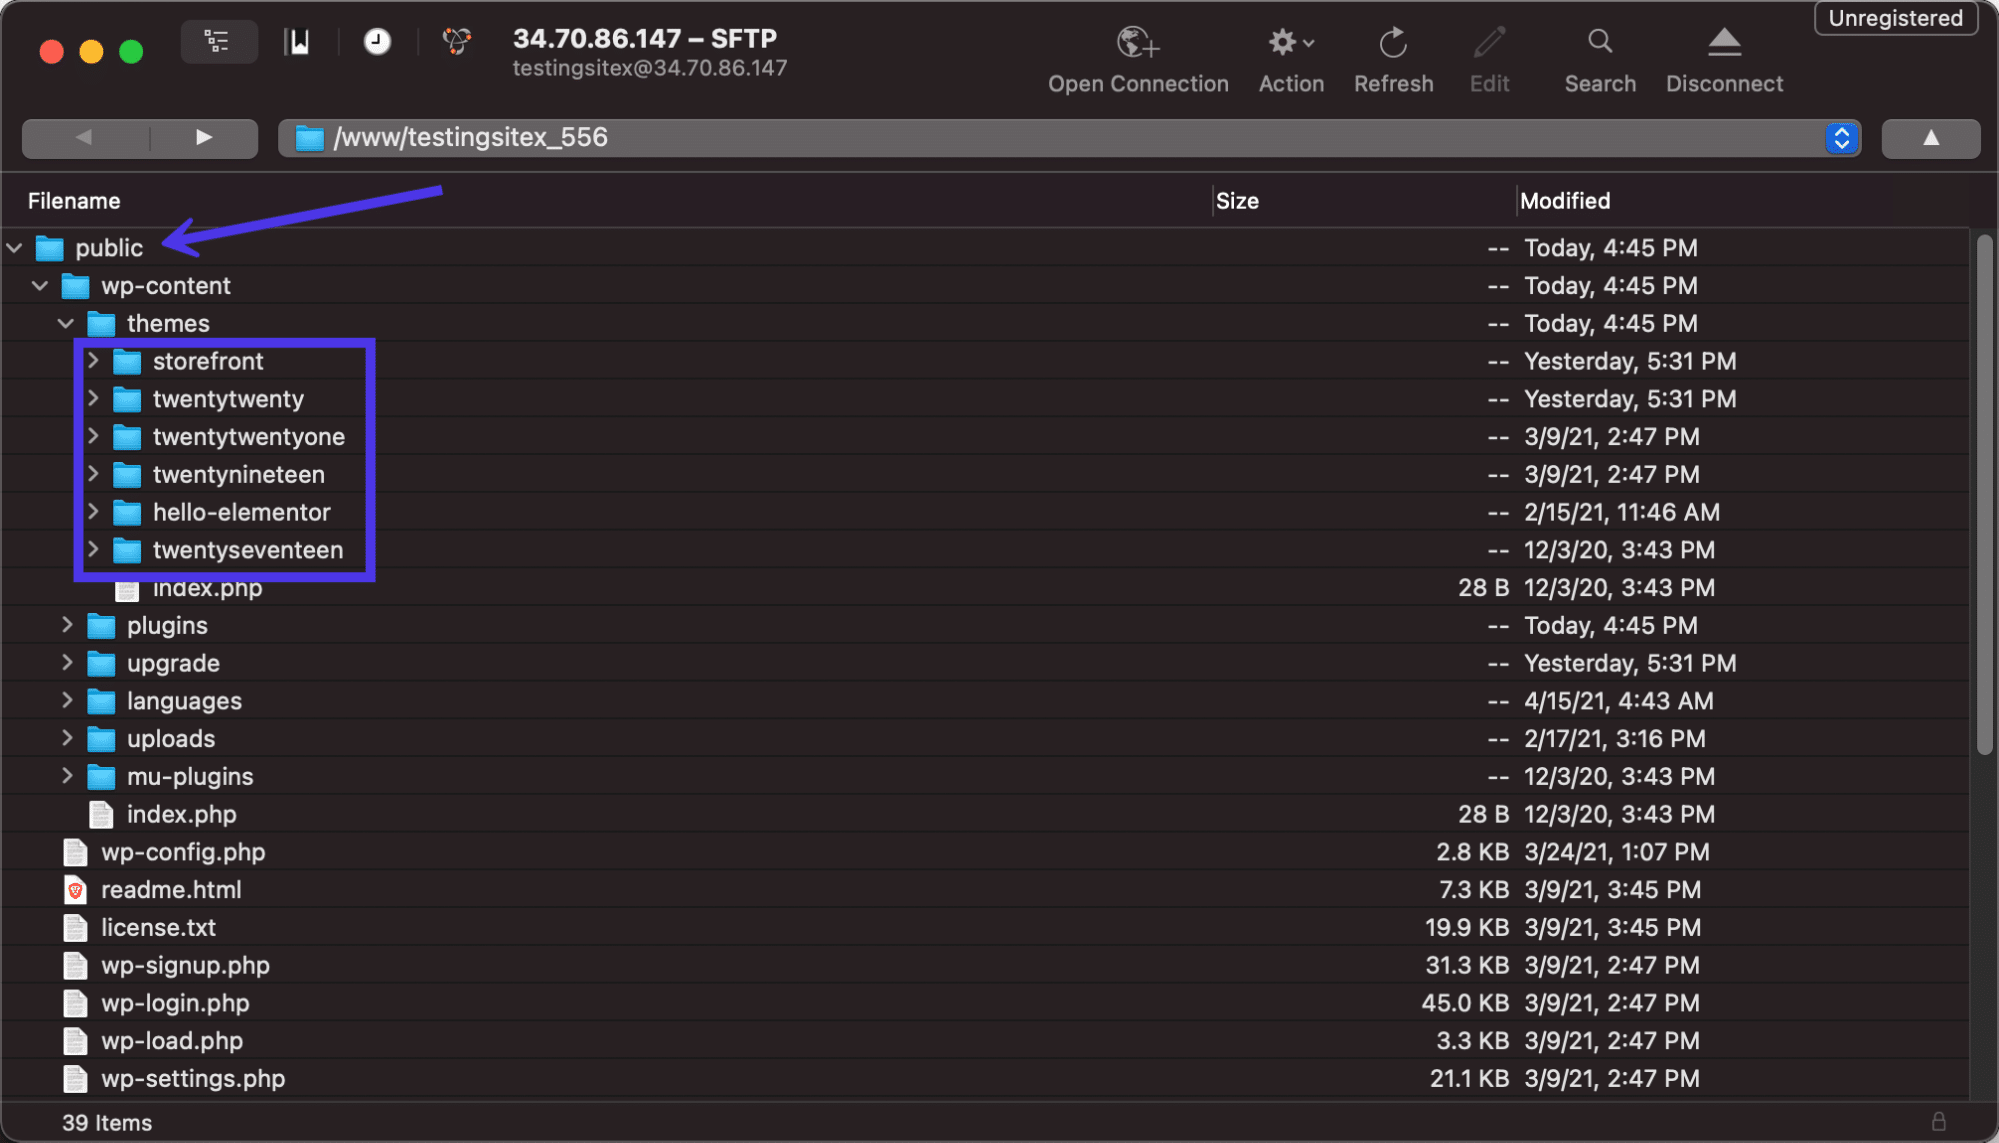
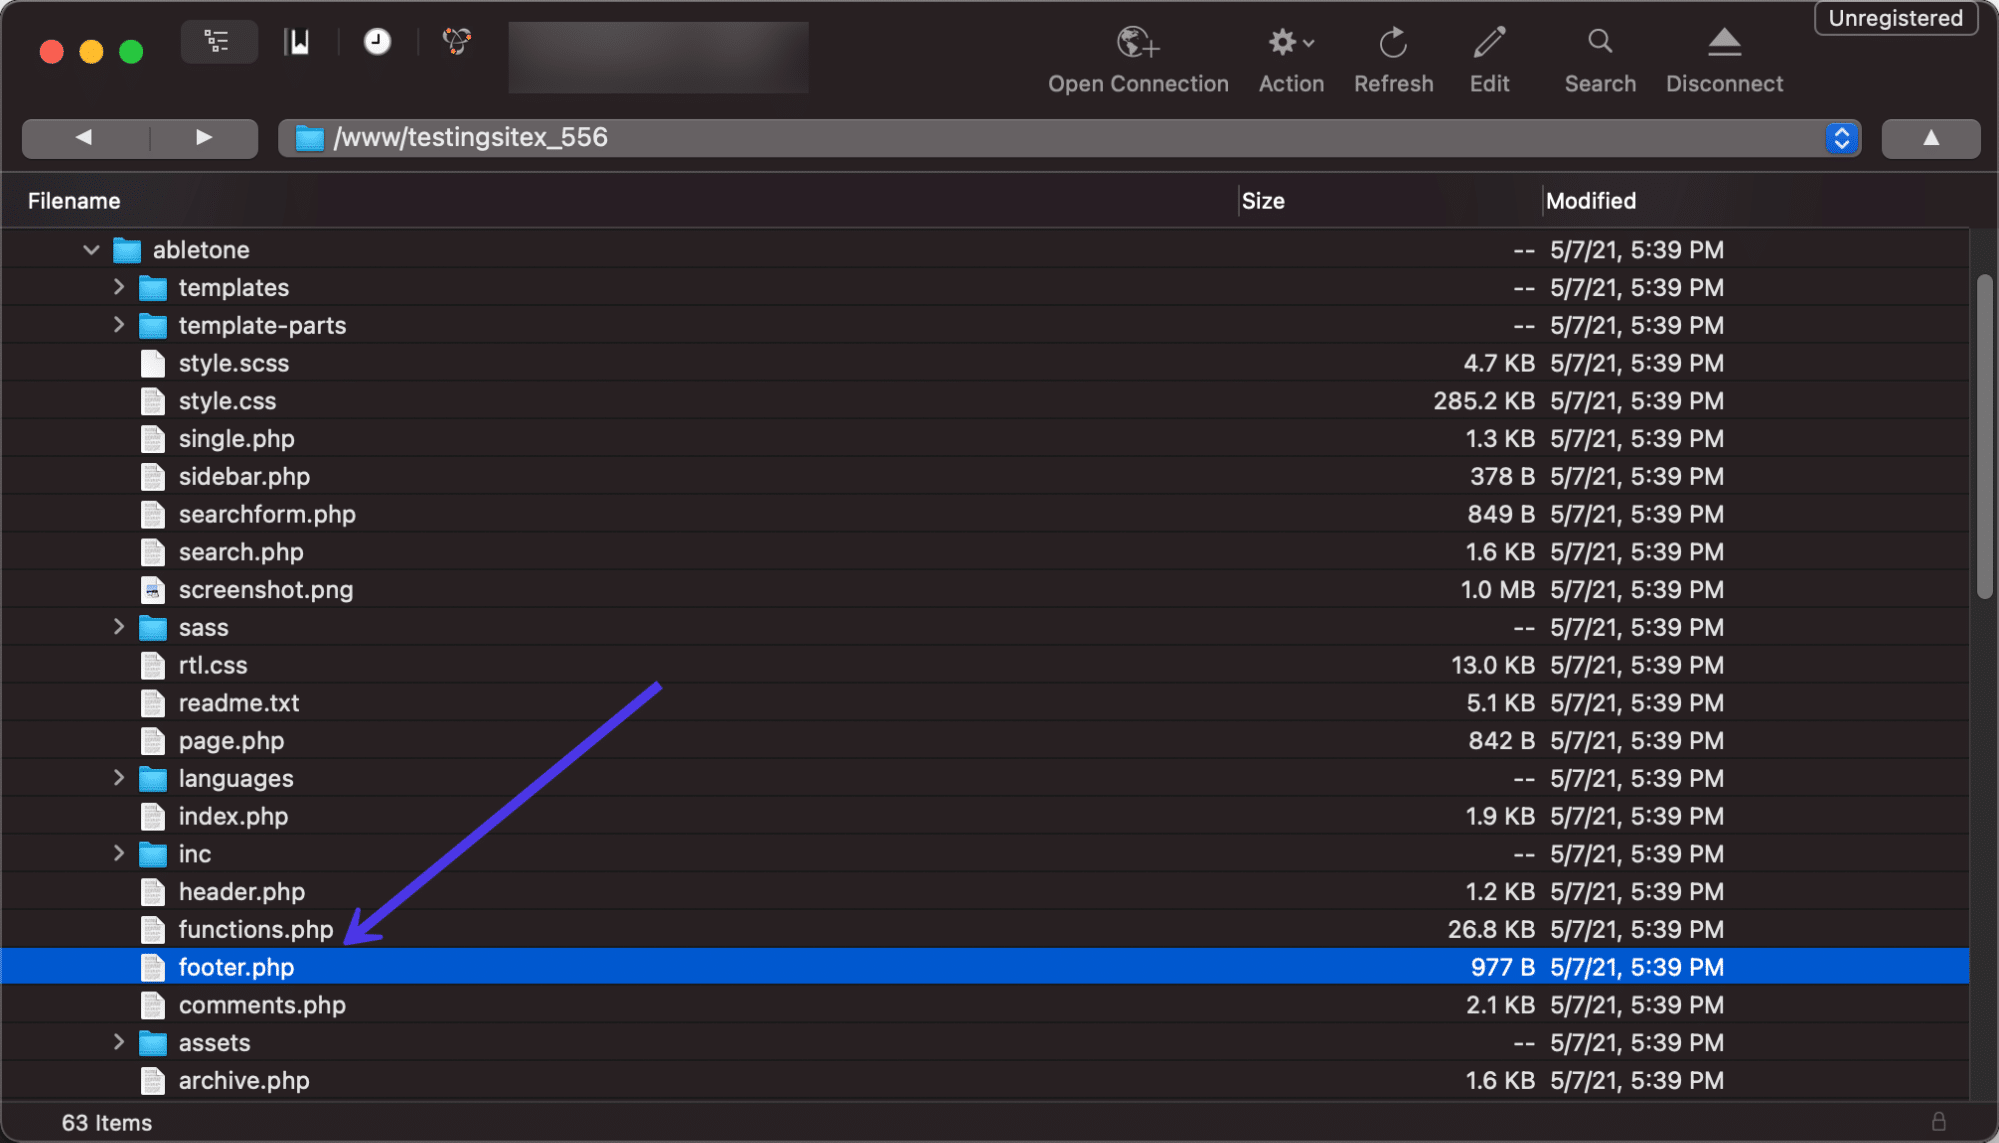
All WordPress themes have a footer.php file somewhere in the theme folder. Scroll through the batch of files to locate that footer.php file.

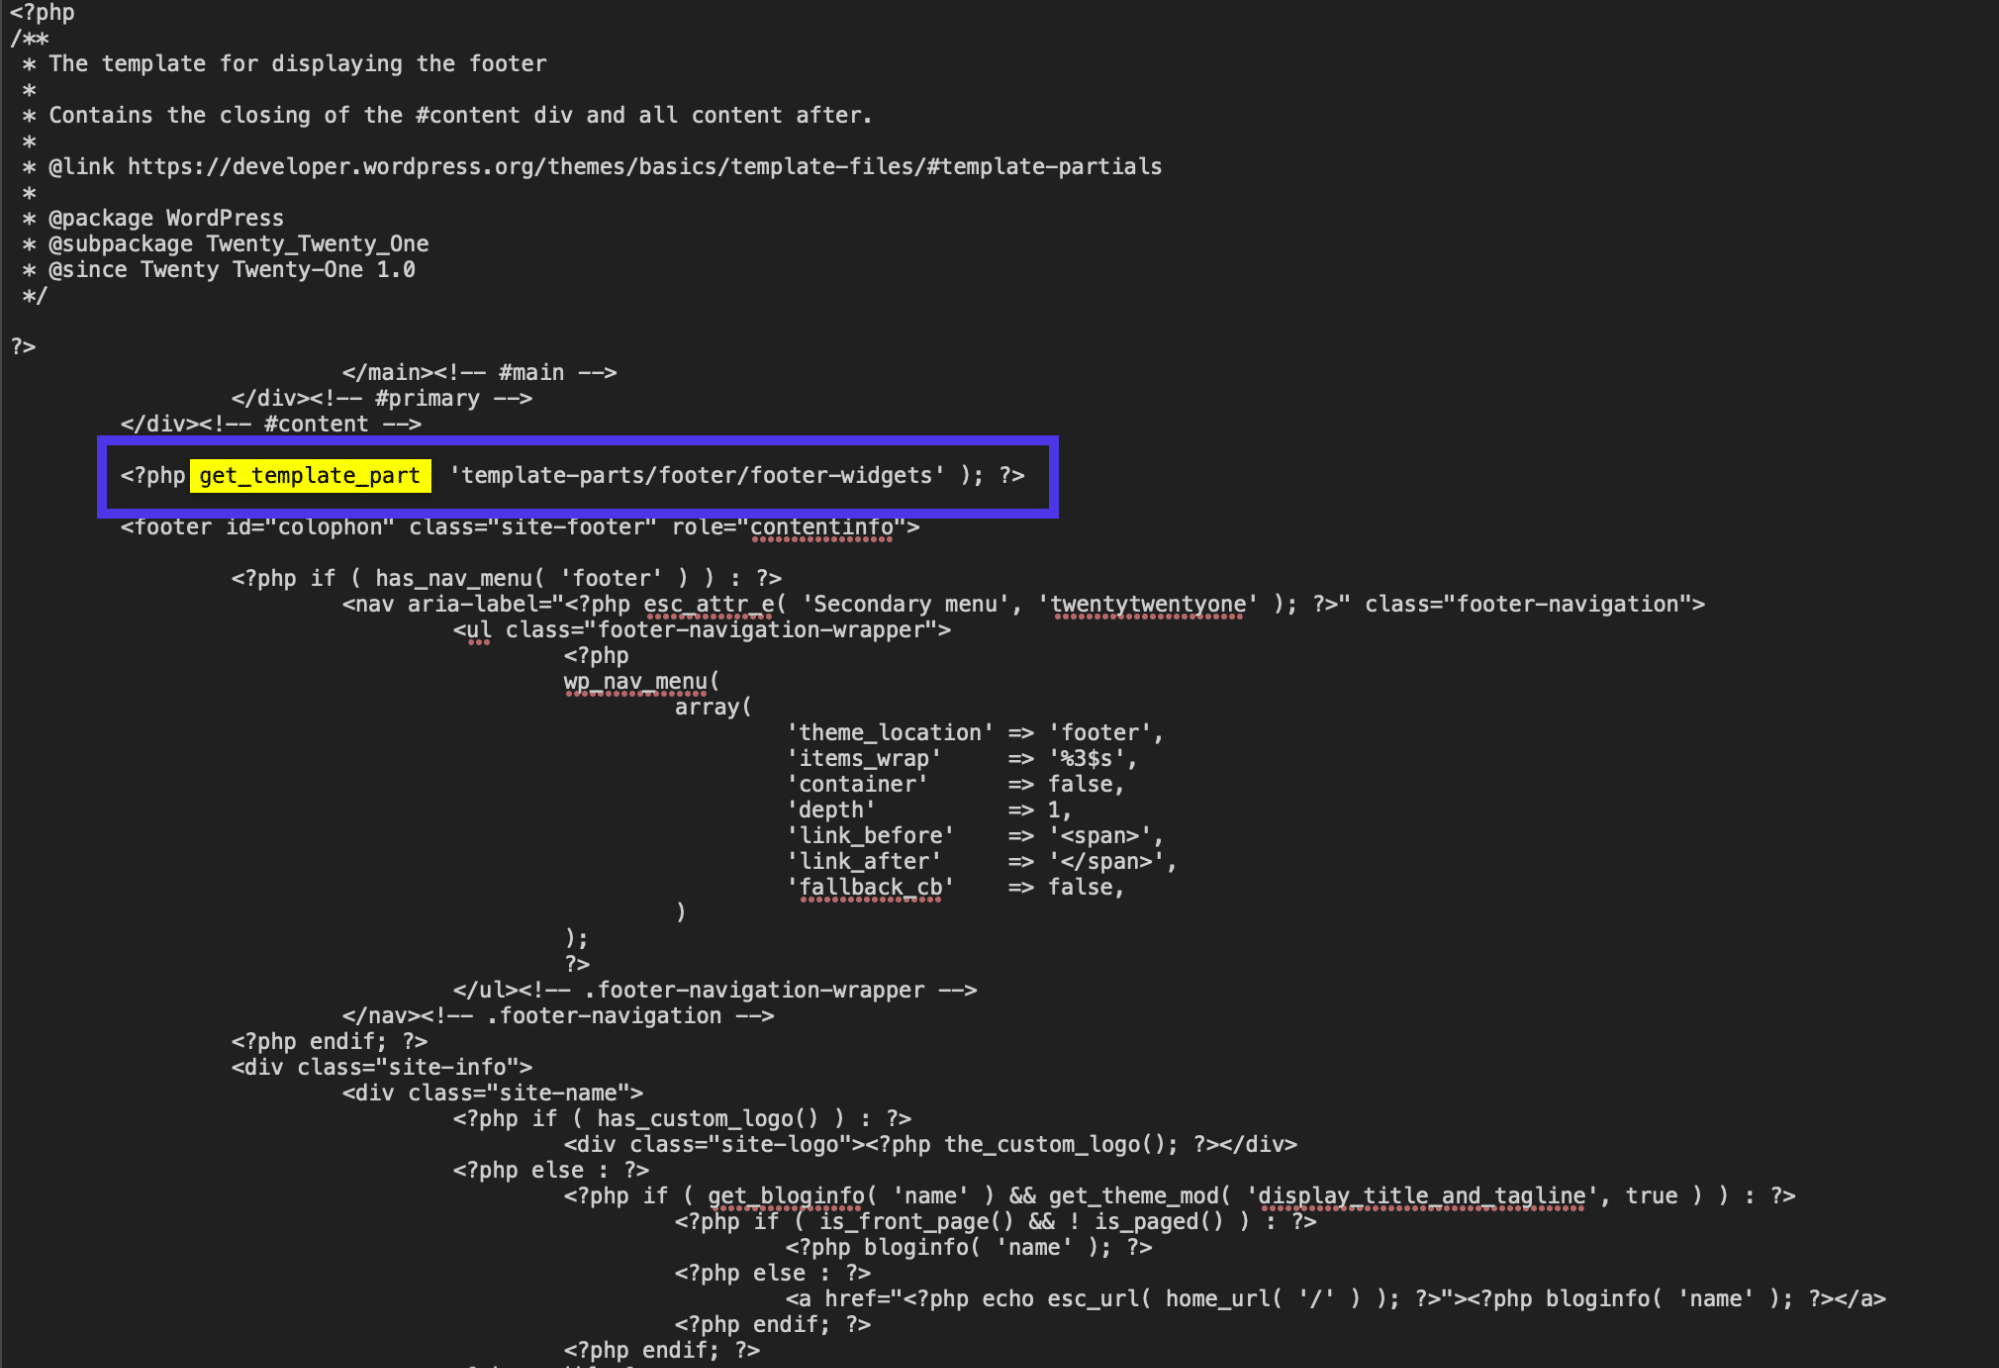
Open the file with the editor of your choice. Once in in that location, you tin can edit the current lawmaking or add new content depending on what you're trying to reach. The get_template_part section is ofttimes modified to insert new bits of text, but nosotros'll exit that upwards to y'all since every footer is dissimilar.
As an alternative, you can edit the footer lawmaking past using a plugin that displays a visual field for the footer.php file. This manner, you don't accept to install an FTP client and link it to your website. It's also a more intuitive, beginner-friendly process that remains bachelor on your dashboard at all times for time to come edits.
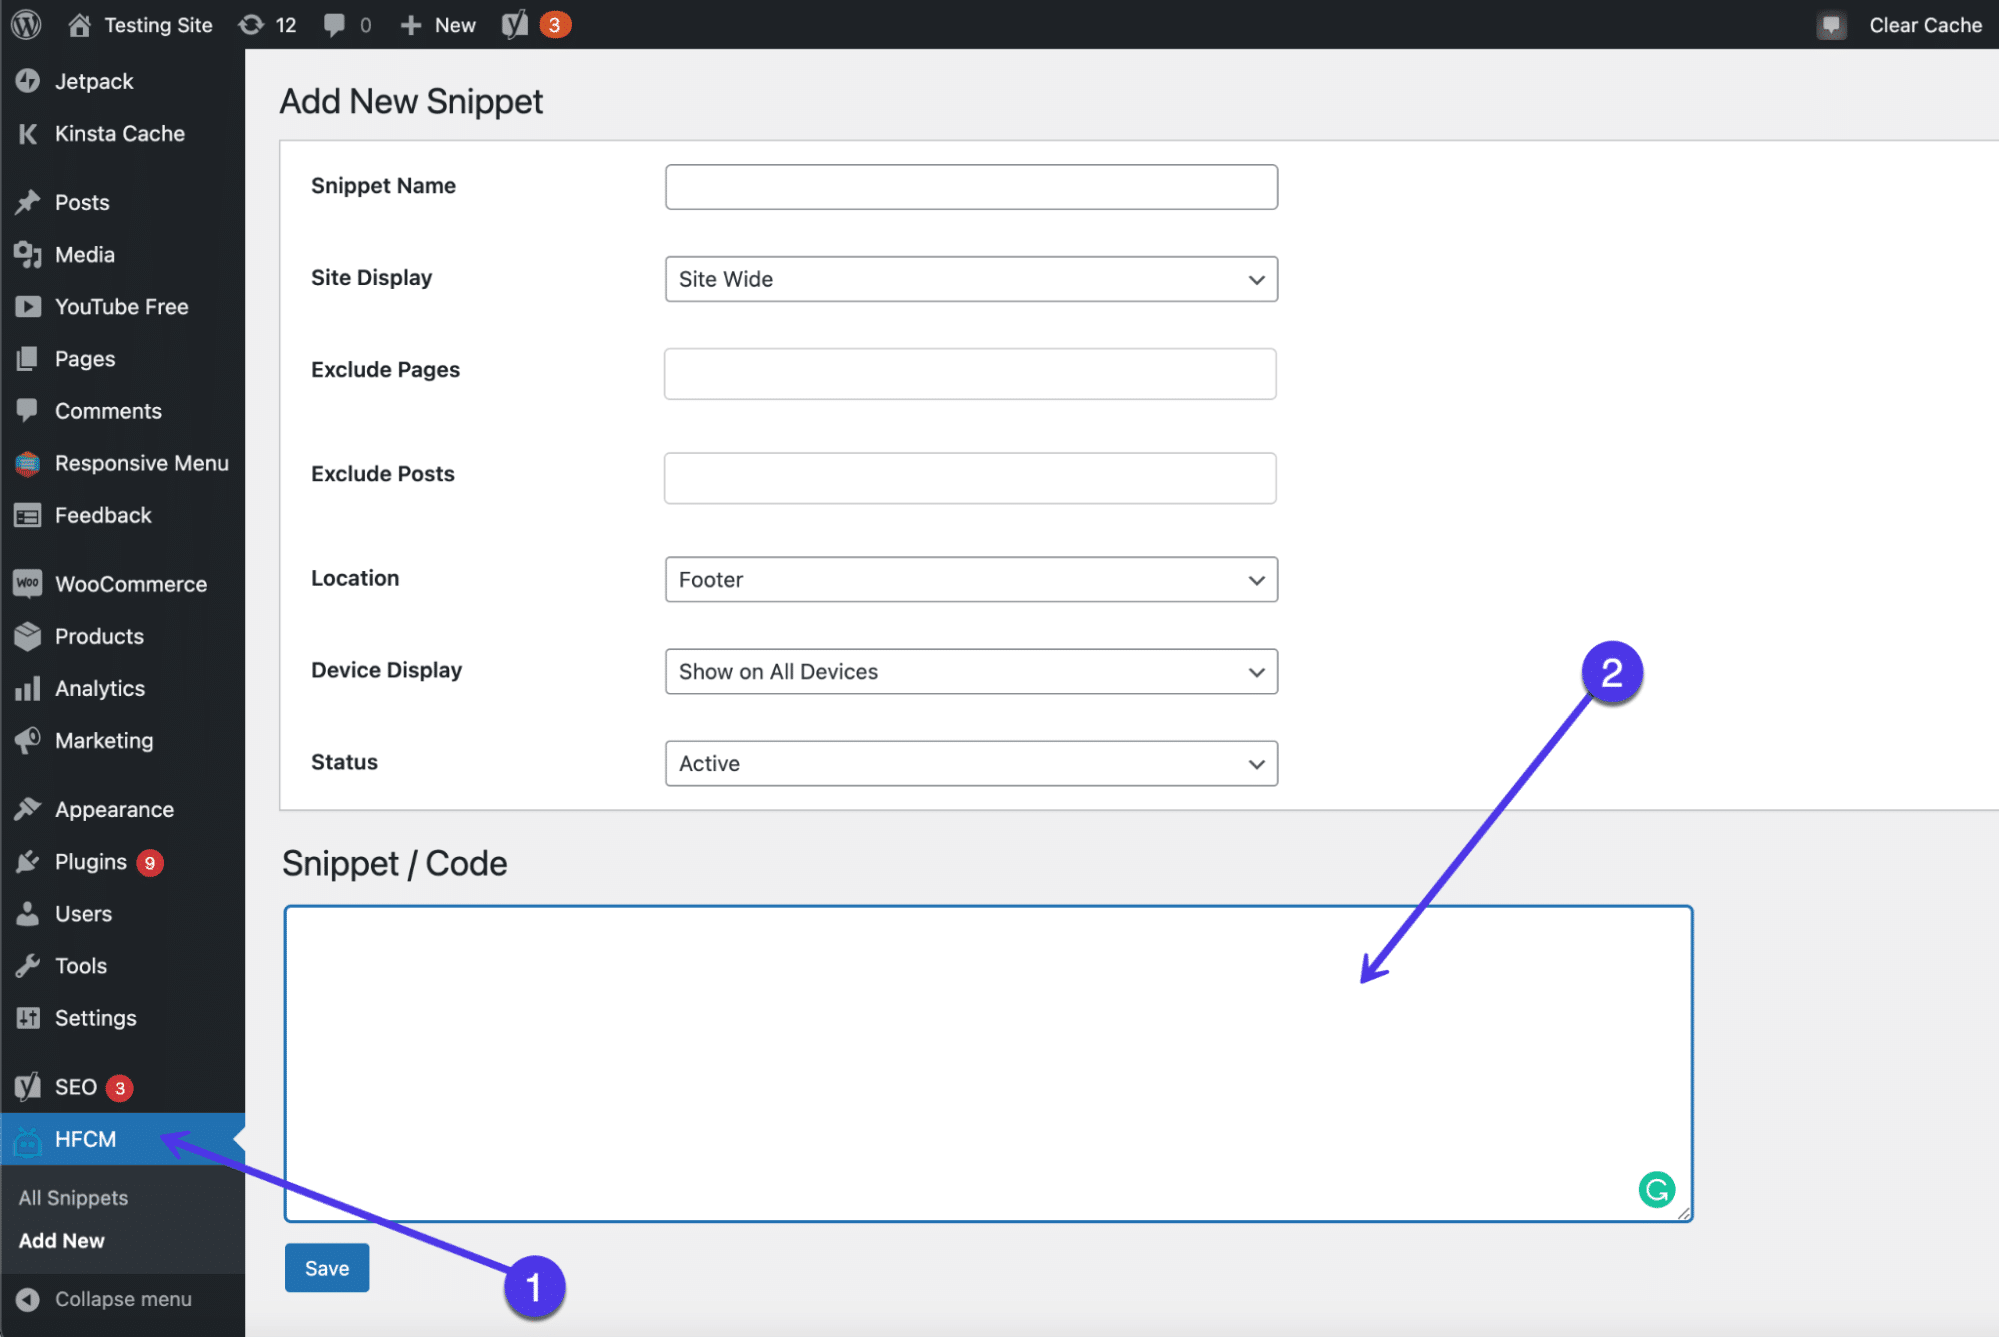
To make this happen, install and activate the Header Footer Code Managing director plugin.

Once information technology's been installed, click on the HFCM tab that appears in the WordPress dashboard. So, name the snippet, choose where you want information technology displayed and set the location as Footer.
The almost of import office is the Snippet/Code field, which you'll fill in with whatever code you desire. Some people utilise this plugin for things similar verification or tracking codes that don't show up on the front end end. Withal, it's also available for you to use for typing in new text and gaining almost complete control over the content in your footer.
Brand sure you lot click on the Relieve button to see the results.
Utilize a Page Builder With Footer Designer
A bonus way to modify your WordPress footer, without the need for code or many of the standard WordPress footer tools, is with a folio builder. Not all page builders offer footer editors, so it's important to conduct some research and ensure that either your current page builder offers information technology or the i you plan on buying has footer features.
Check Out Our Video Guide to Editing the WordPress Footer with Page Builders
Regardless, this is a relatively basic feature for a folio architect, then it's a good idea to only become for a page builder if you plan on customizing your unabridged site with it.
A few other page builders offering footer editing, only our favorites include Elementor and Visual Composer.
To create a custom footer with Visual Composer, you lot must have the Pro version. There are some workarounds to edit the lower part of your website with the free version, but the truthful drag-and-drop architect for the footer requires an upgrade.
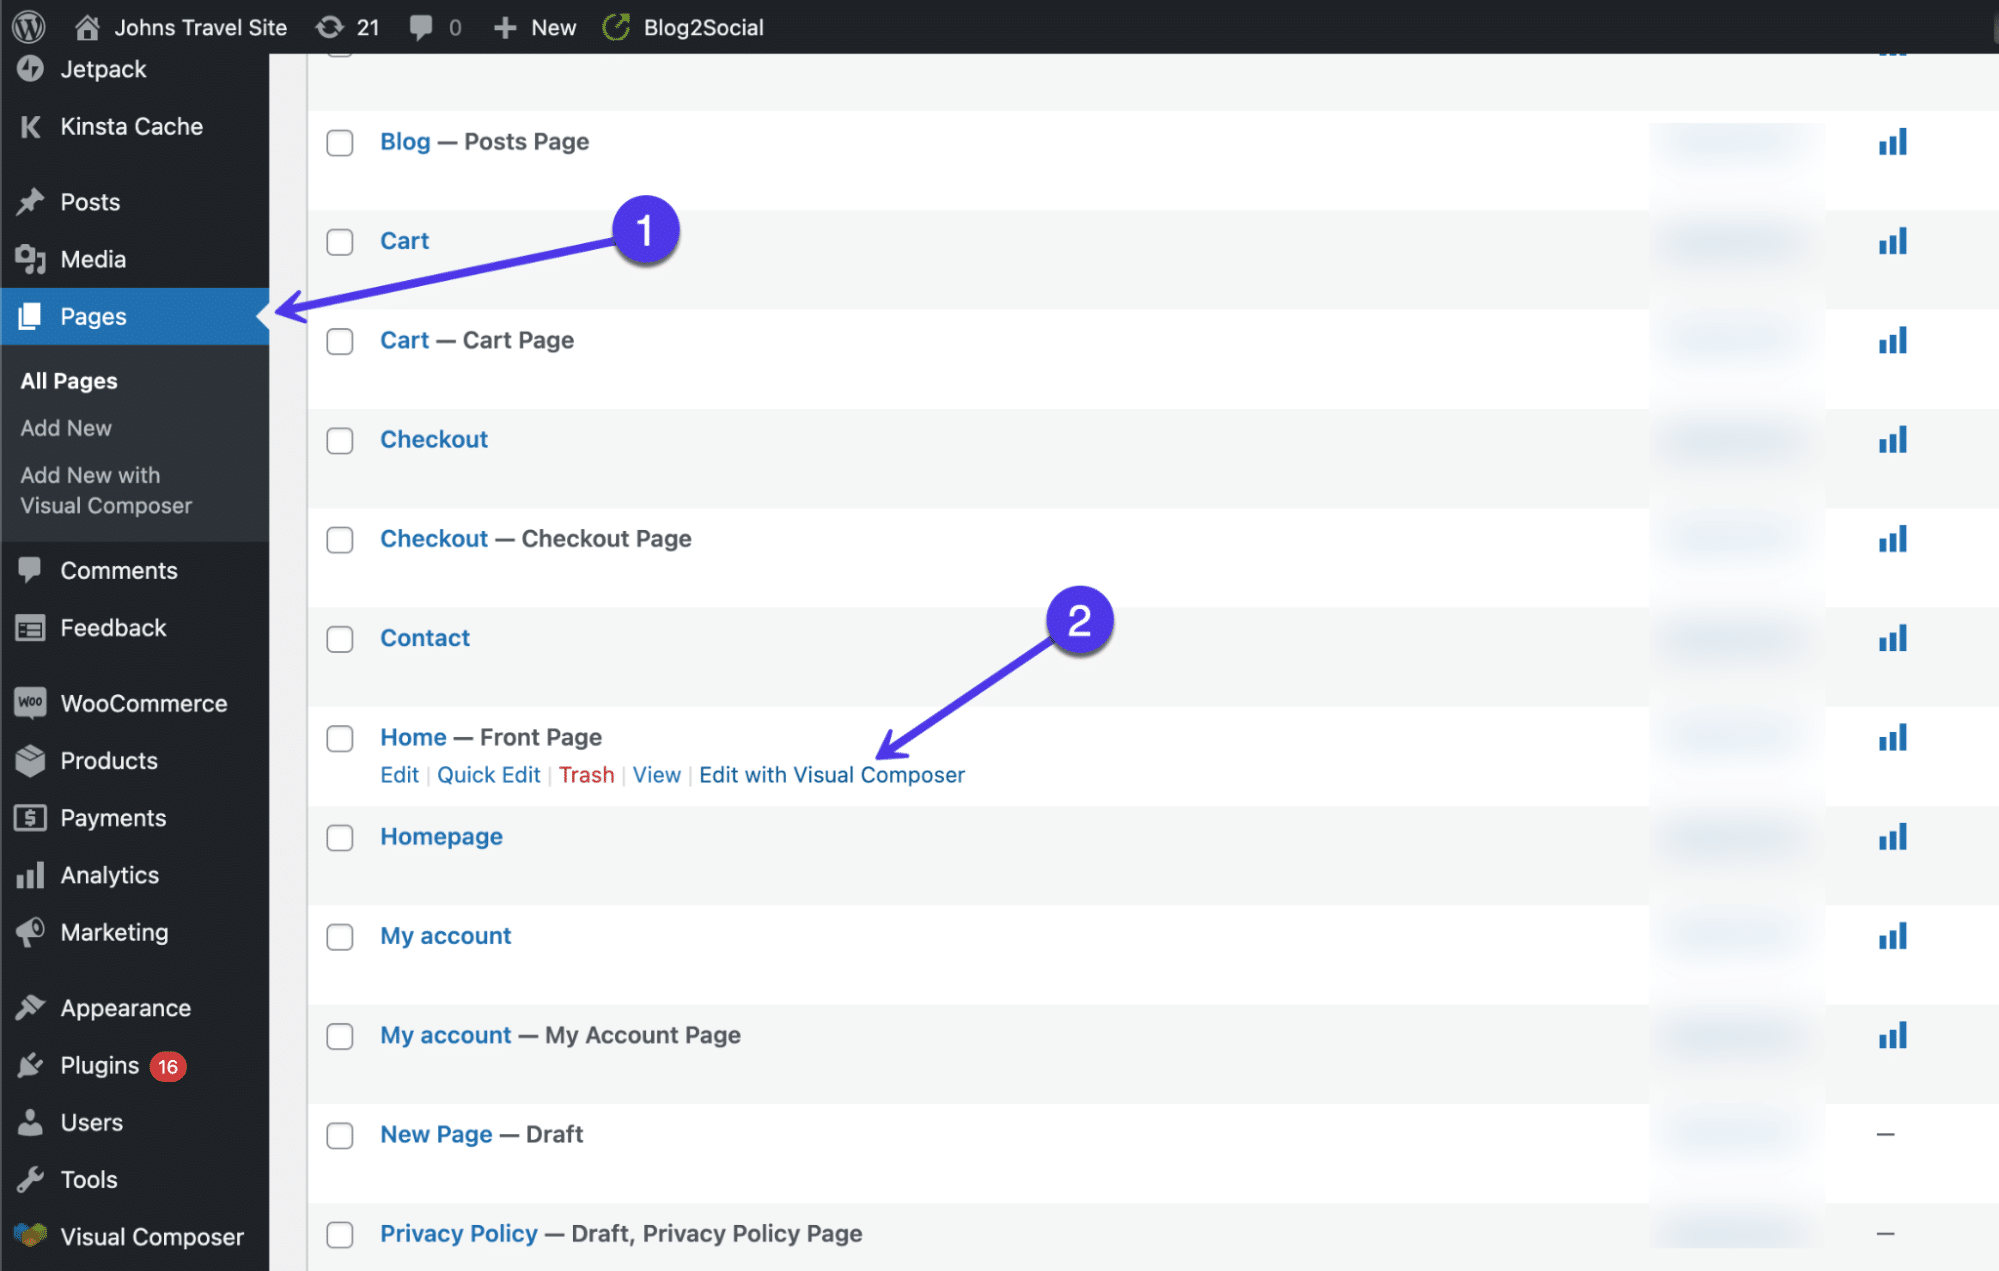
Once installed, click on the Pages button in your dashboard. Curl through the pages yous want to edit and select the Edit With Visual Composer link on whatsoever of those pages.
That brings up the Visual Composer designer, with a live preview of your webpage on the right side and drag-and-drib pattern tools like elements and templates on the left.
I of the easiest ways to implement a cute footer is to simply choose a template (many of which are gratis). These templates provide professional designs for your unabridged site, along with a overnice footer that'south customizable.
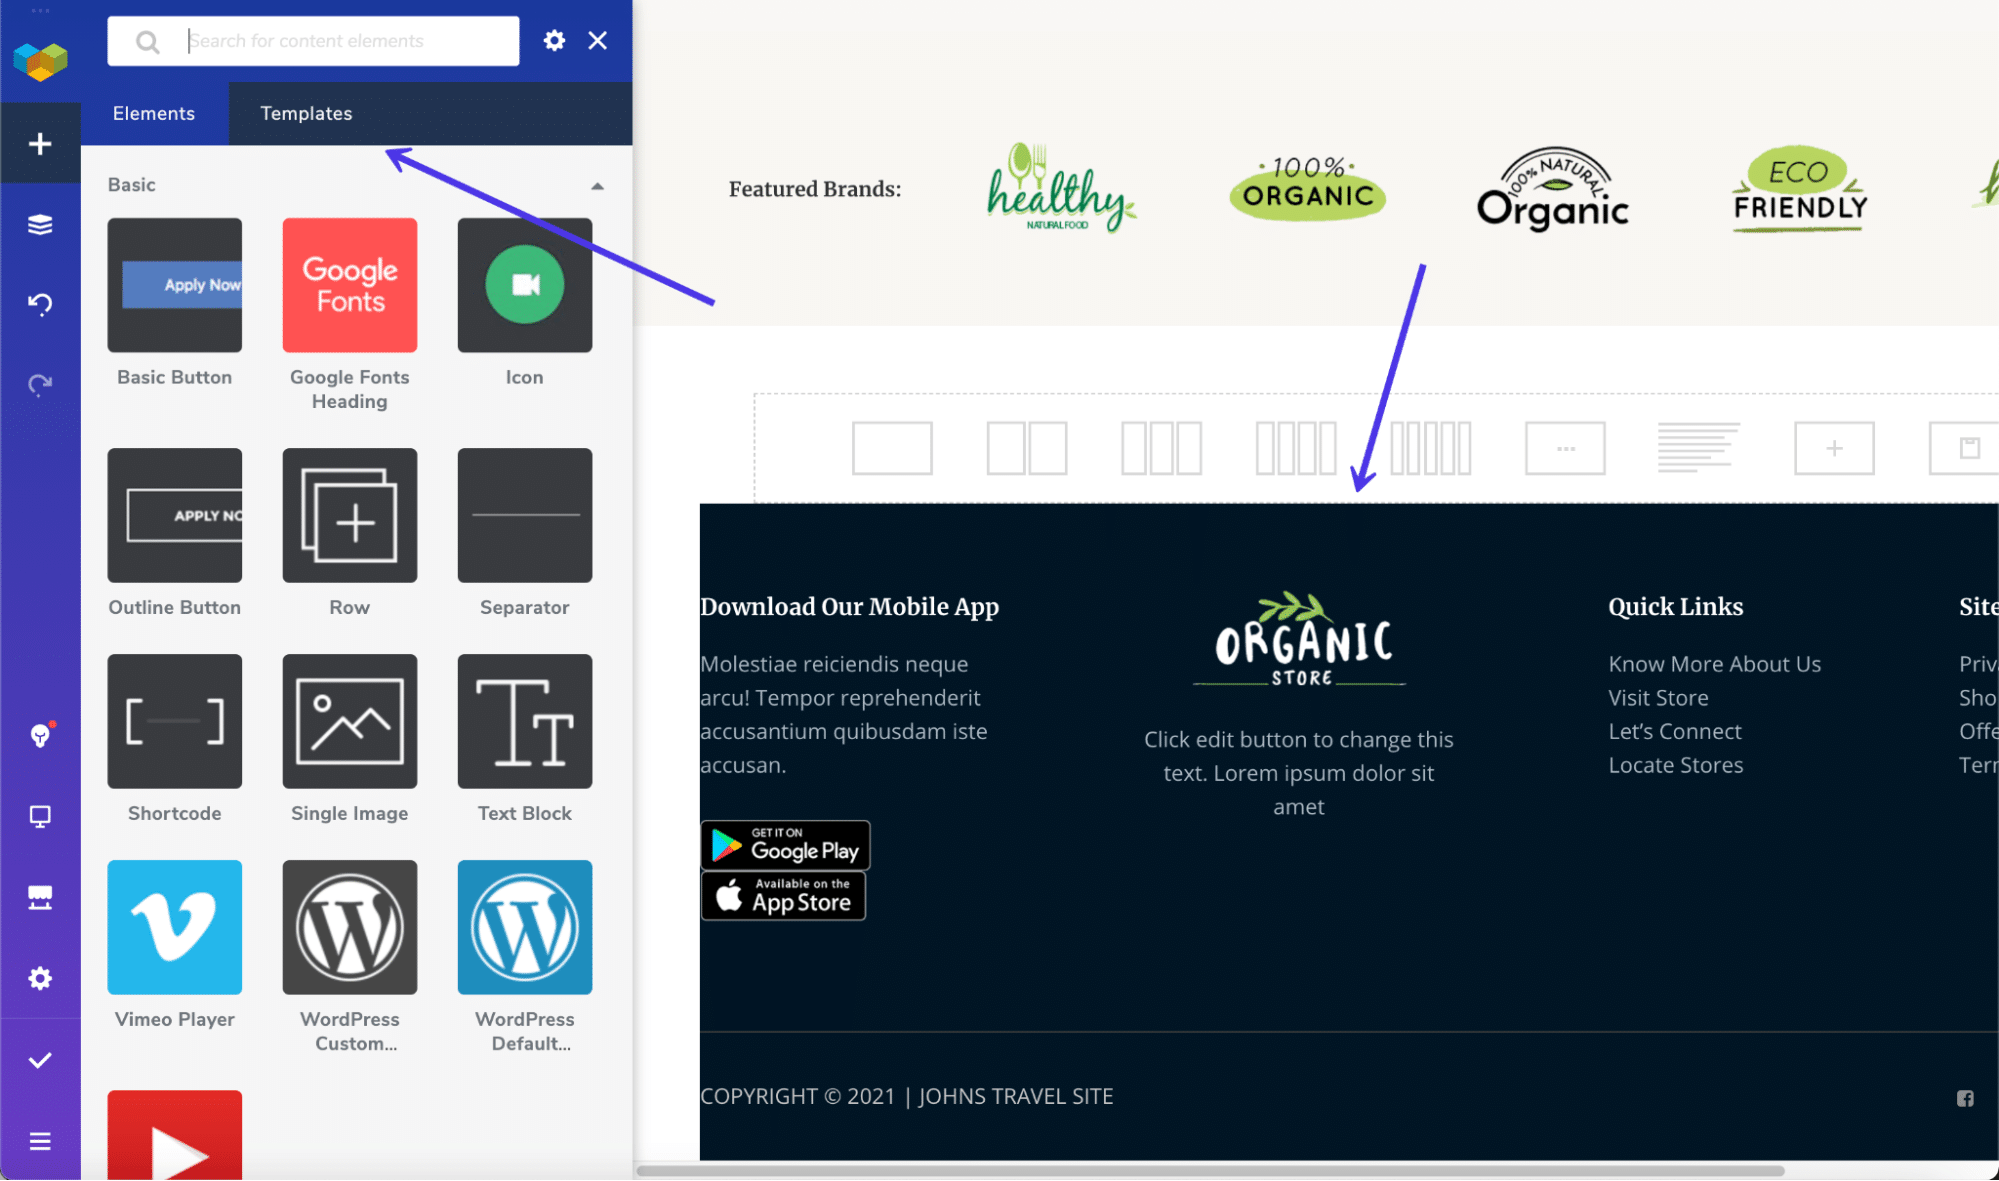
To meet what's available, you can click on the Templates tab, then the Get More Templates push button. Visual Composer offers templates for all aspects of your site, including headers, footers, and sidebars.

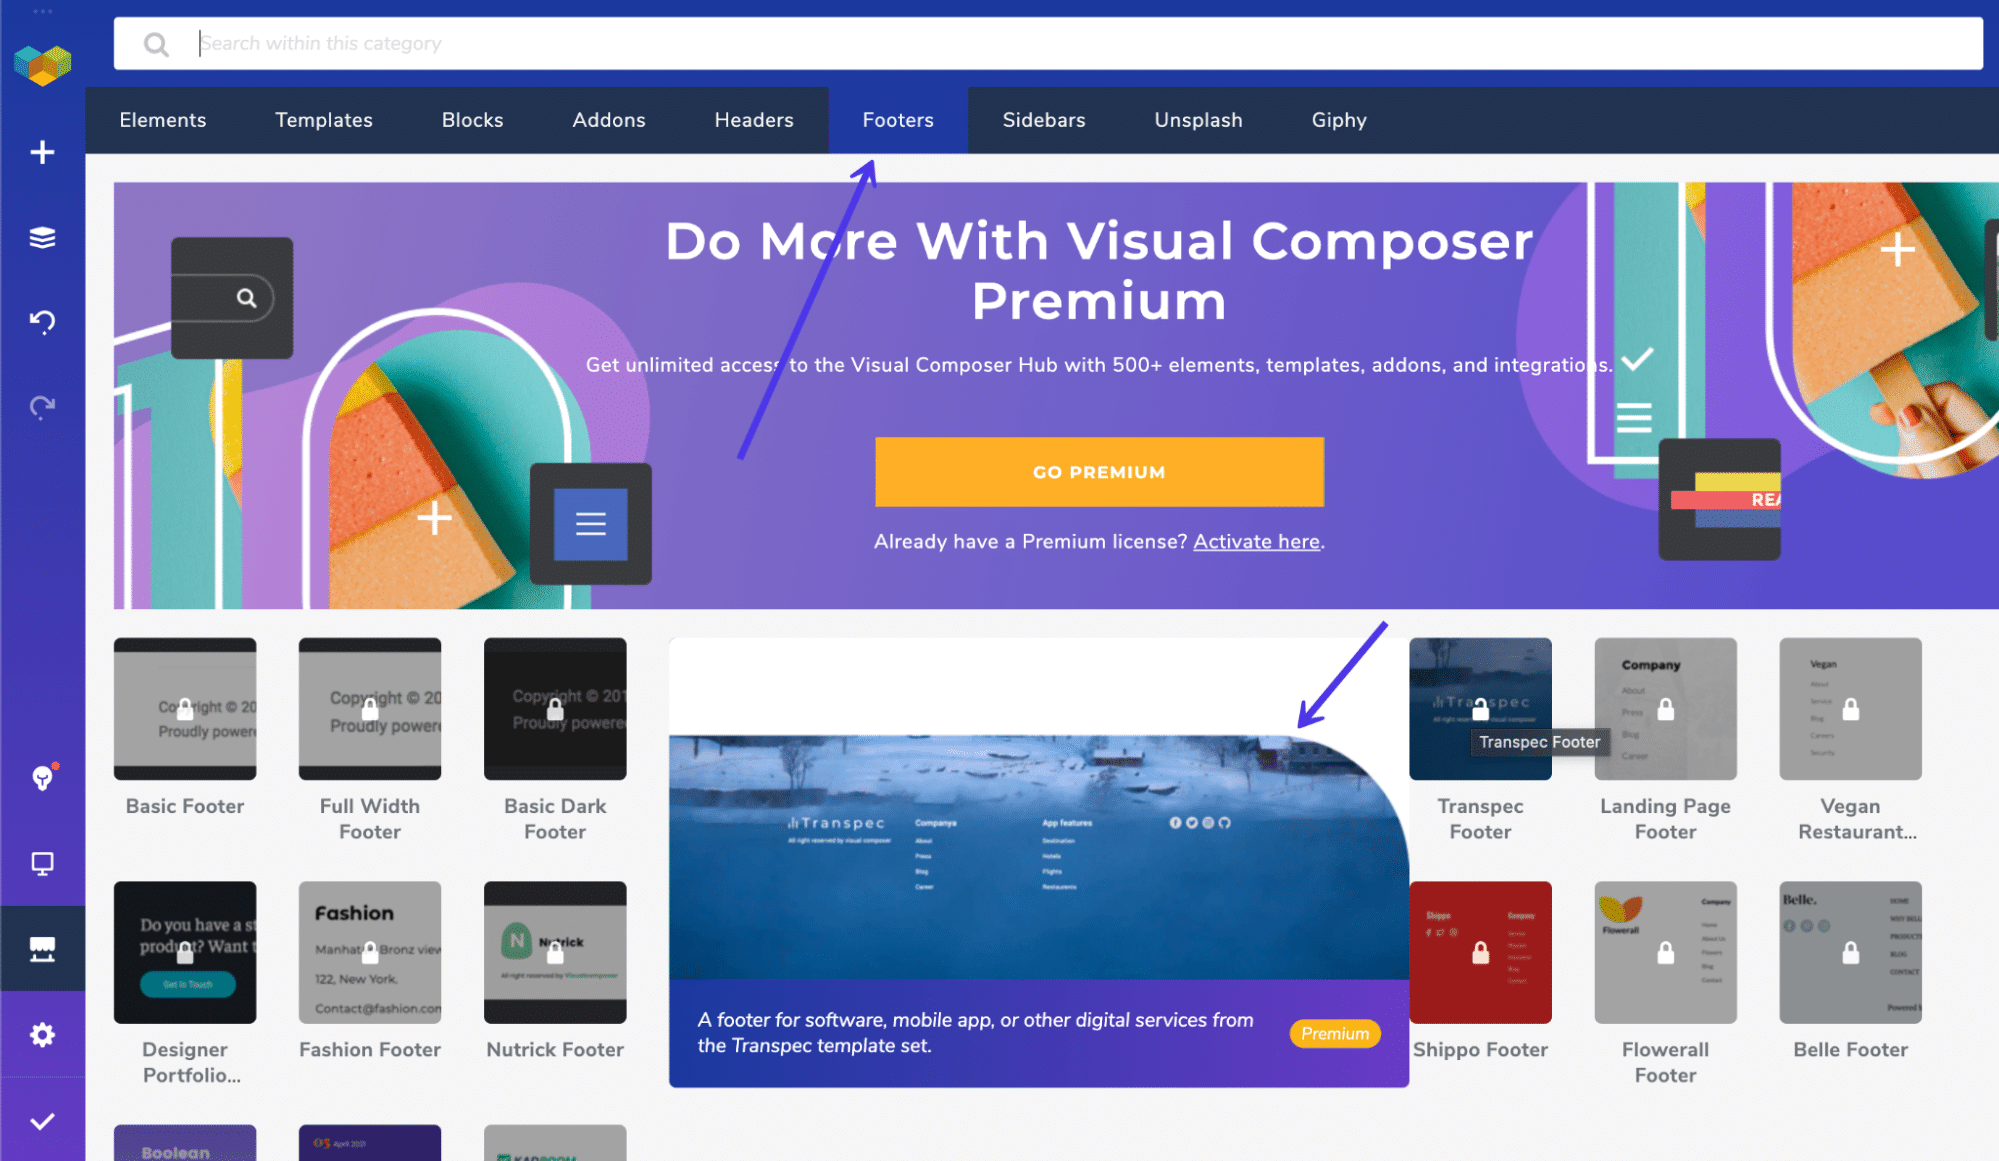
The side by side window shows a large library of templates, all categorized under filters for things like Elements, Templates, Blocks, and Footers.
Cull the Footers tab to show all premade footer templates.
Once once again, this part of Visual Composer requires the Pro version. One time active, y'all can curlicue through the dozens of footer templates to implement them on your website and edit them equally you please.
One of the other page builders with footer editing tools is called Elementor. Much similar Visual Composer, Elementor provides a full website builder for constructing homepages, product pages, footers, and more.
Keep in listen that you do receive footer content blocks for gratis with this method, simply the actual footer builder uses the Pro version of Elementor. Similar Visual Composer, you demand to upgrade for full functionality.
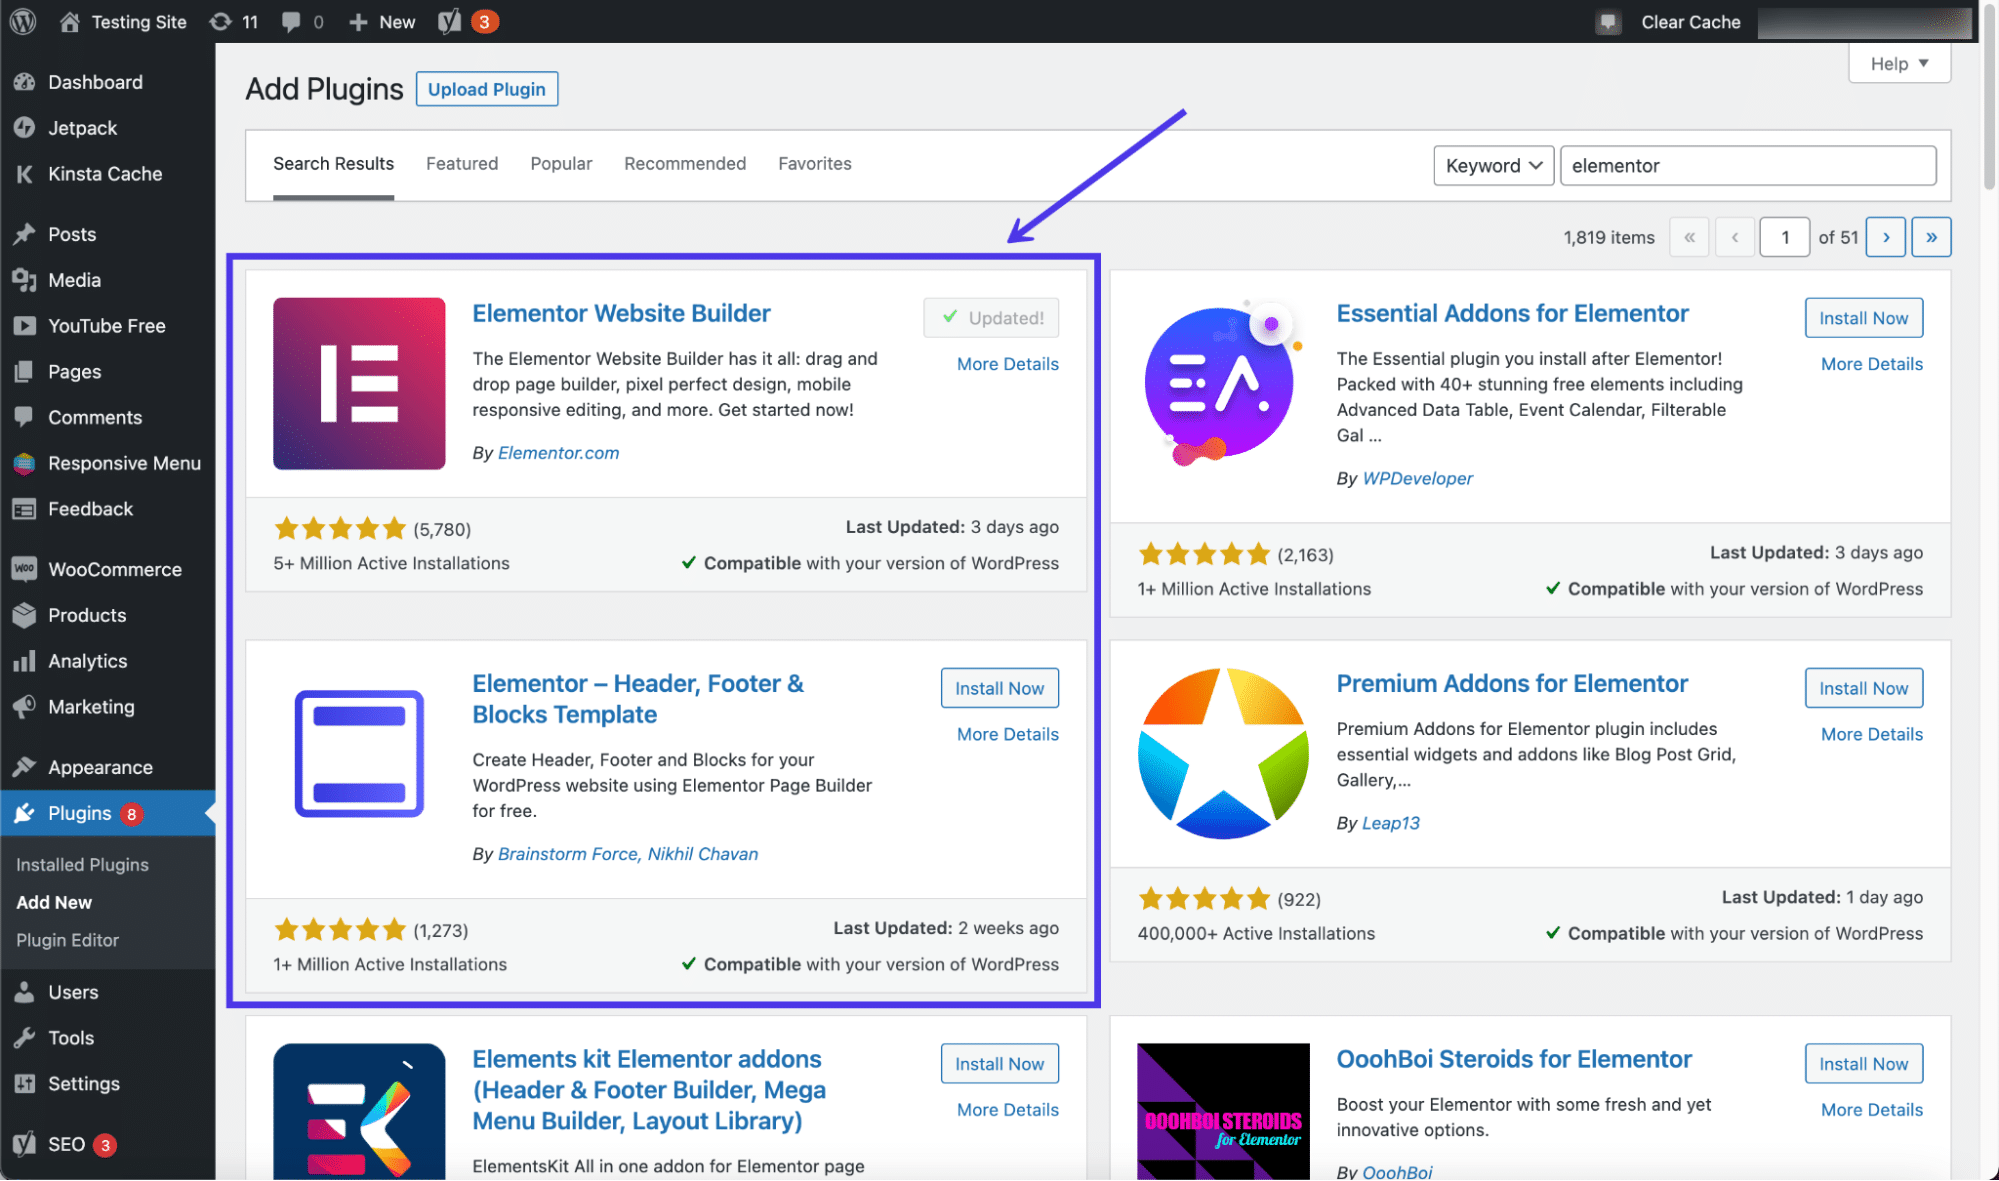
To go started, install and activate both Elementor and the Elementor Header Footer and Blocks Template plugins.
Click on Templates > Theme Builder to open the complete website builder from Elementor.
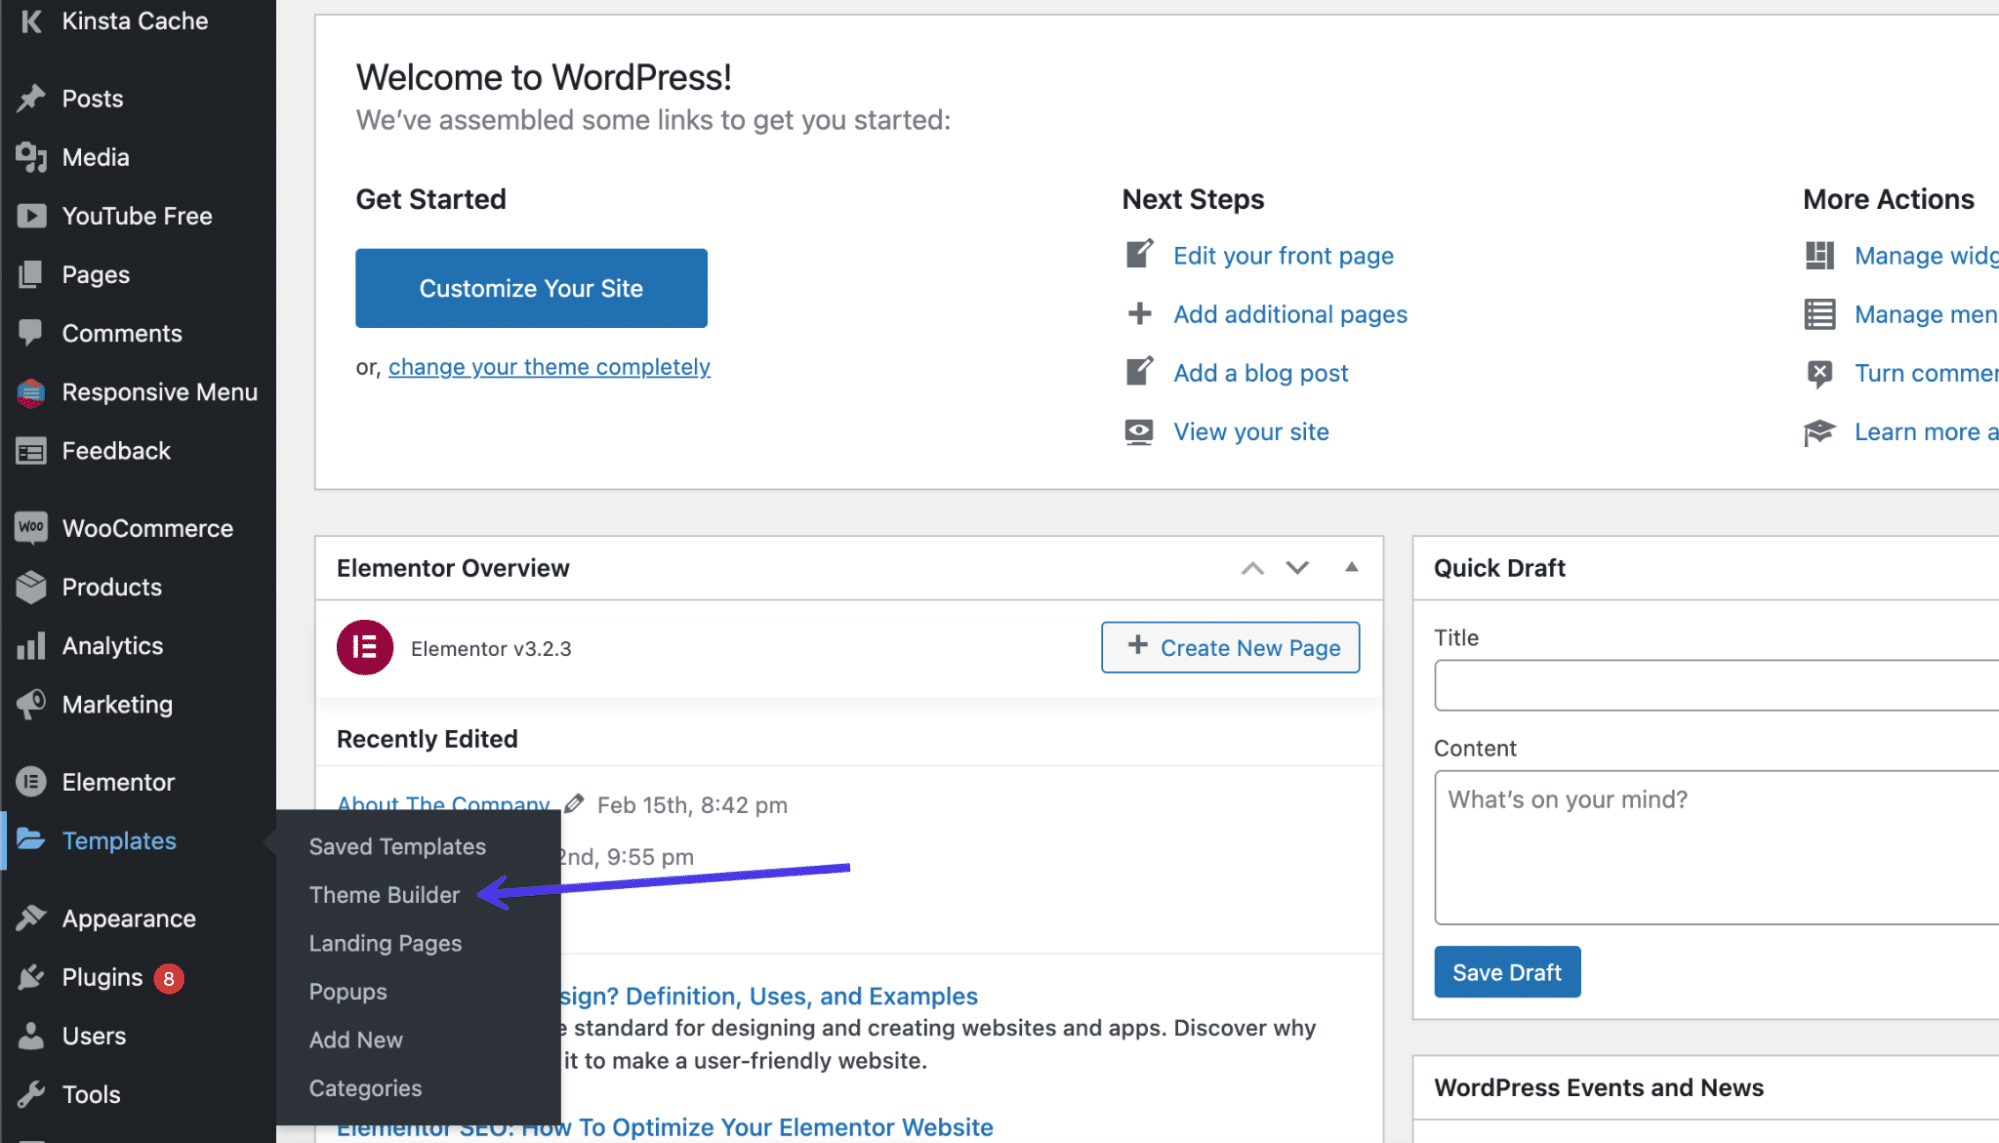
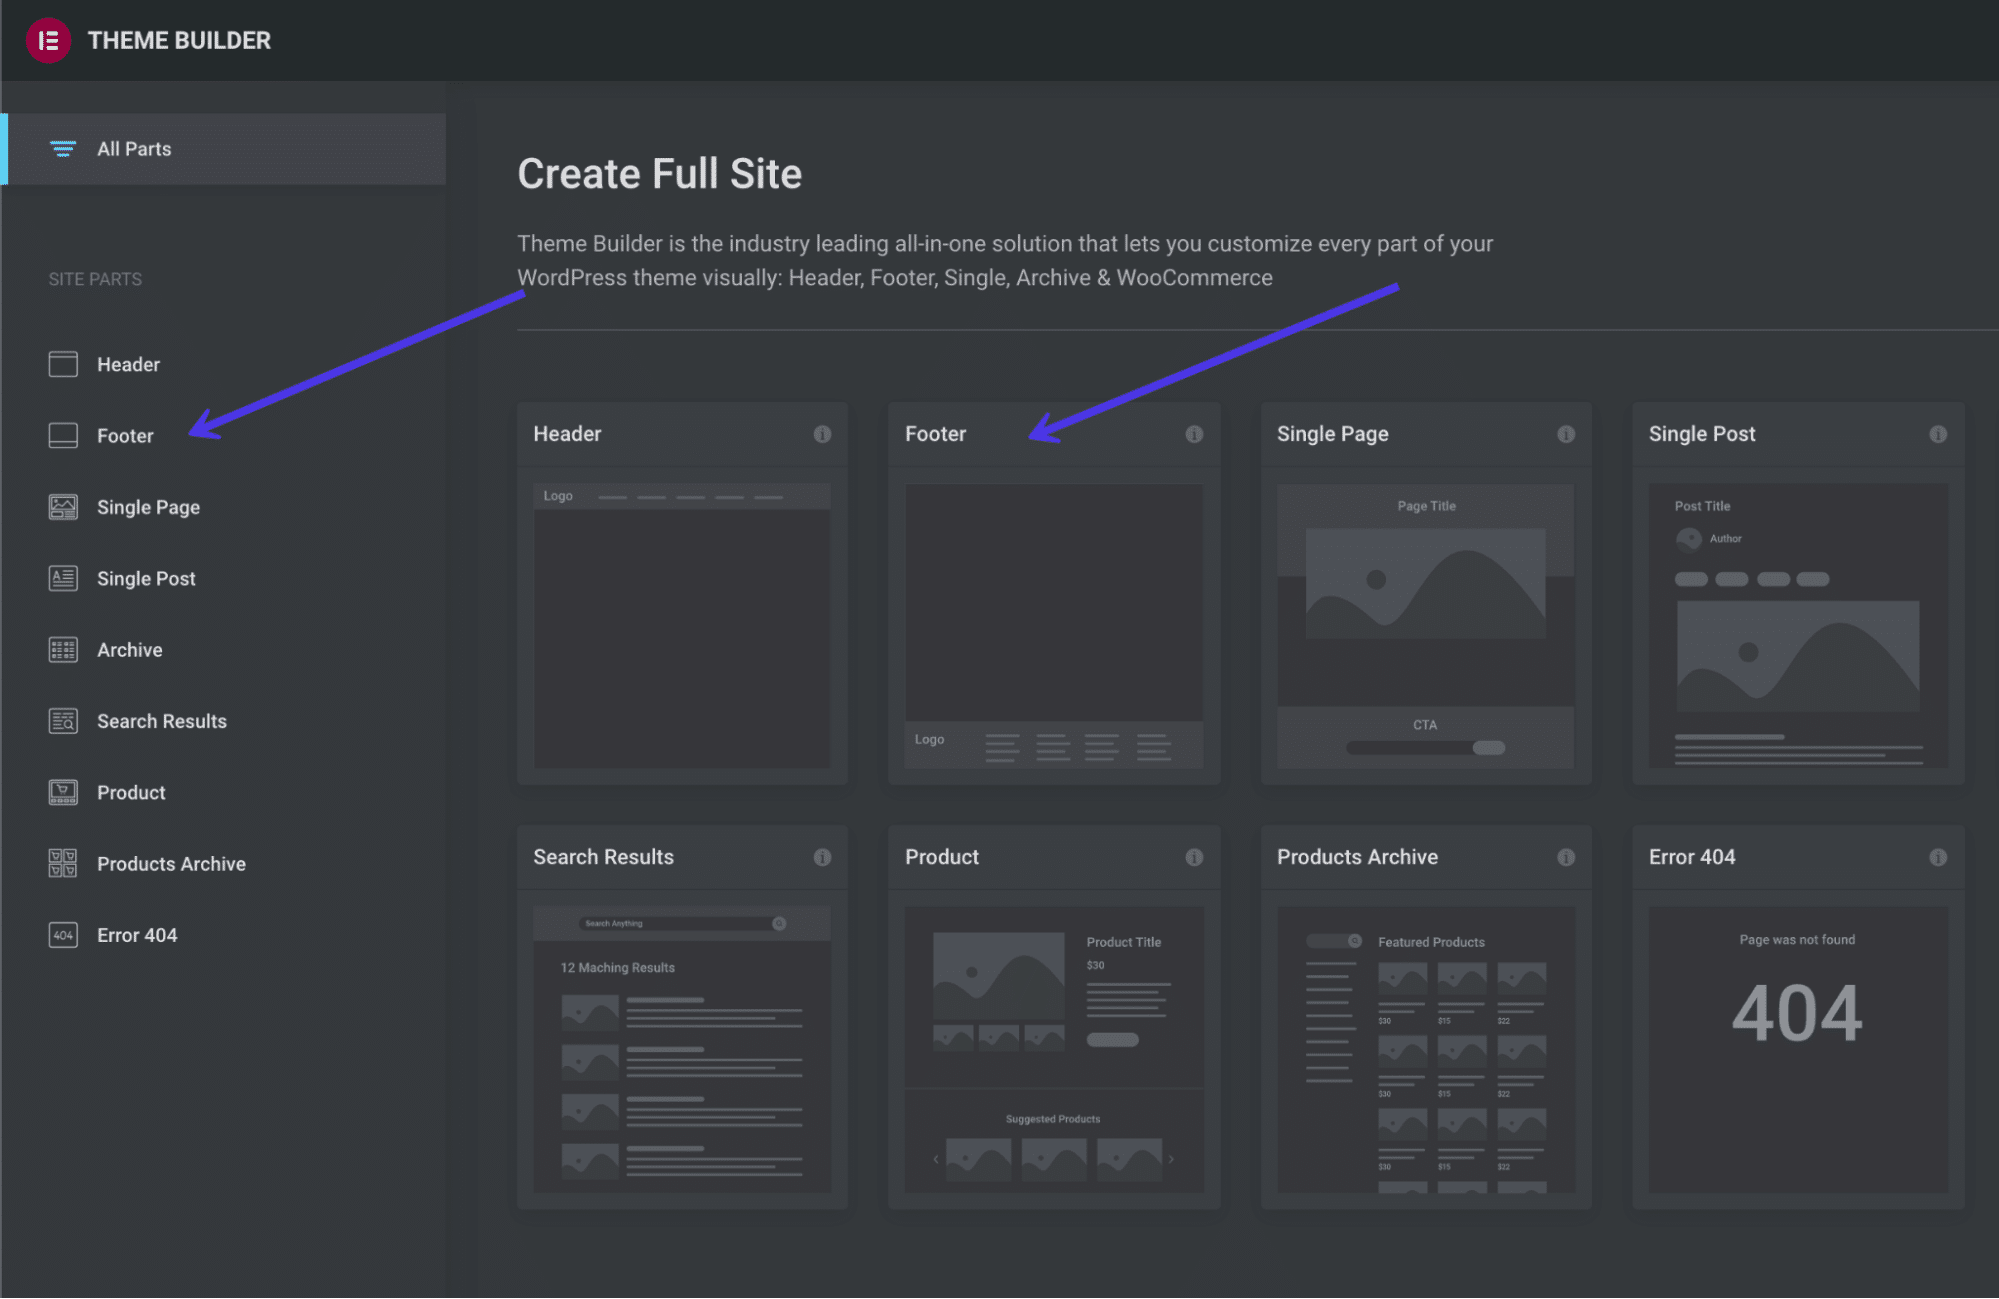
Here, you lot'll encounter a bill of fare to edit various parts of your site such equally the header, footer, and single pages.
Subscribe Now
Select the parts of your site you want to customize on the left side carte du jour or with the icon buttons in the middle of the page. As you can see, there's a Footer link in two places.
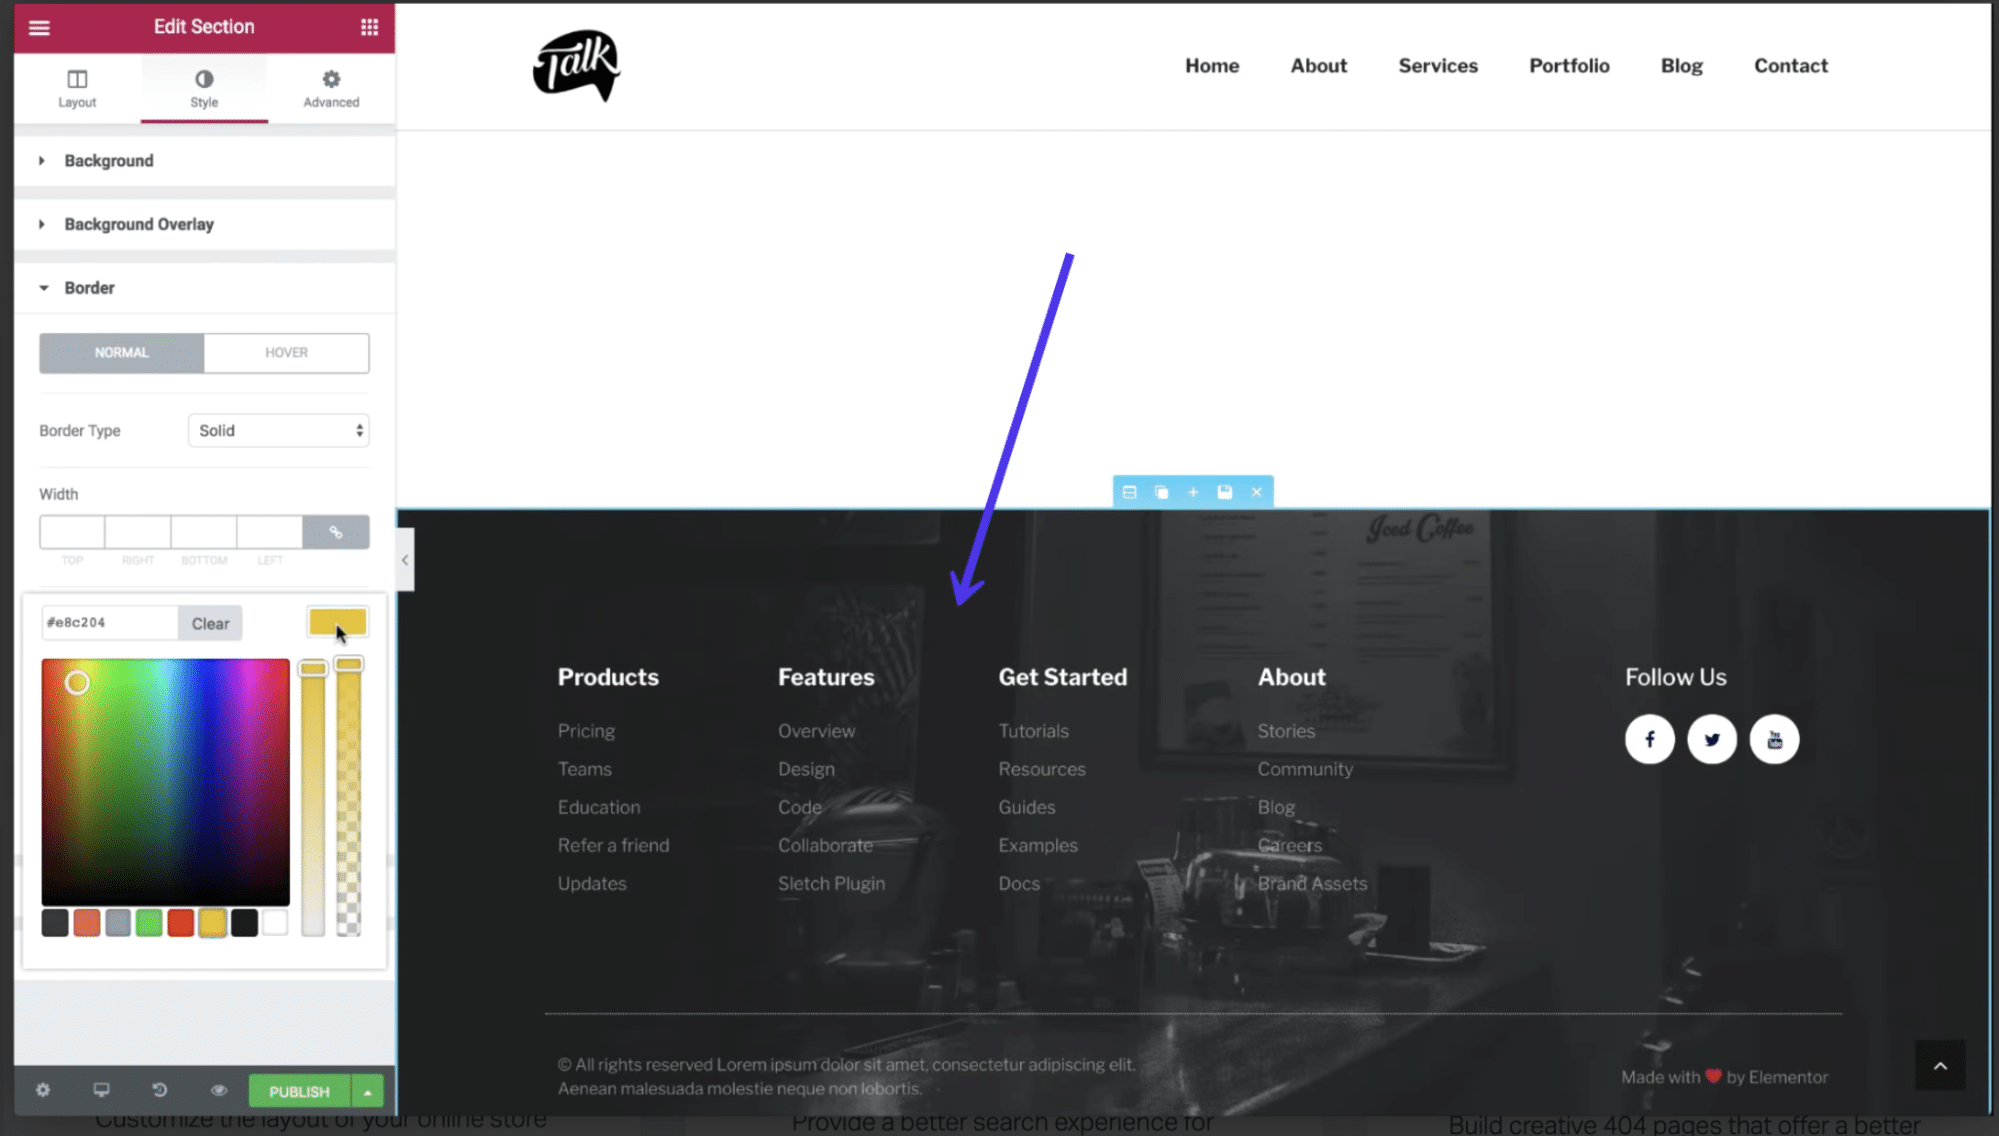
The footer editor works similarly to every other editor in Elementor: You can change the layout, adjust the style, and click on the cake to type in new content. Every attribute of the footer is customizable when using Elementor, making it one of the more than flexible and desirable options when it comes to footer control and learning how to edit a footer in WordPress.
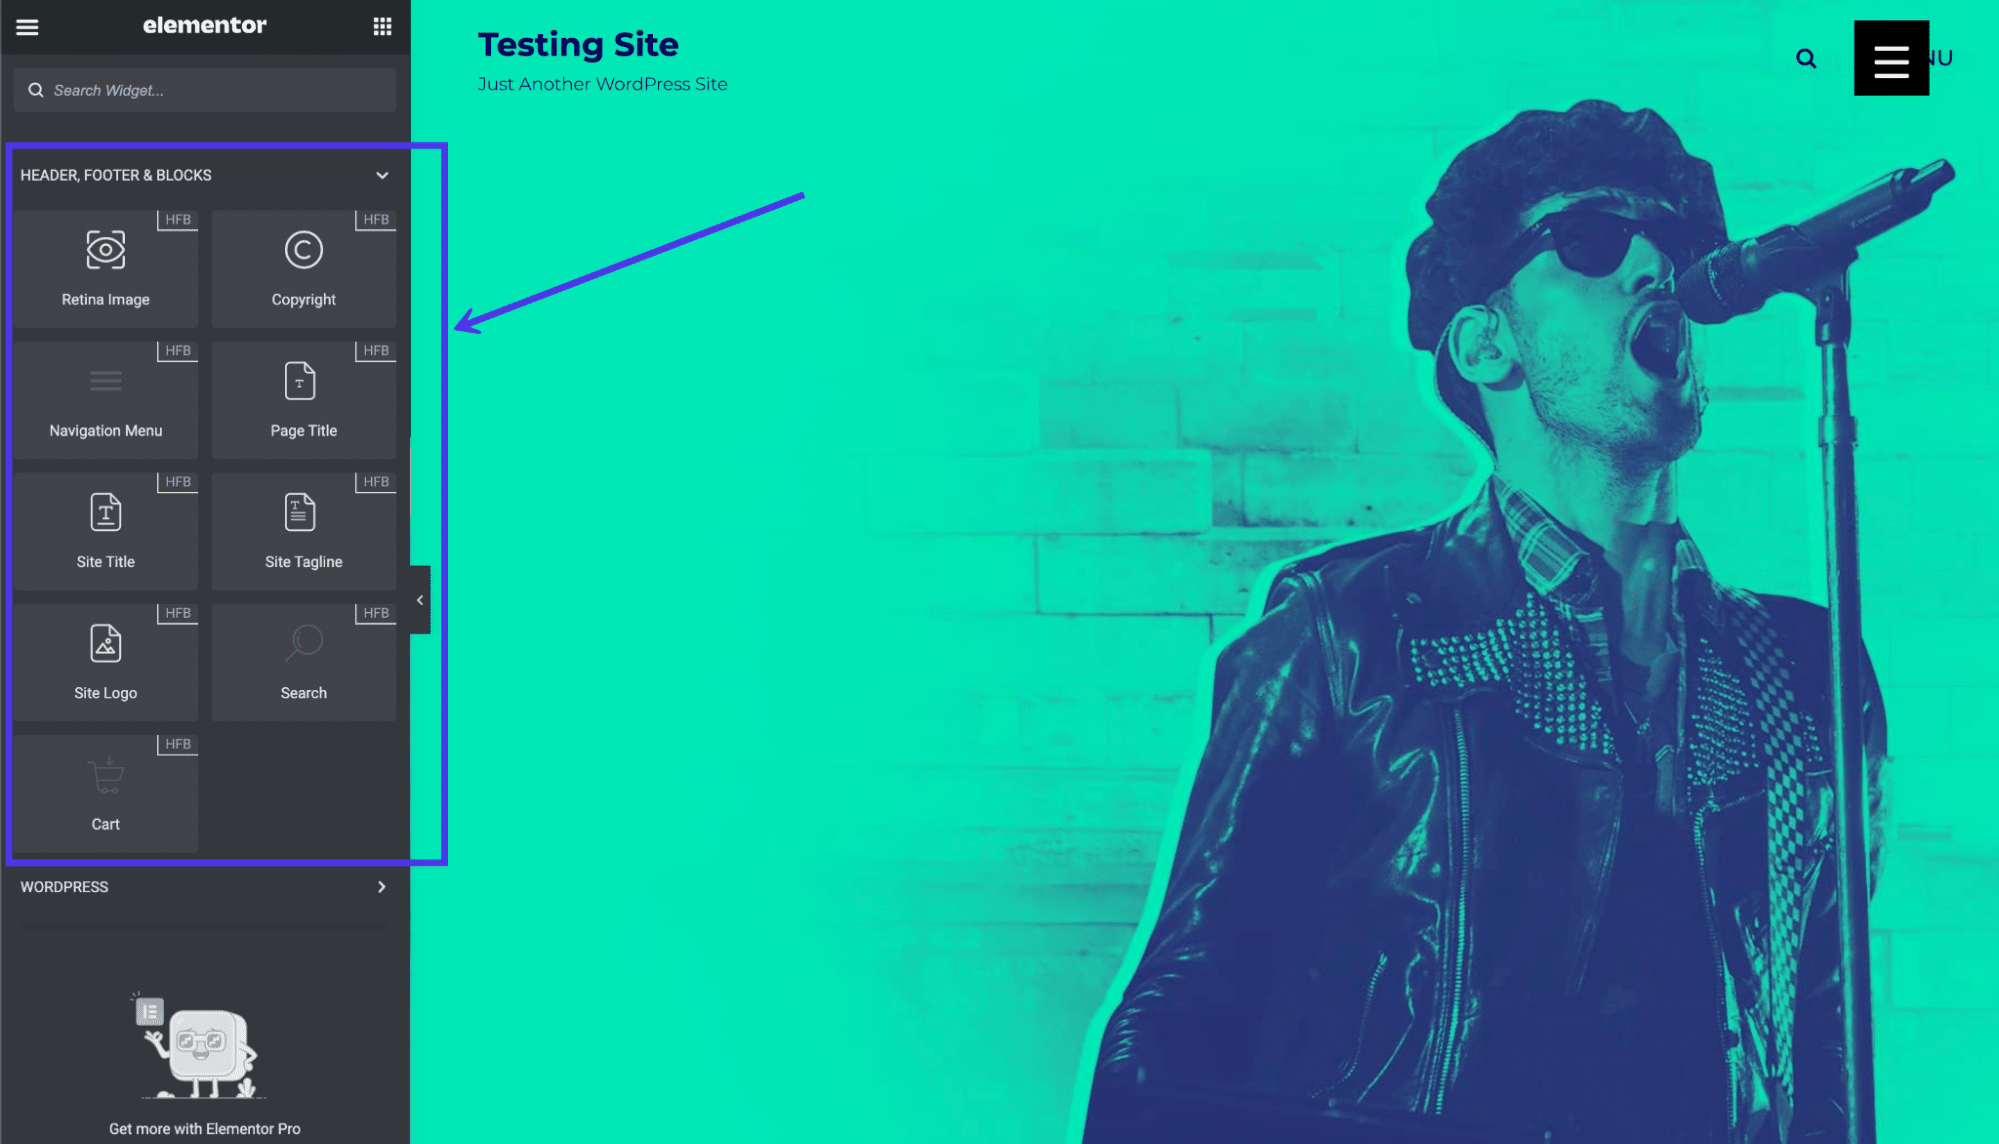
The Header Footer and Blocks plugin provides content modules made specifically for headers and footers. In terms of the footer blocks, y'all can choose from modules like copyright information, images, site titles, and taglines.
To utilize these blocks, get to Appearance > Header Footer and Blocks in the dashboard.
You can too make a unique cake and choose to edit it in the Elementor folio architect. Once in Elementor, curlicue downward to the block collection for Headers Footers and Blocks, then elevate whatever of these elements into your electric current pattern to activate some of the more than common content items within a footer. Equally mentioned, you tin can find everything from search bars to site logos and cart icons to copyright text in these blocks.
How To Edit a Footer in WordPress.com
WordPress.com, the hosted version of WordPress, includes footers for many of its themes, with options to remove or modify the footers with a few clicks. The methods for editing footers in WordPress.com are somewhat similar to how it's done in the self-hosted WordPress.org version, only with a few differences.
Commencement of all, the interface doesn't await exactly the same.
You must log in to your WordPress.com dashboard and manage your footer in the Theme Customizer. Luckily, many of the themes offered for WordPress.com are similar or exactly the same equally what you'd find for WordPress.org. Nonetheless, that also means the way in which you edit the footer in WordPress.com depends on which theme you install.
To begin, go to Advent > Customize in the dashboard.
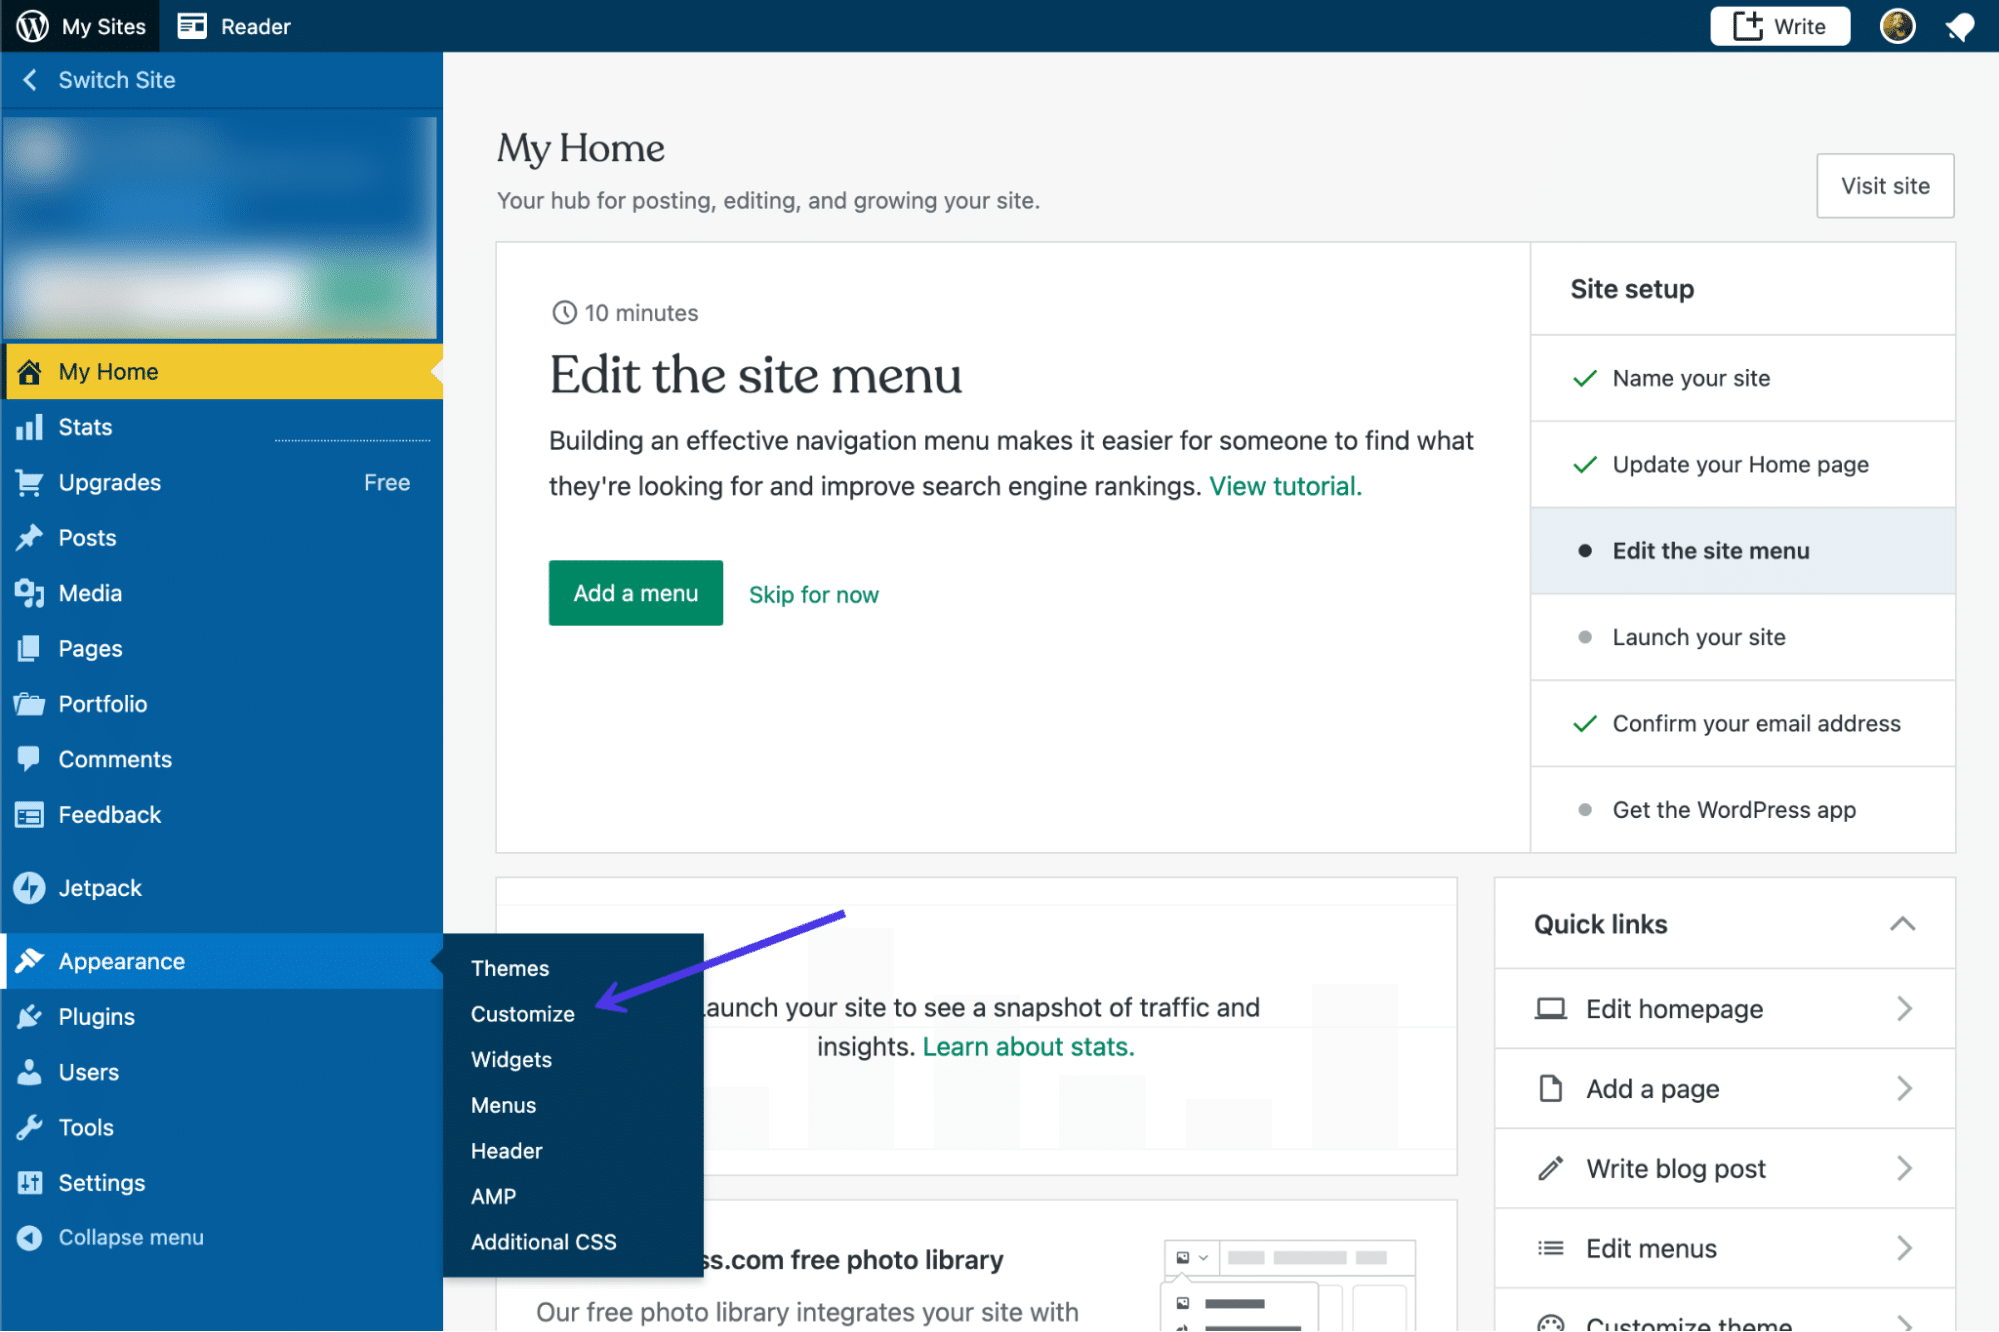
Look at the Theme Customizer tabs available for that particular theme. About themes take a Widgets tab, simply you must figure out if a footer surface area for placing widgets is provided with your theme. Click on the Widgets tabs to find out.
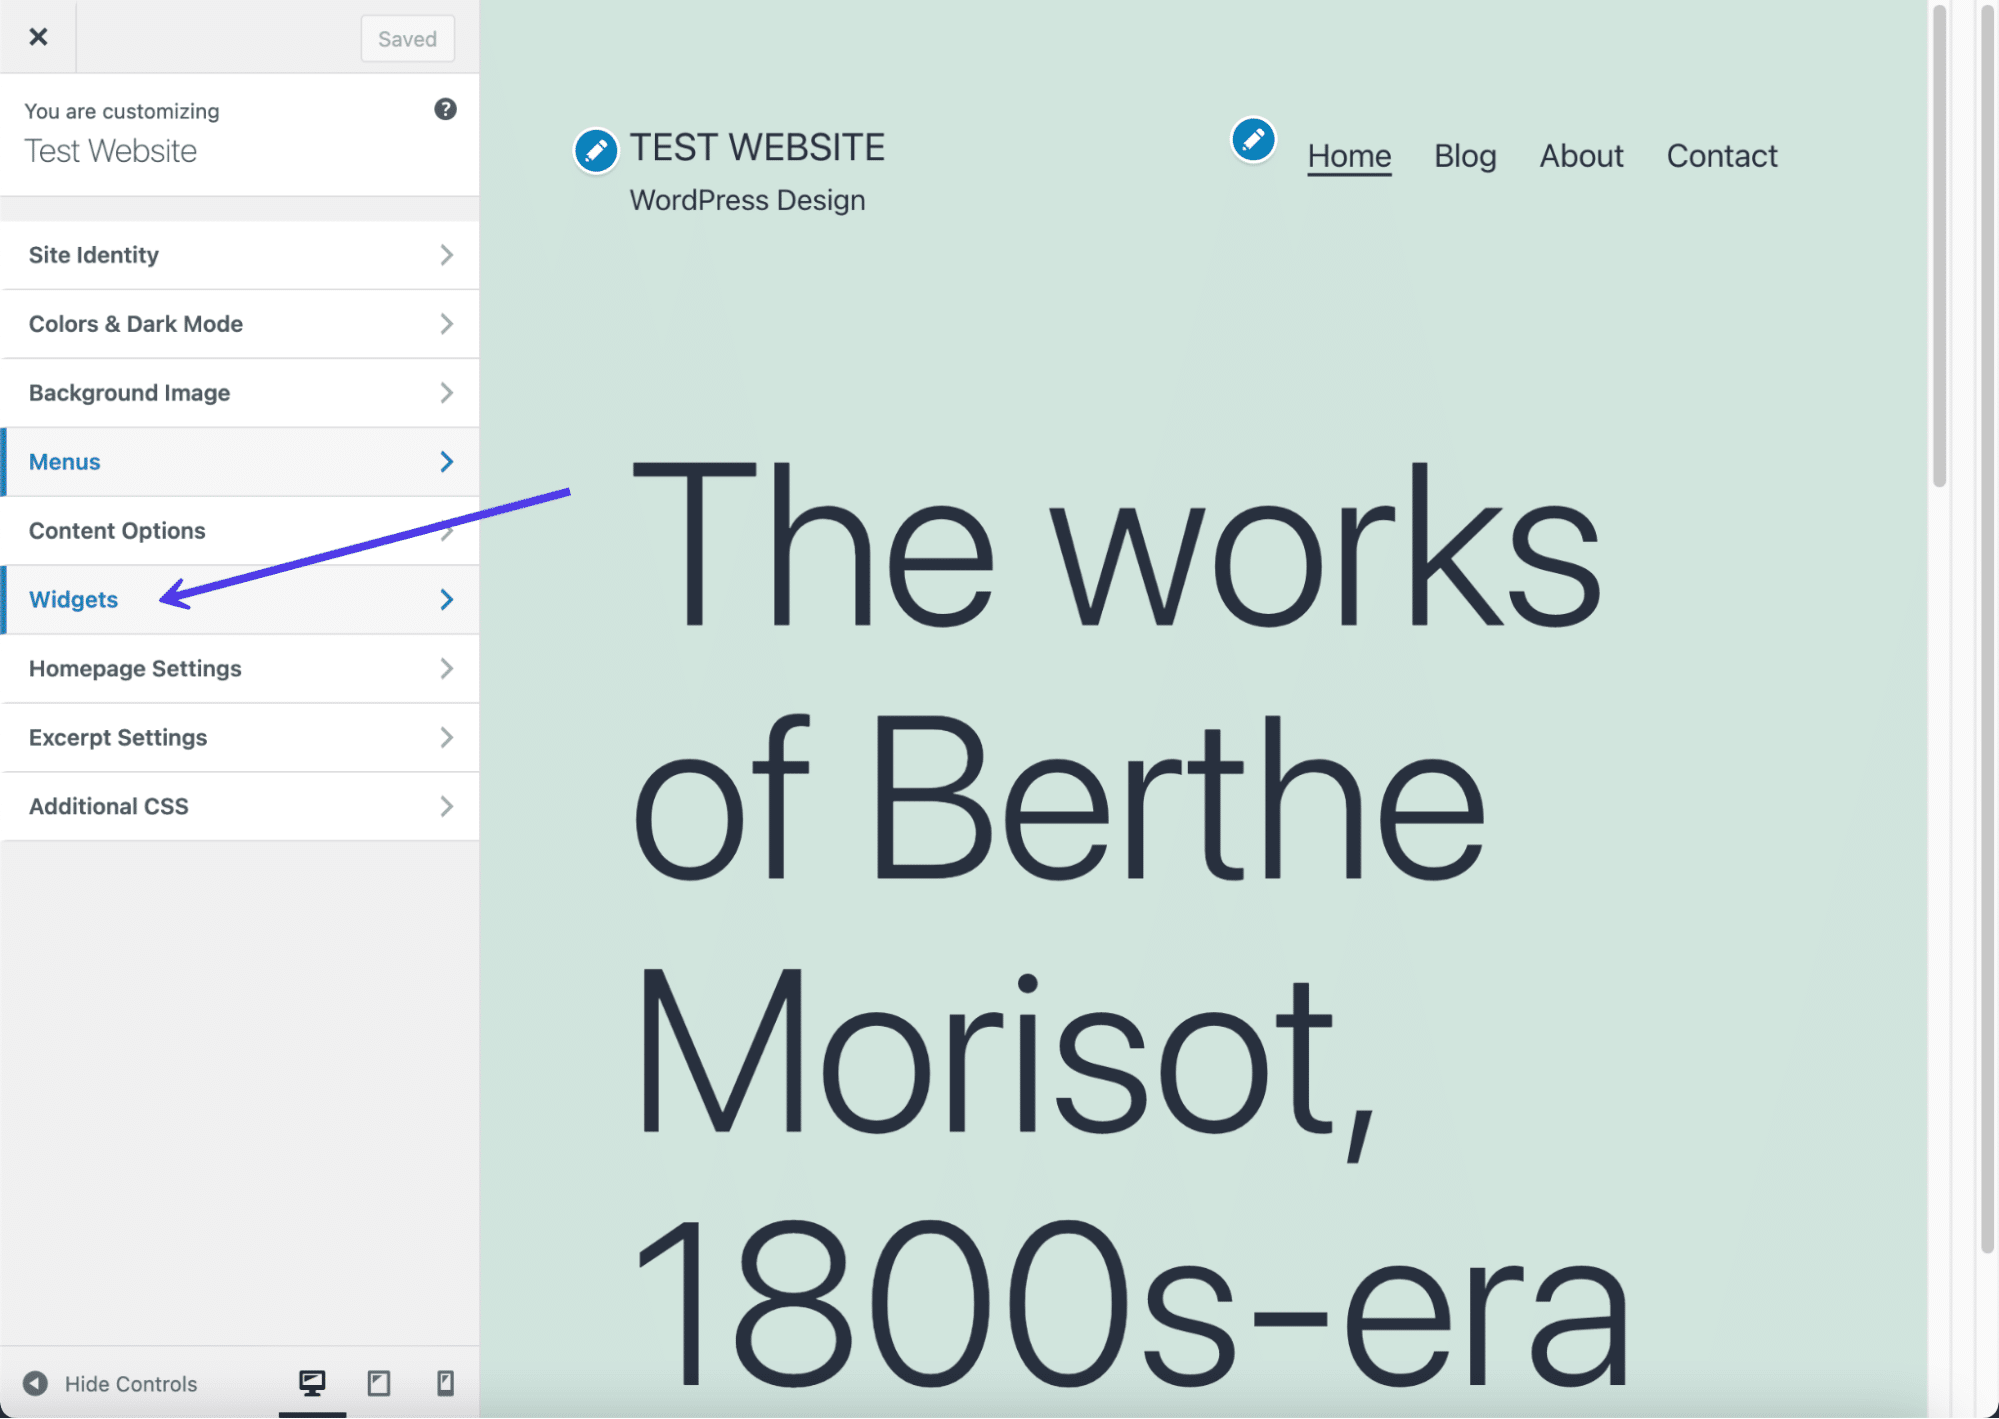
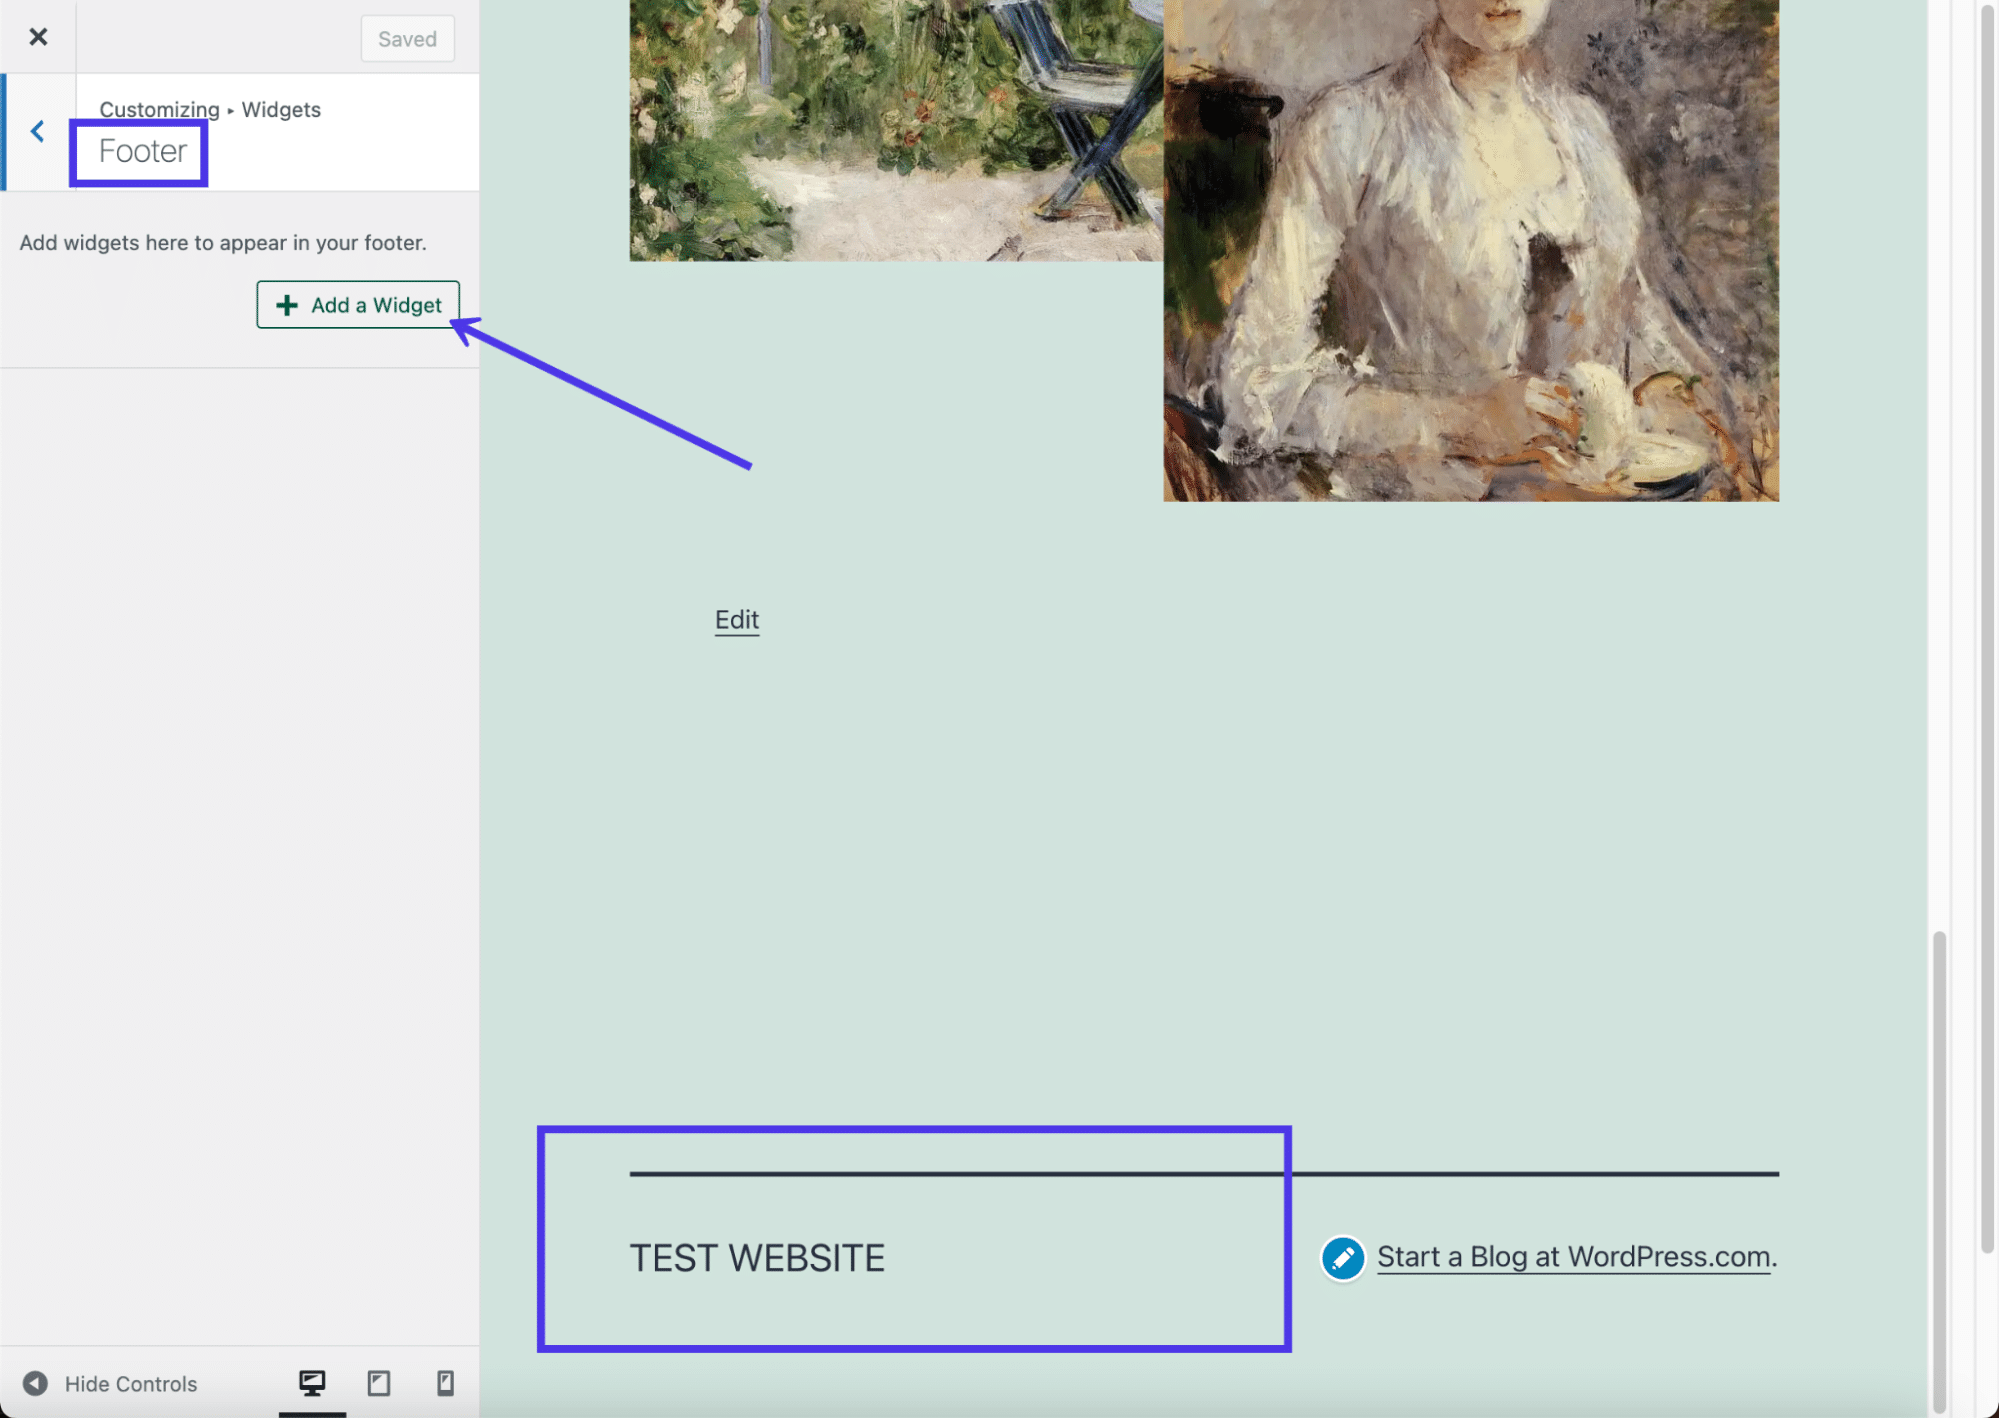
This current theme we're using provides a Footer Widget module. If you lot don't encounter an selection to put widgets in the footer, consider trying a new theme, or use menus instead of widgets.
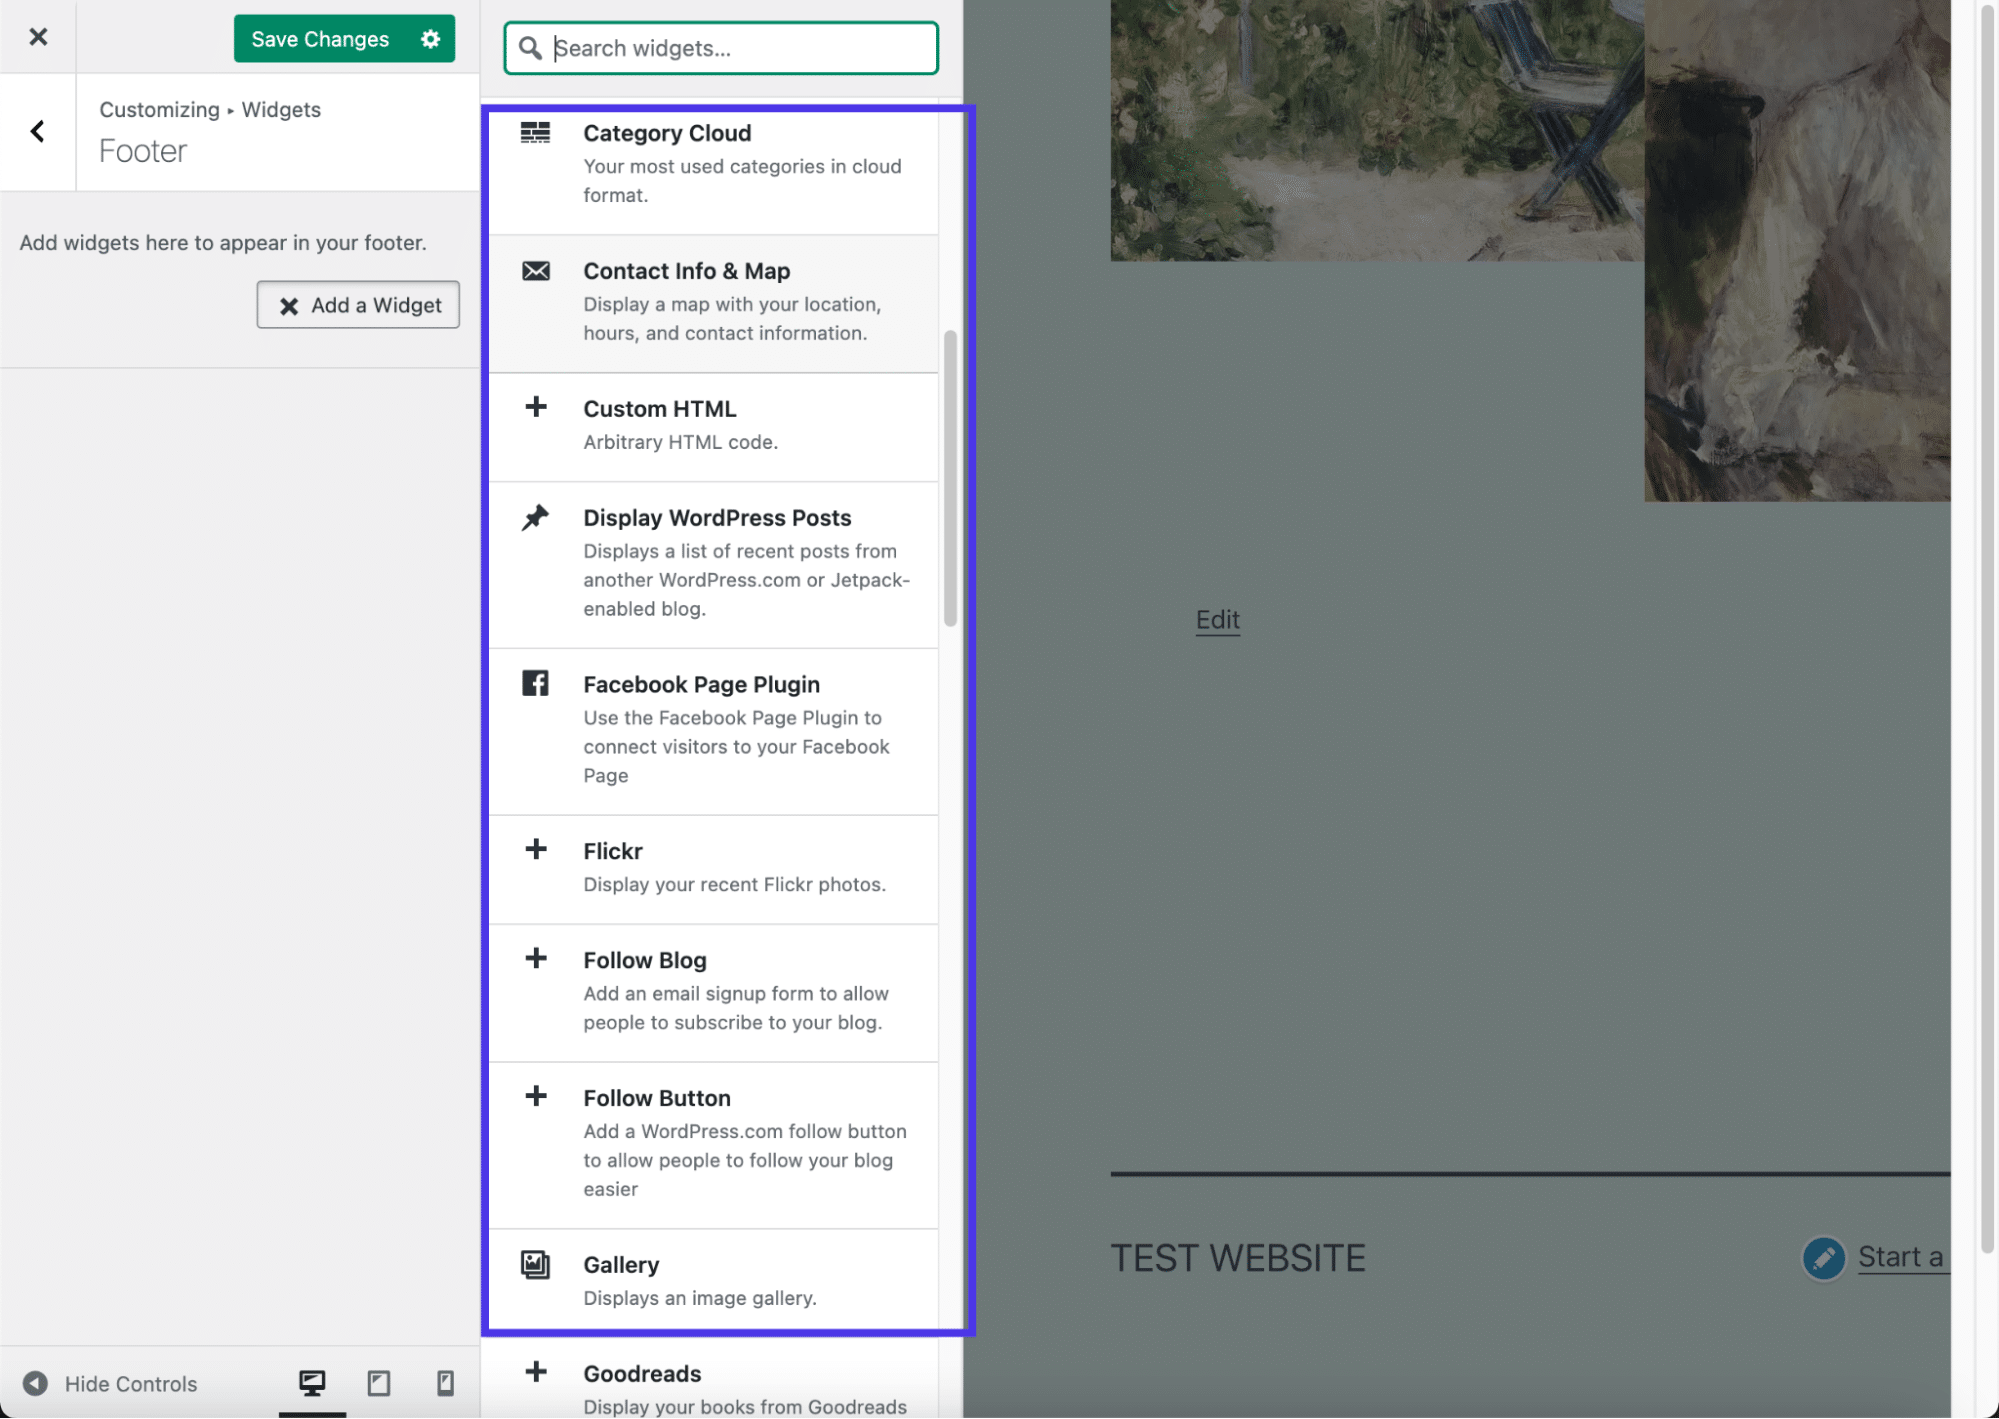
For this instance (with a footer widget area), click on the Add A Widget button.
A slideout carte appears with a collection of widgets. You lot can select whichever widgets make the most sense for your visitor.
Over again, the theme dictates how many widgets you tin fit into the footer without it looking as well cluttered. Information technology appears this particular theme allows for about three columns of widgets earlier the pattern starts looking messy.
For our example, nosotros'll cull a Contact Info and Map widget, along with a Follow Blog widget, which prompts visitors to sign upward with their e-mail addresses.
The preview on the right shows the widgets in action. We recommend going through each widget settings panel to configure individual elements like the display text and choose which fields y'all want to prove in each widget.
Make sure you click on the Save Changes push button so the widgets appear on the front end stop of your website.
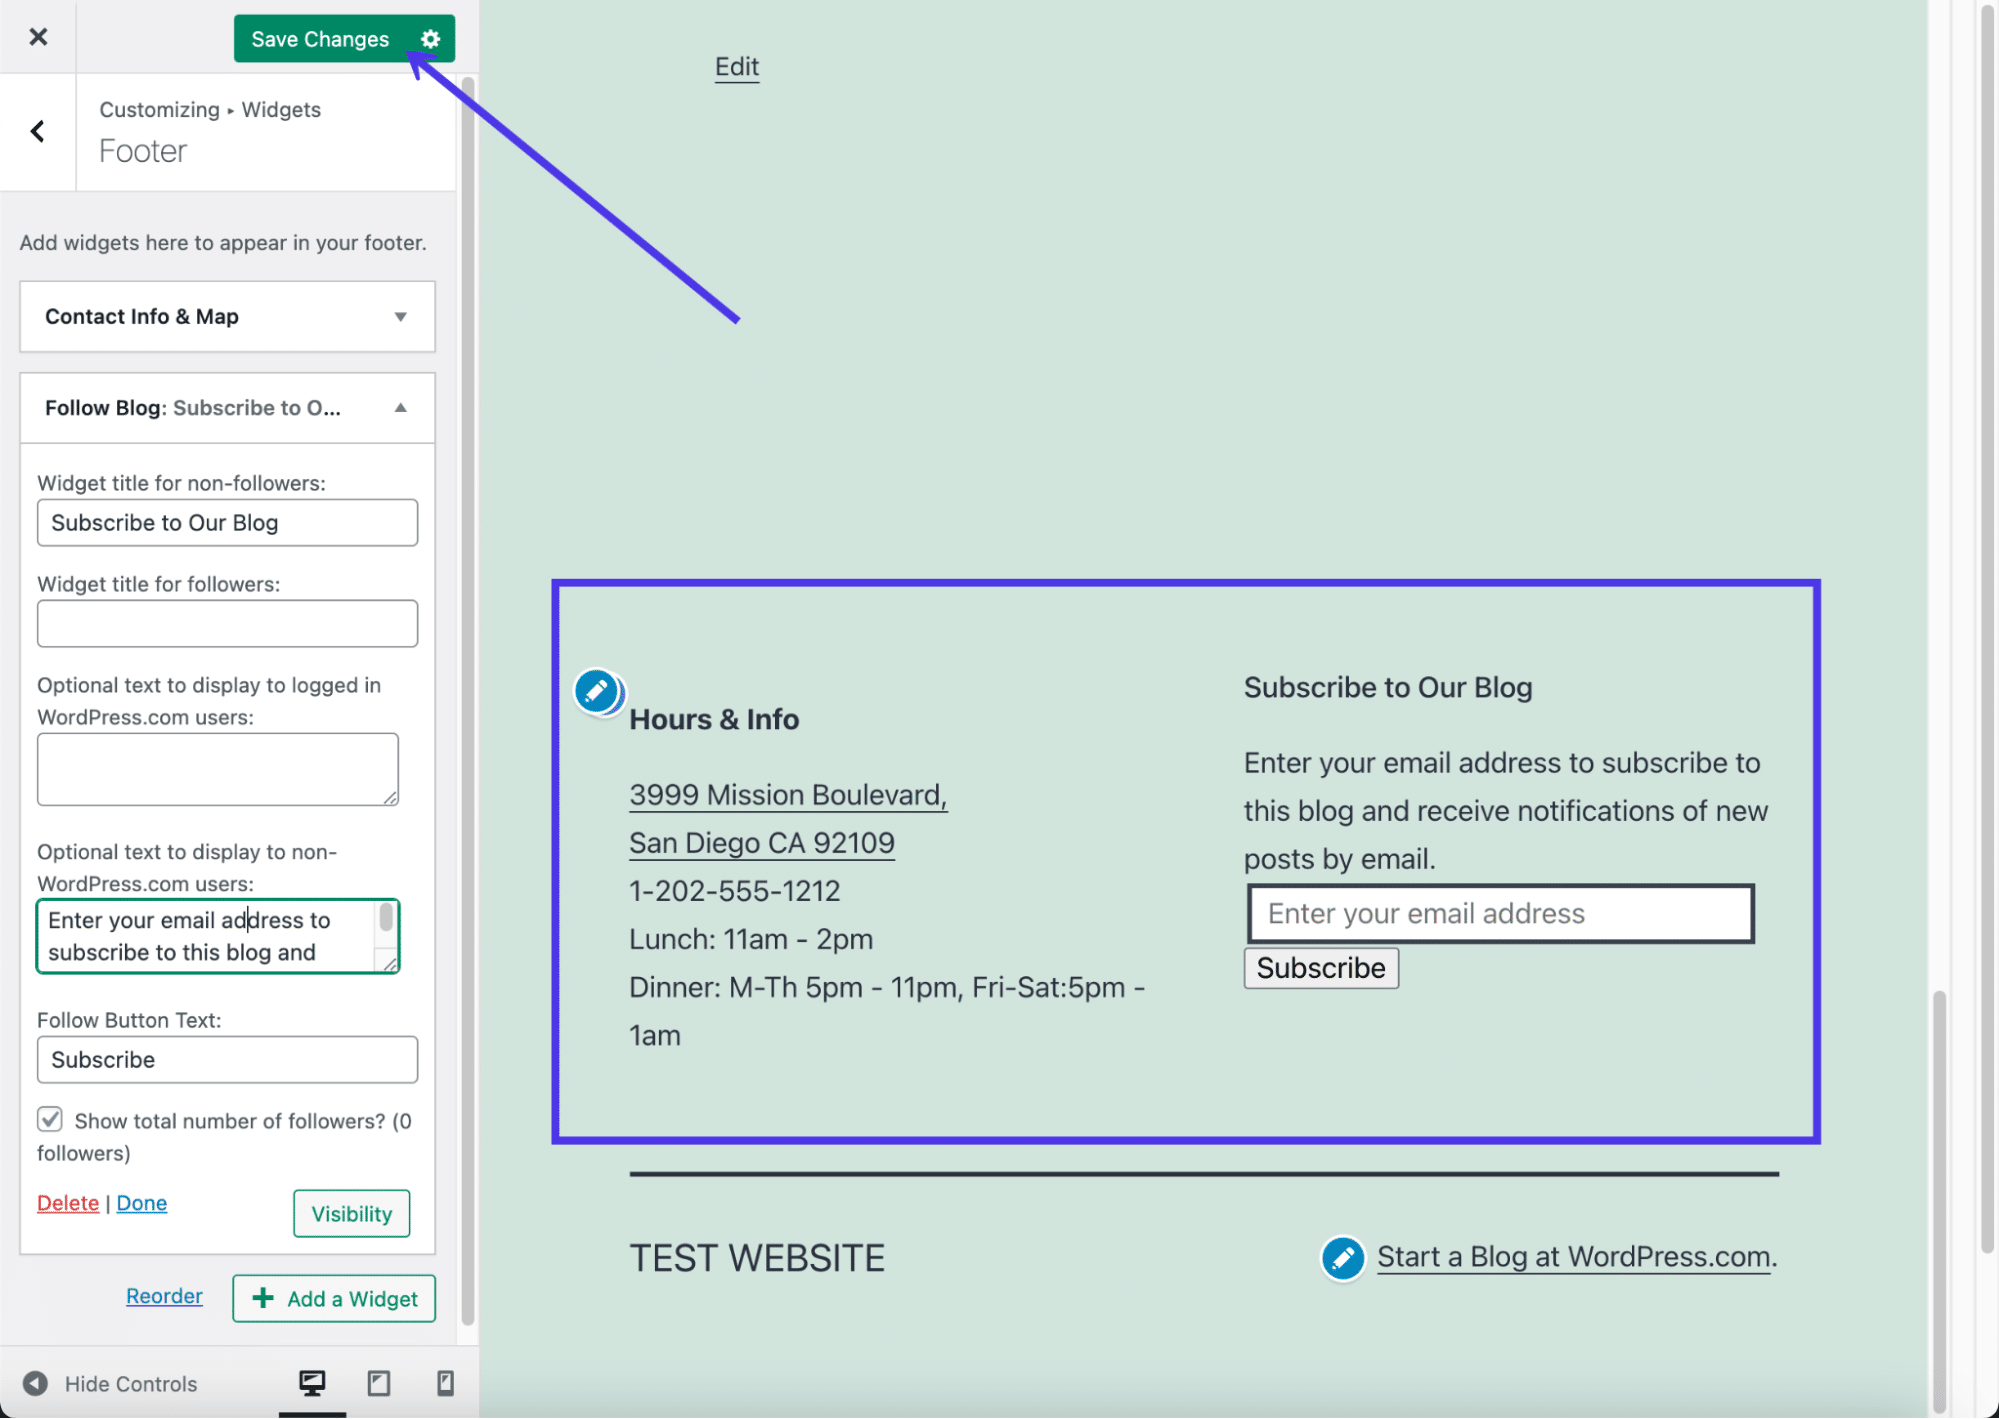
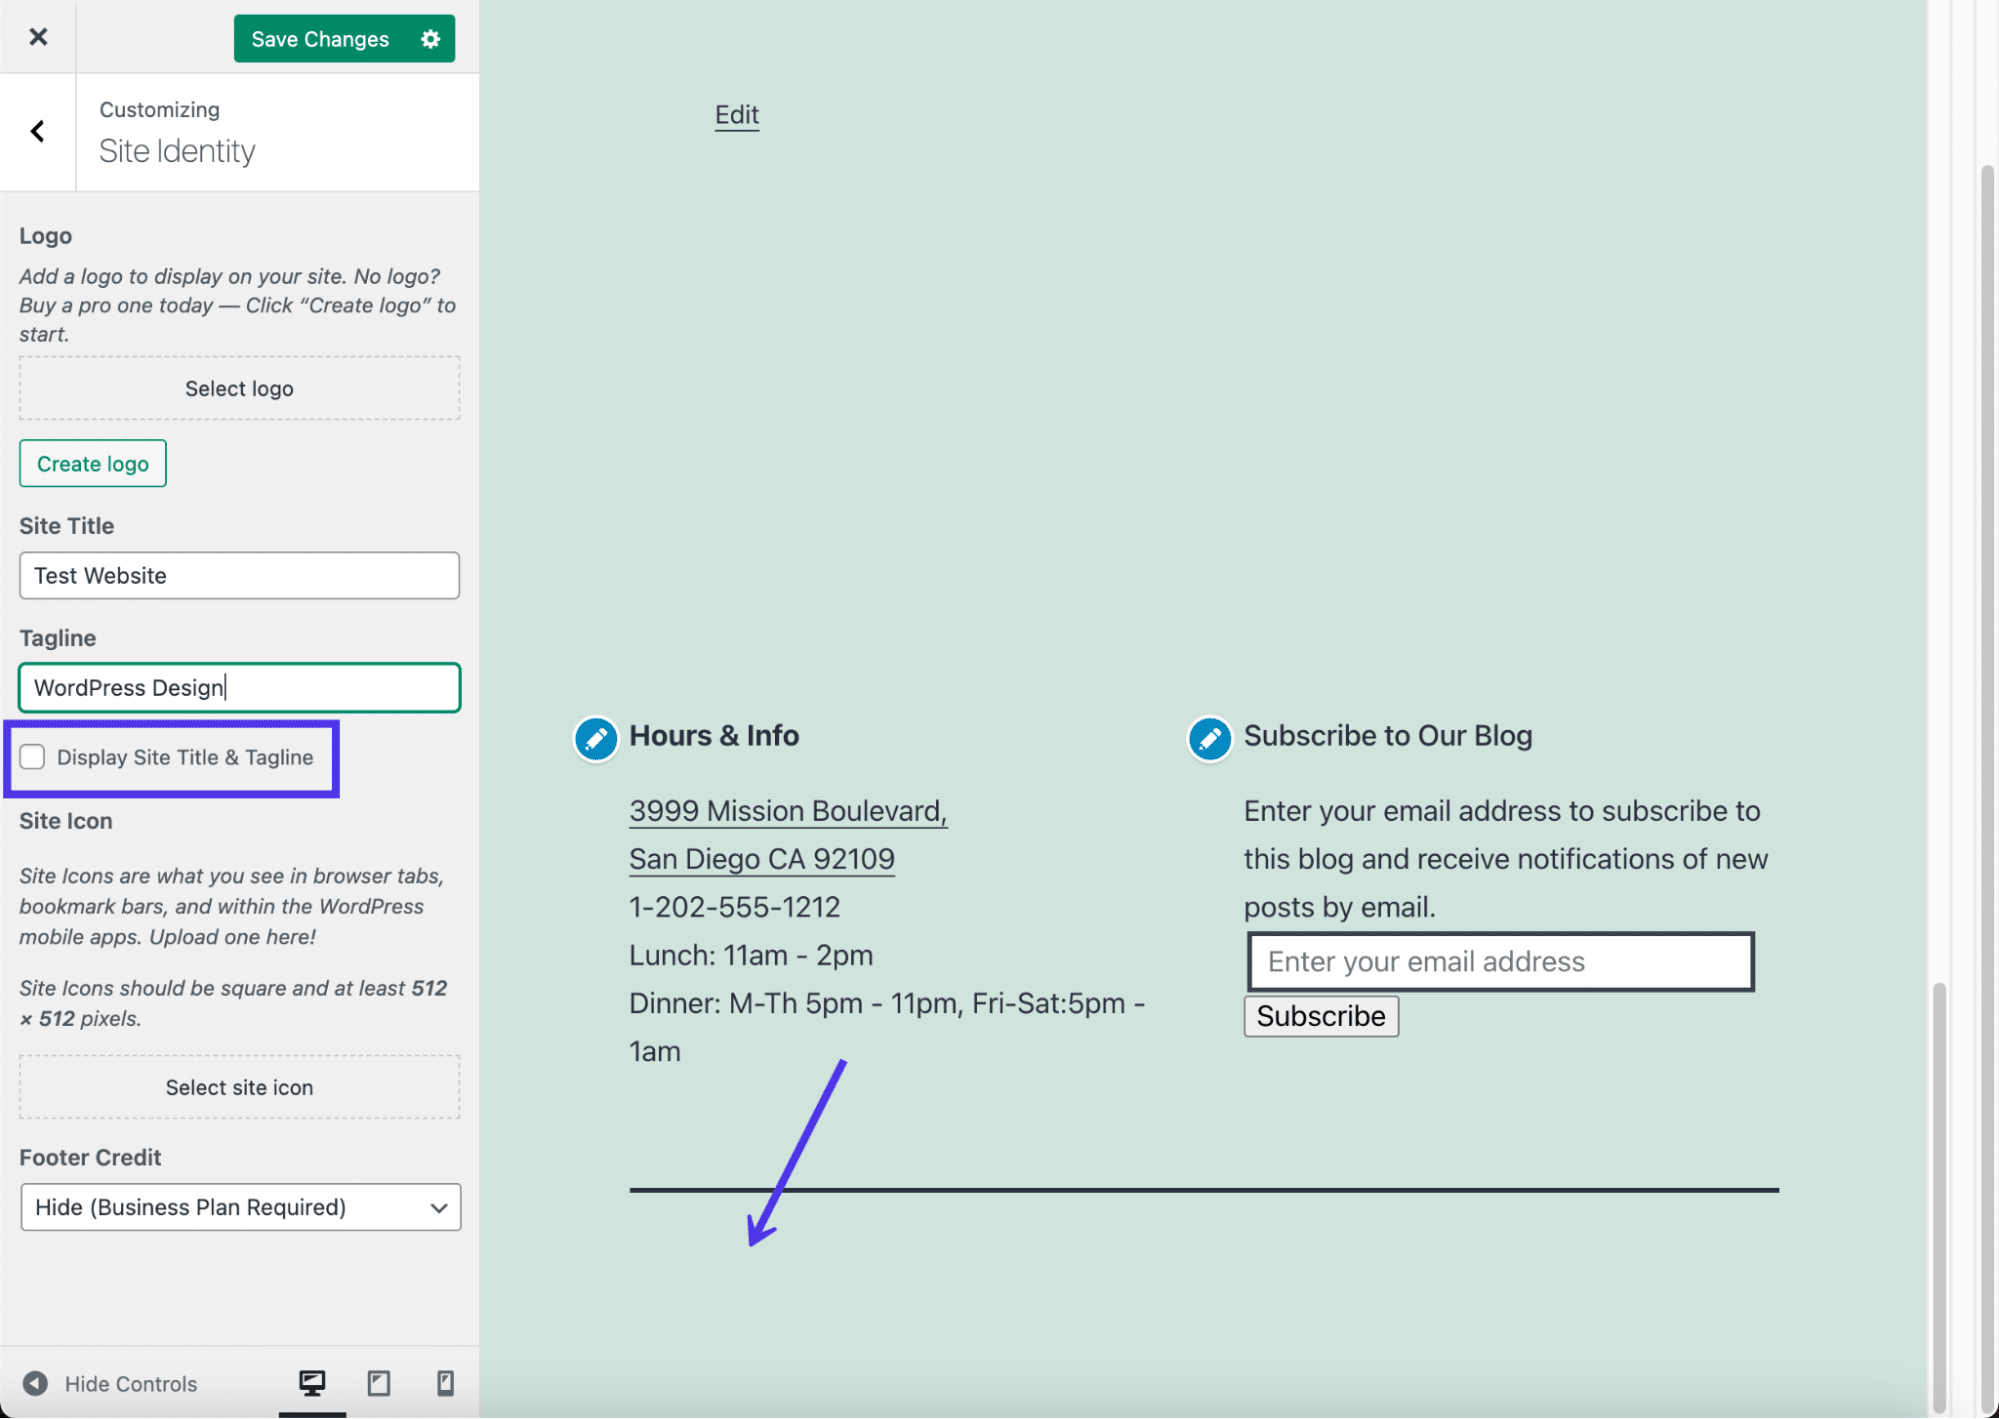
You besides may detect that WordPress.com automatically adds your site title and a WordPress credit at the very lesser of your footer. You can unremarkably get rid of the site title if you want, merely the WordPress credit removal requires you to pay for the Business Programme.
To modify both of these elements, click on the Site Identity button.
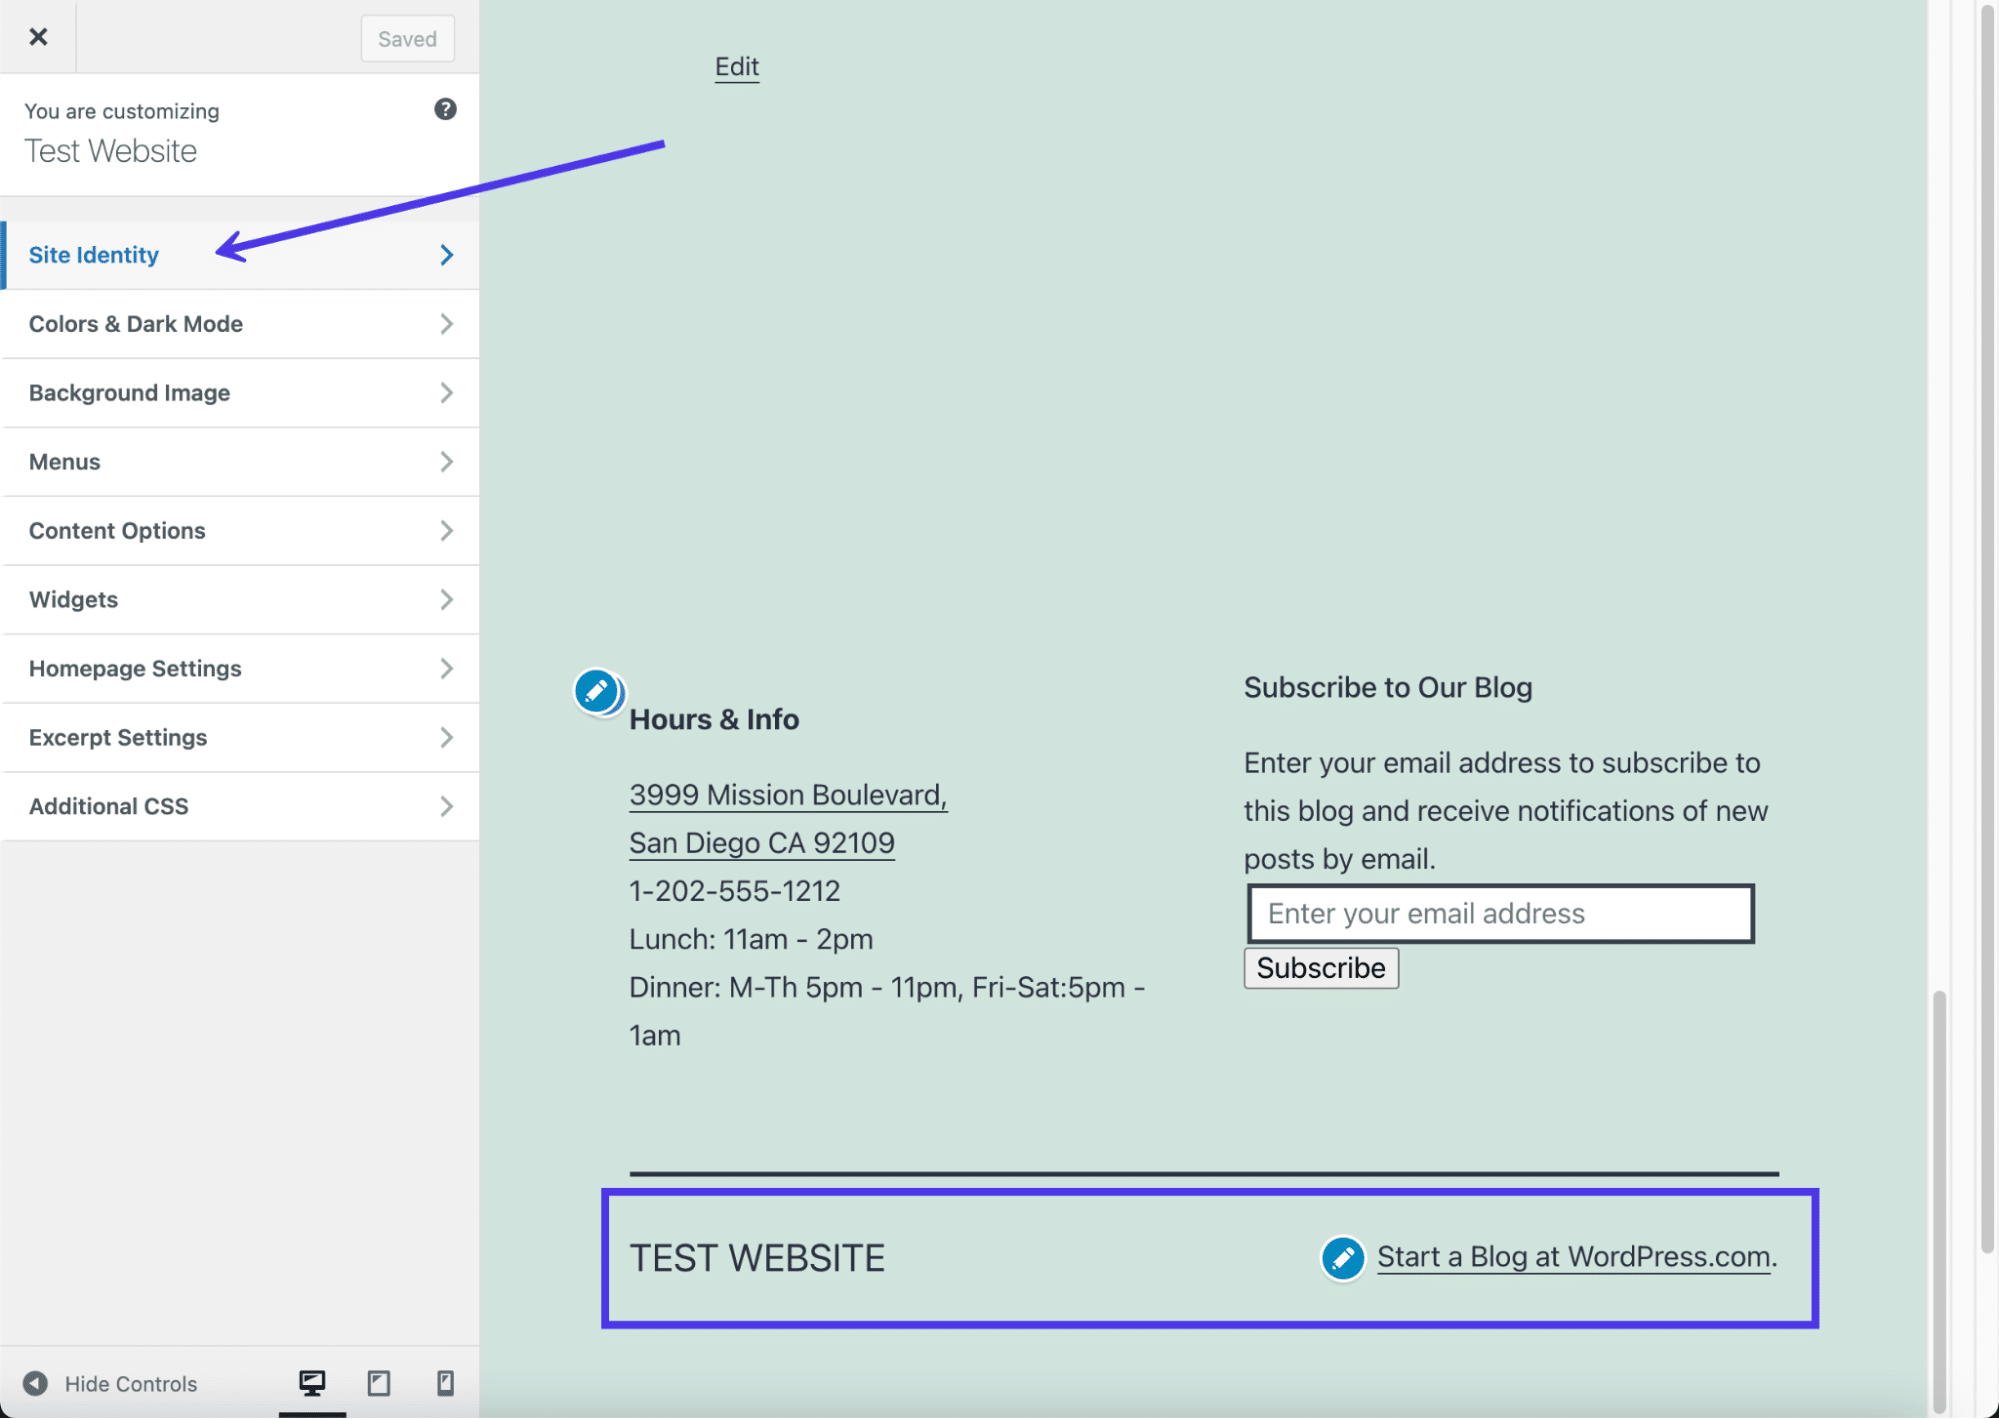
First off, get to the lesser of the settings to discover the Footer Credit field. Click that dropdown to reveal all possible options.
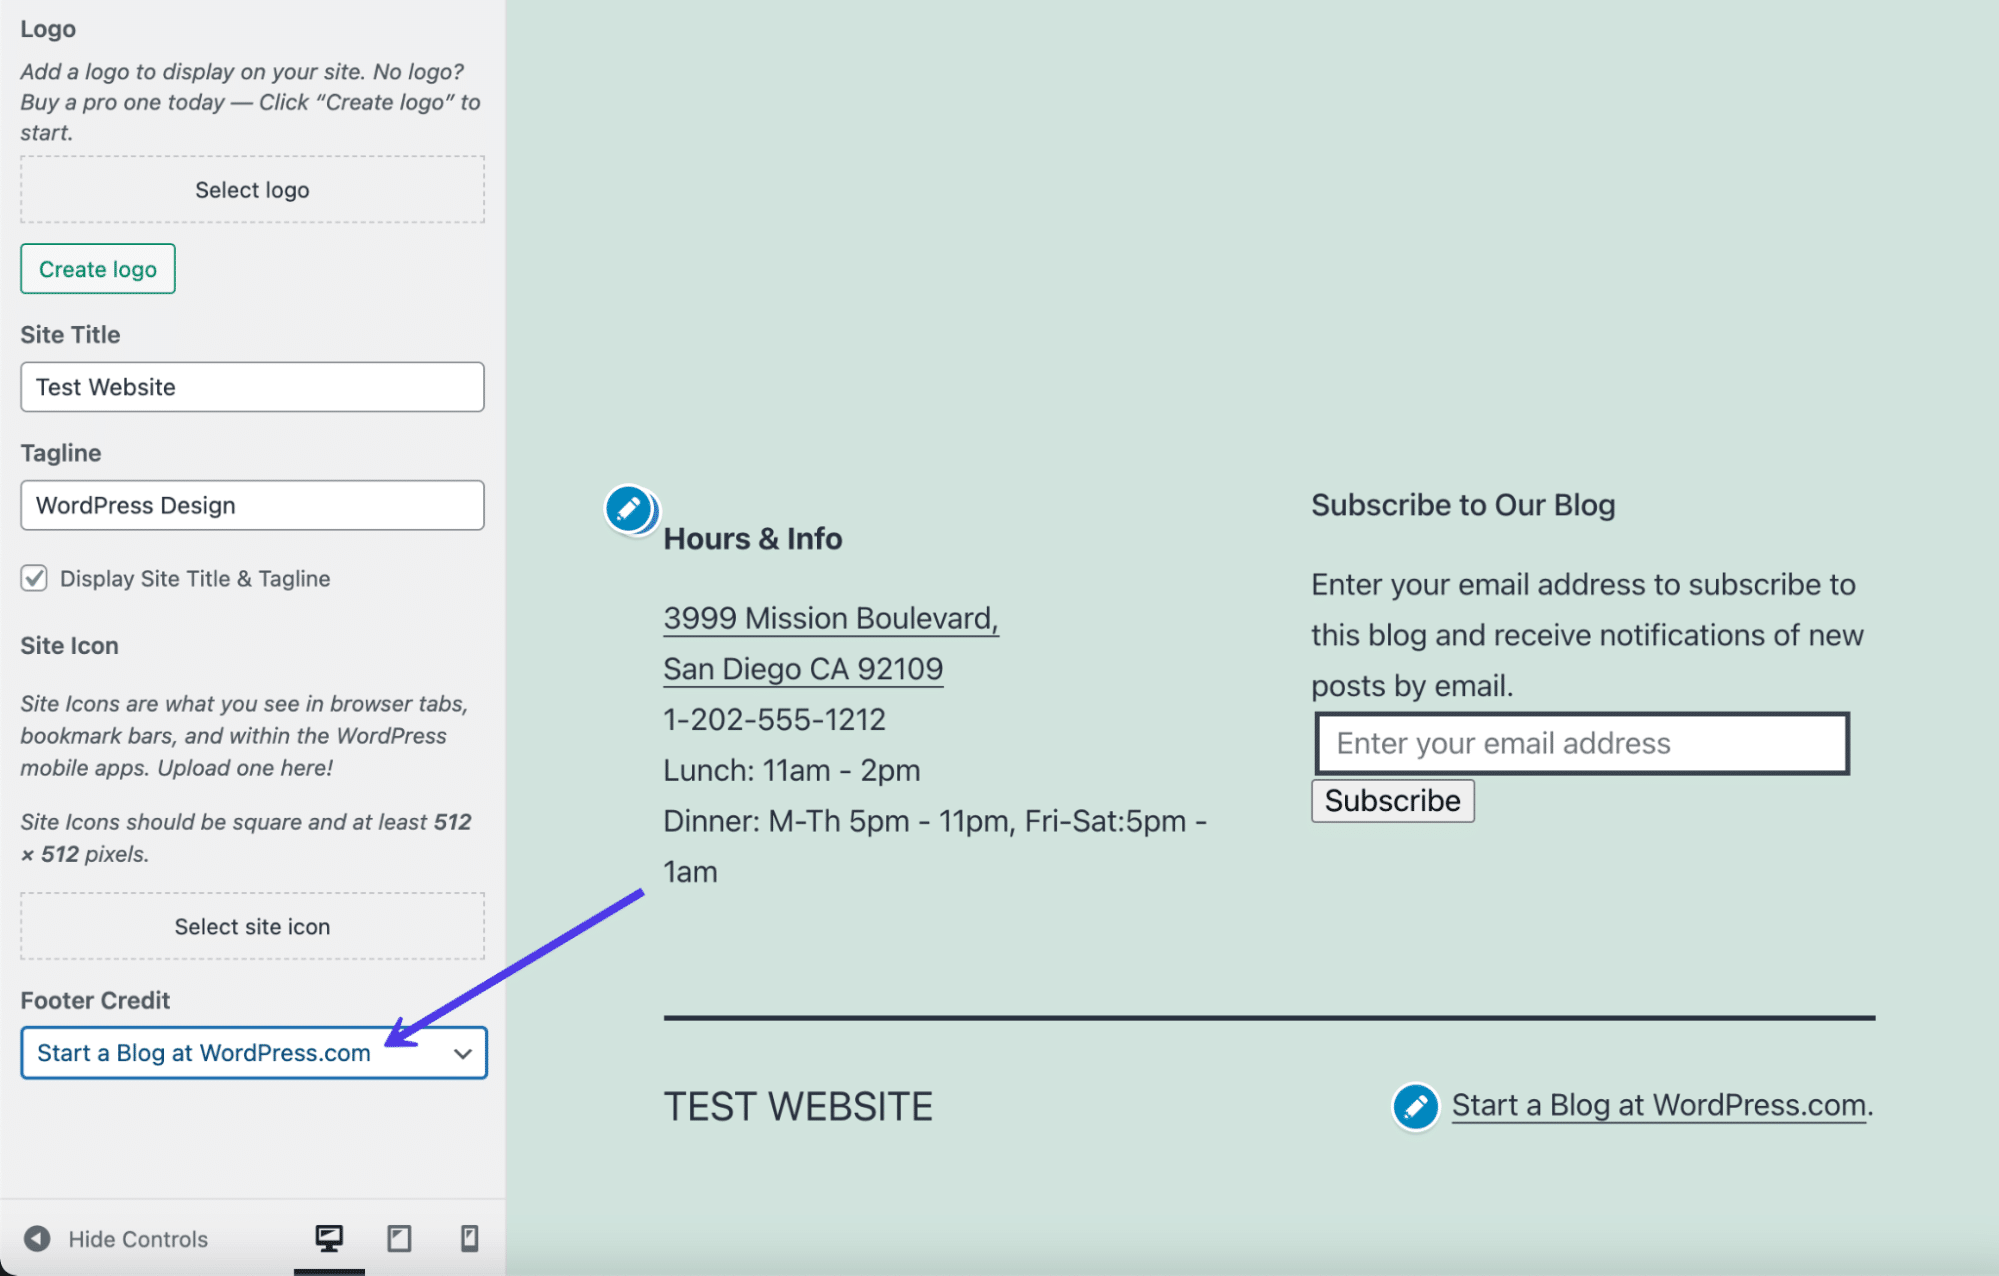
Every one of the credits has some sort of reference to WordPress. A WordPress credit isn't a big deal if you're running a personal blog or online journal, just nosotros advise you upgrade to the Business Plan and remove the credit if your site is for a legitimate business.
After that, you tin click on the dropdown menu and choose the Hide option to get rid of the credit completely.

The credit then disappears in the preview, leaving whatever widgets you lot added to the footer along with the site title.
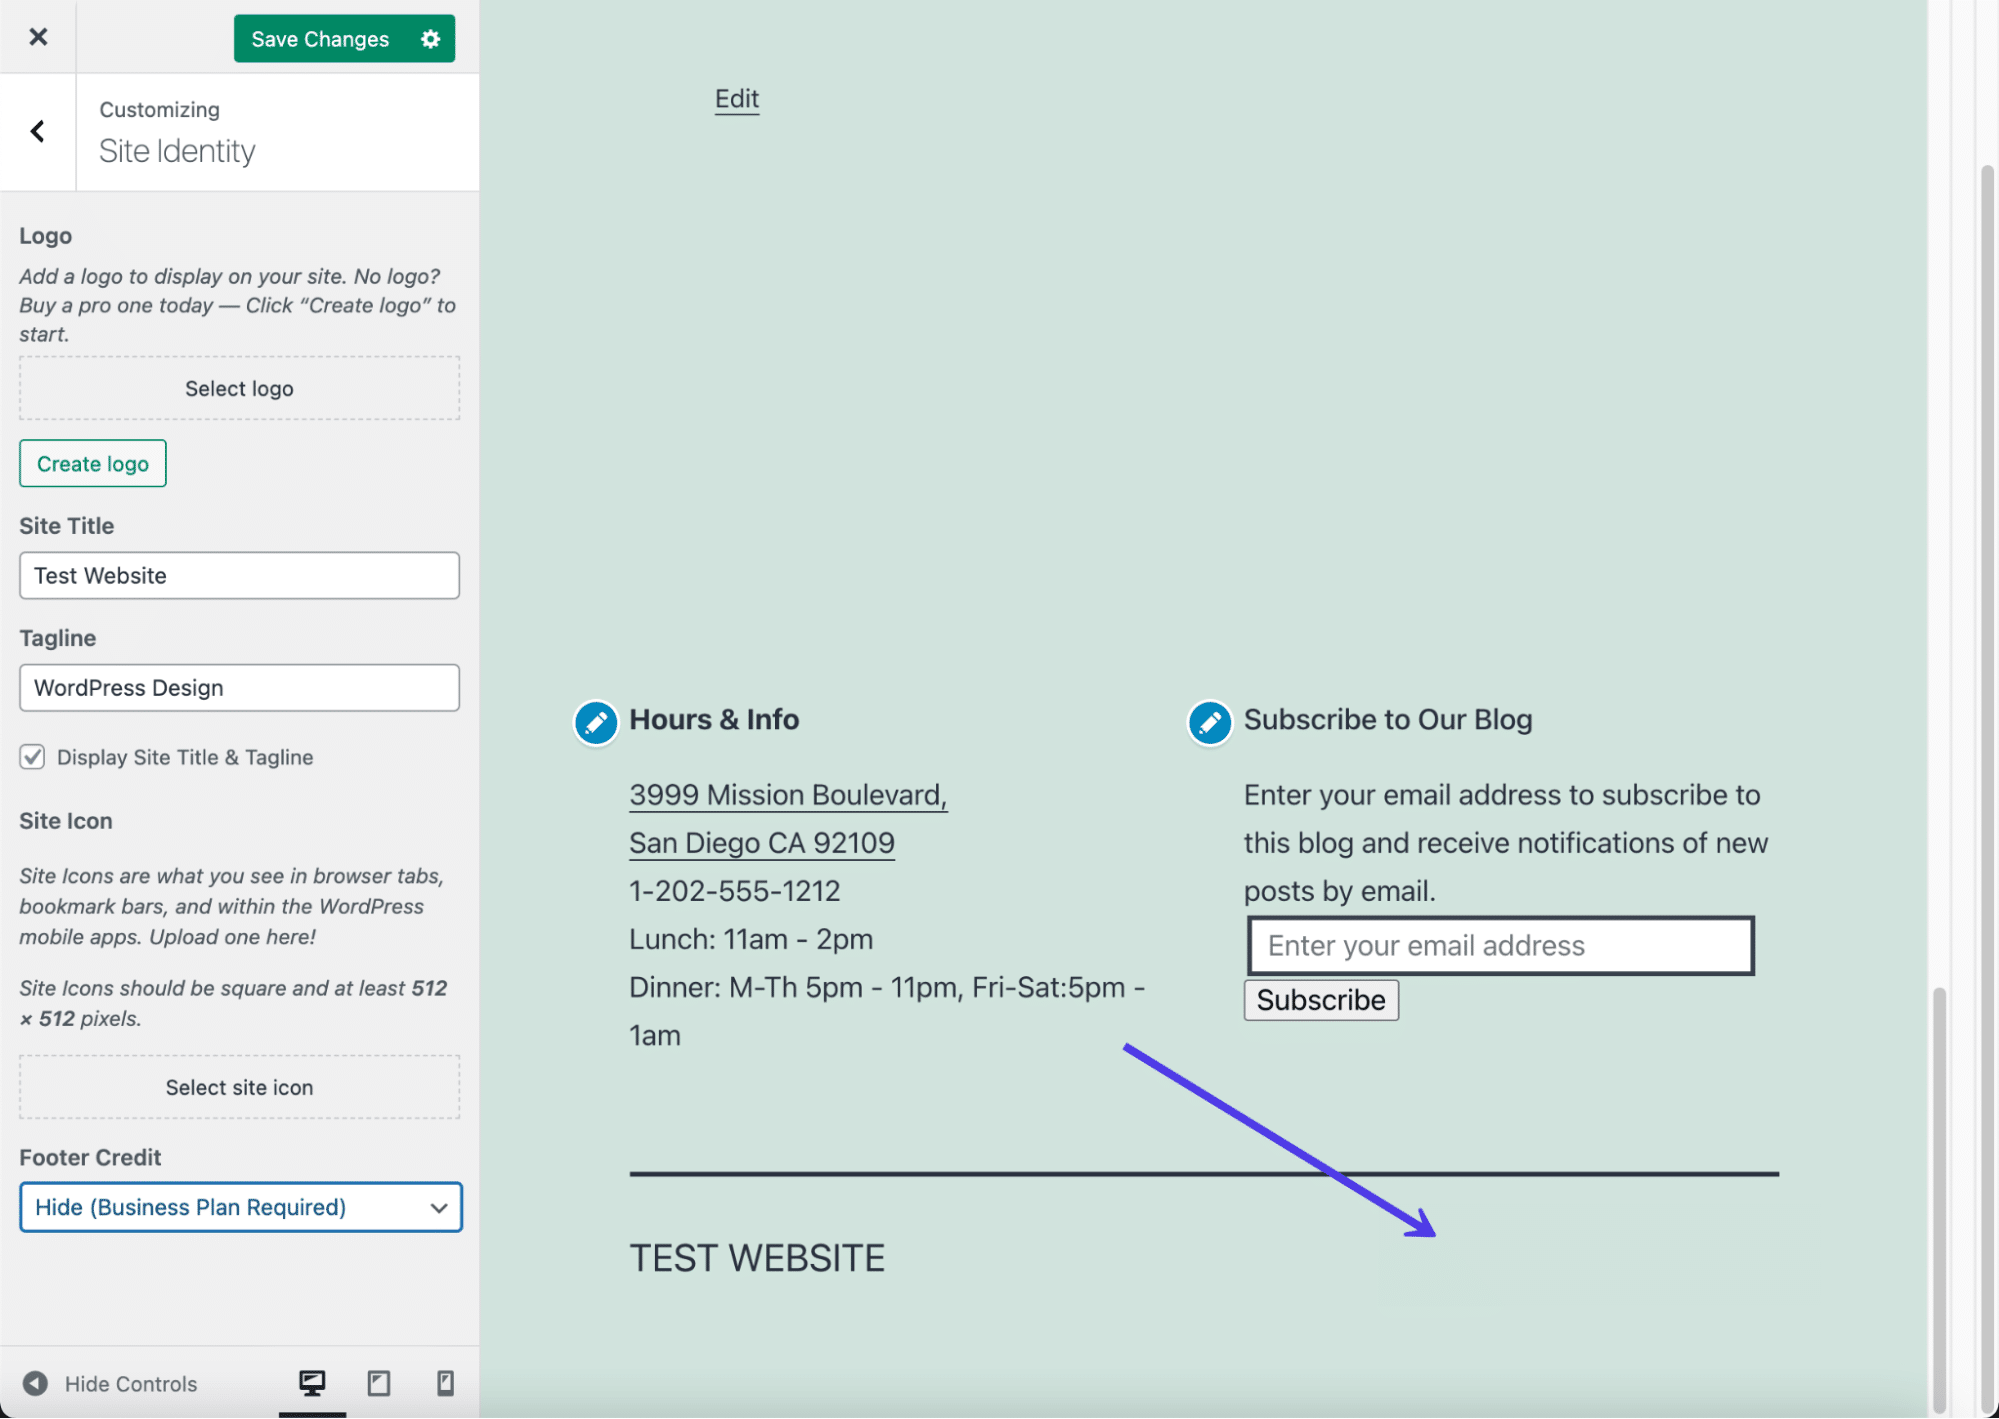
Some themes have the ability to remove the site title from the footer also. The easiest manner is to uncheck the Display Site Title and Tagline box. That gets rid of the site title in the footer and potentially the header. For the header, we recommend uploading a logo anyway.
Other themes take dissimilar ways of removing the site title and tagline. Sometimes it's not possible at all, while other times the site title isn't included in the footer, to begin with. When in dubiety, endeavor deleting what'due south within the Site Title field if yous don't take the Display Site Title and Tagline check box.
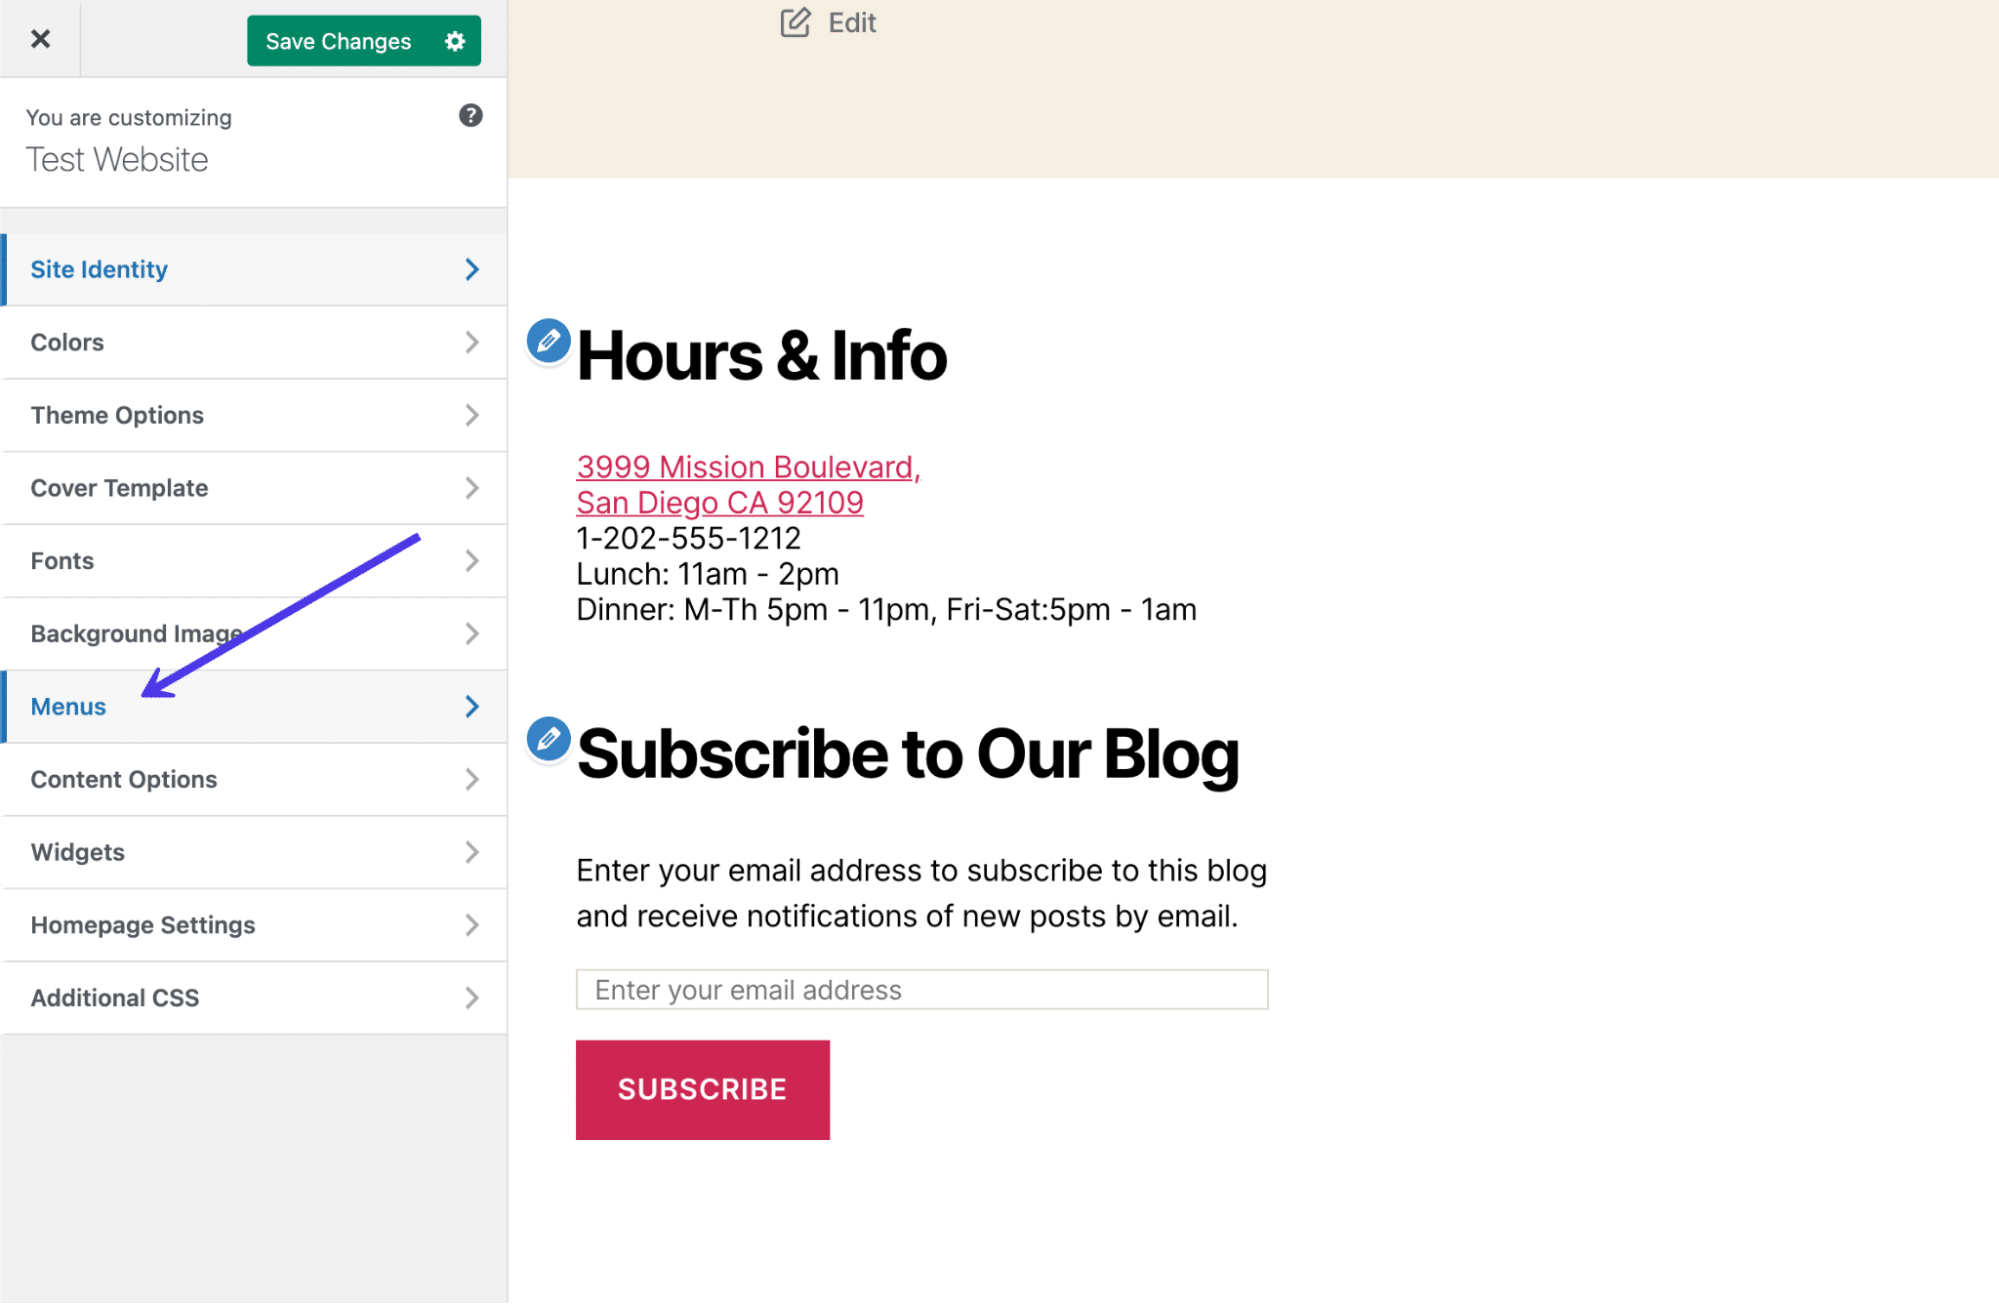
Some other fashion to insert content in your WordPress footer is past utilizing the Menus panel. Not all themes allow for menus in the footer, only it's a good idea to at least cheque.
Click on the Menus tab to proceed.
Select View All Locations. This brings up a list of where you lot're allowed to place menus in this item theme.
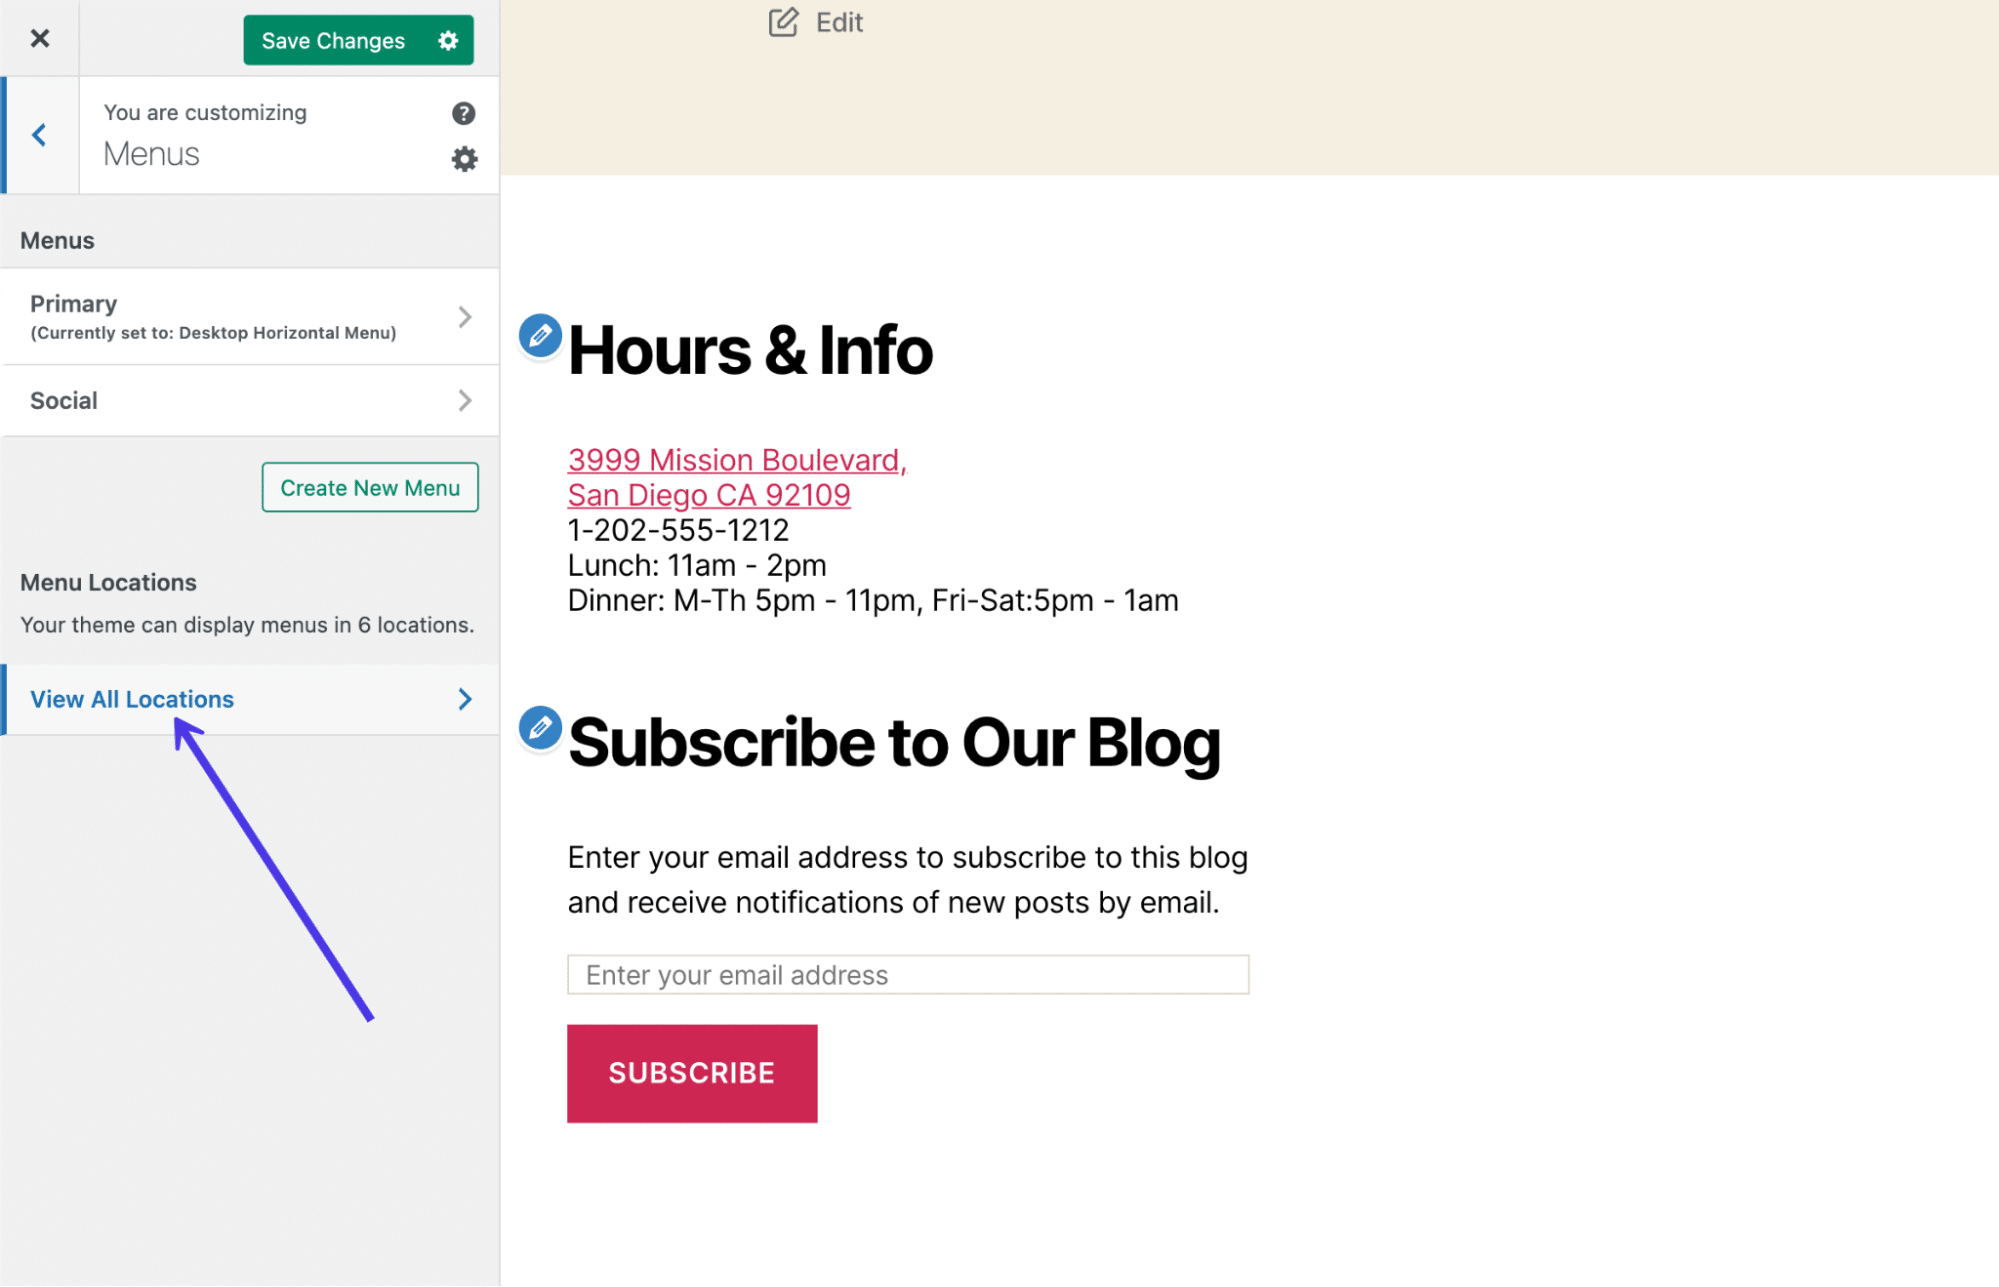
For our example theme, we accept quite a few menu location options, one of which is for the footer. You won't be so lucky with every theme you come across, then exist prepared to either swap them out or consider using the widget technique for editing your footer instead.
With themes that support footer menus, click on the Footer dropdown field.
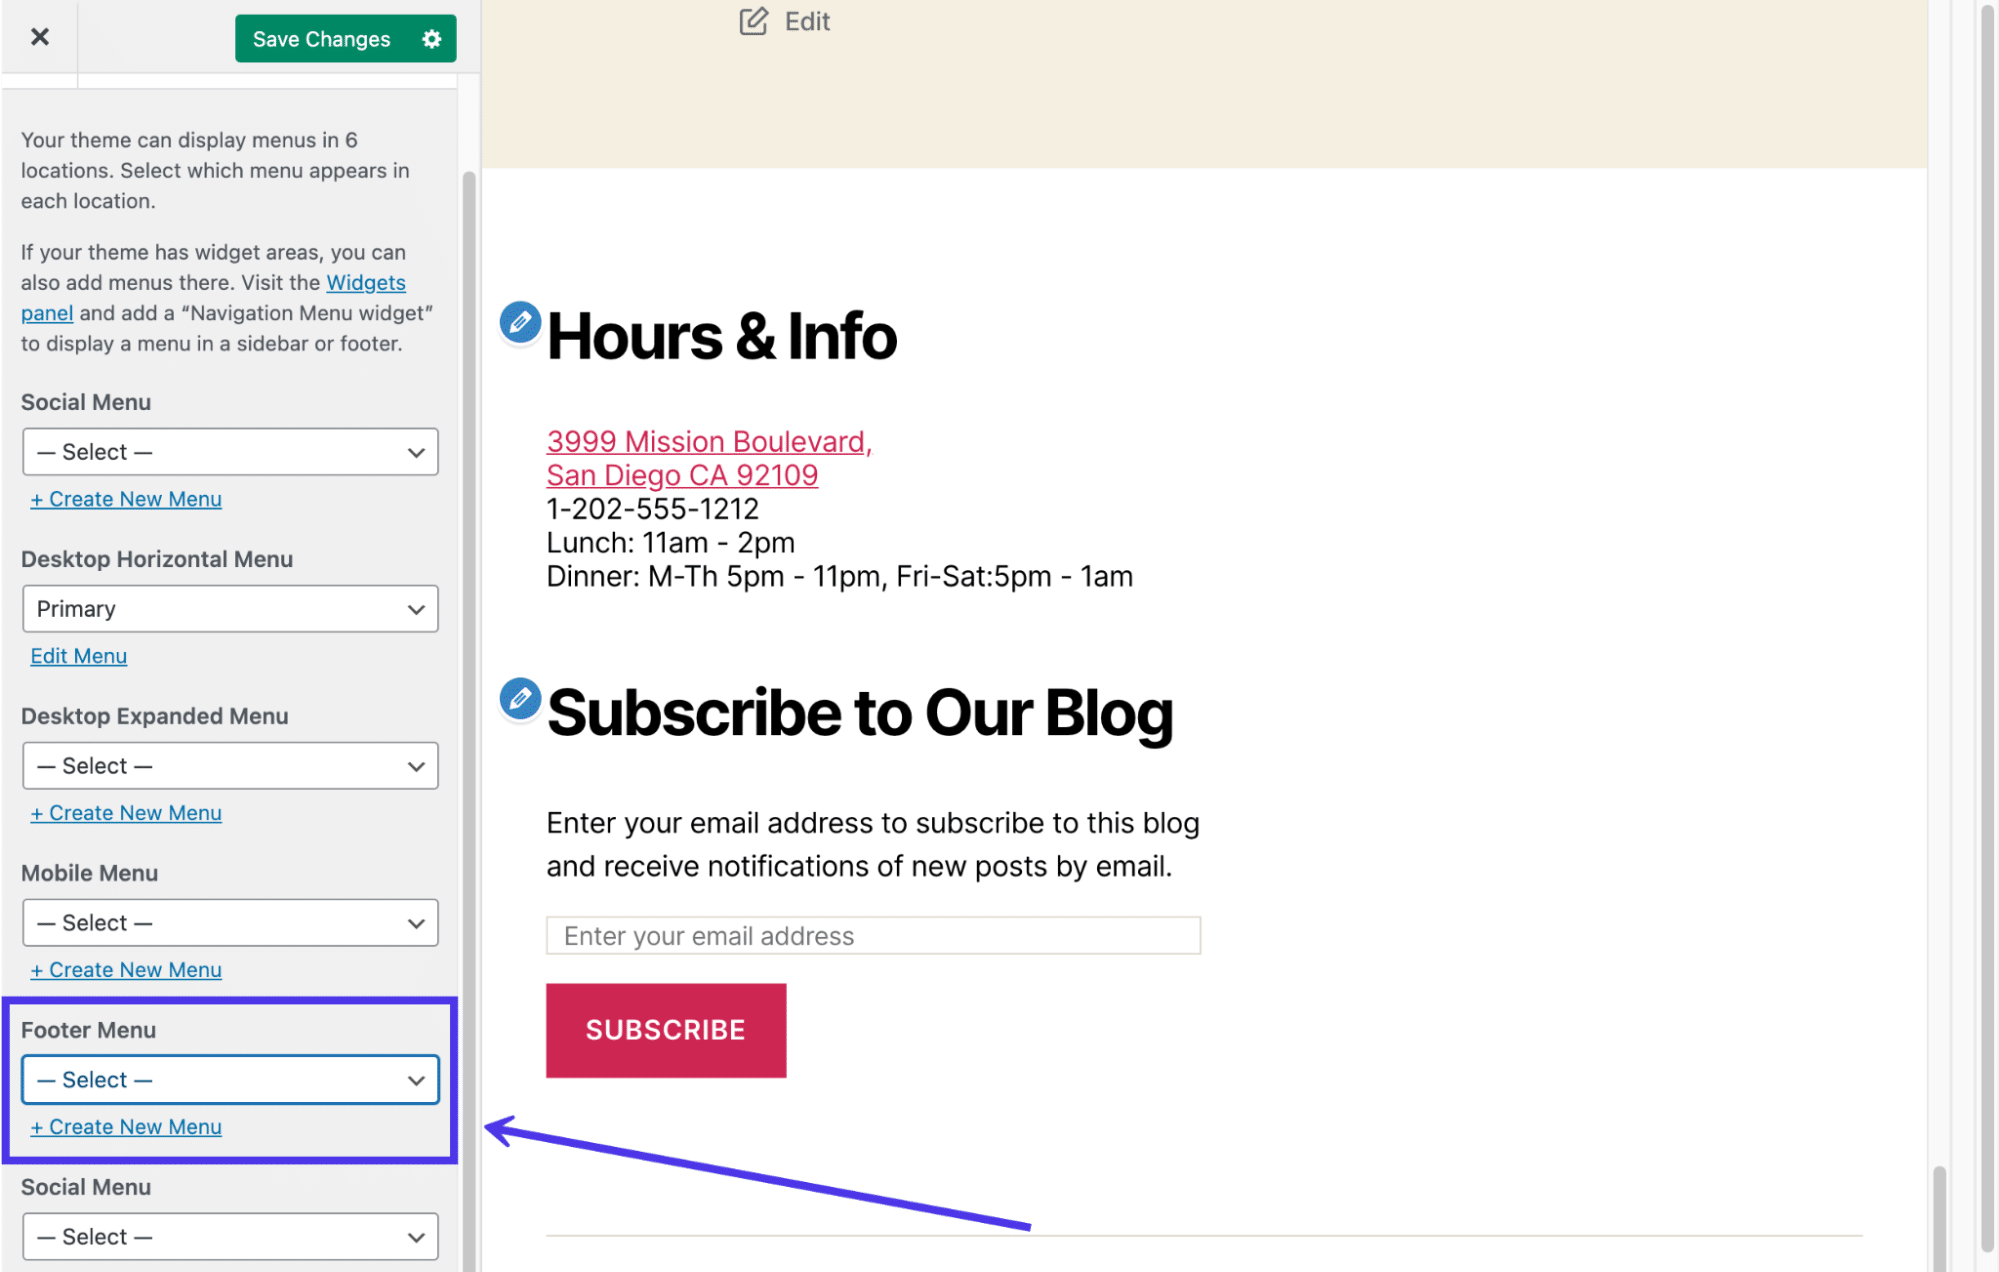
Nosotros chose a premade Social menu for the footer. Feel gratuitous to select the Create New Menu link if yous don't already have a suitable carte du jour.
The result is a simple text/link menu that appears above any widgets you already added to the footer. It's possible you're unable to add together widgets to your theme, so you may not see the exact same format.
Keep in mind that all menus are just lists of text and links, so you won't be able to incorporate something similar a social media icon card unless yous consider a separate plugin that supports that.

How To Add Social Media Icons to WordPress Footer
A mainstay of the footer area is the archetype list of social media buttons. Many websites add them in their primary menus, simply information technology'southward also a wonderful idea to have them at the bottom of your website too, or every bit an alternative to placing the social buttons at the tiptop of your site. In general, if you feel the header is already cluttered, go for footer placement instead.
Quite a few plugins provide widgets to add together social media icons and links to your footer and header. Therefore, we suggest straying away from any custom coding here.
Although many social icon plugins exist, the goal for our purposes is to find one that specifically provides a quick widget for calculation your links and customizing the buttons.
A popular, highly-rated solution is called Social Icons Widget & Cake by WPZoom. It has over 400 icons for social media and other platforms, forth with a widget to place your icons directly into your footer. Not merely that, but yous tin can upload your own custom icons and switch settings for colors and sizes.
After installing the plugin, you tin go to the Settings page and disable certain font packages if you lot don't desire them. However, all of them are already active, then skip the settings if you'd rather take everything available to yous.
To add social icons to your WordPress footer, get to Appearance > Customize.
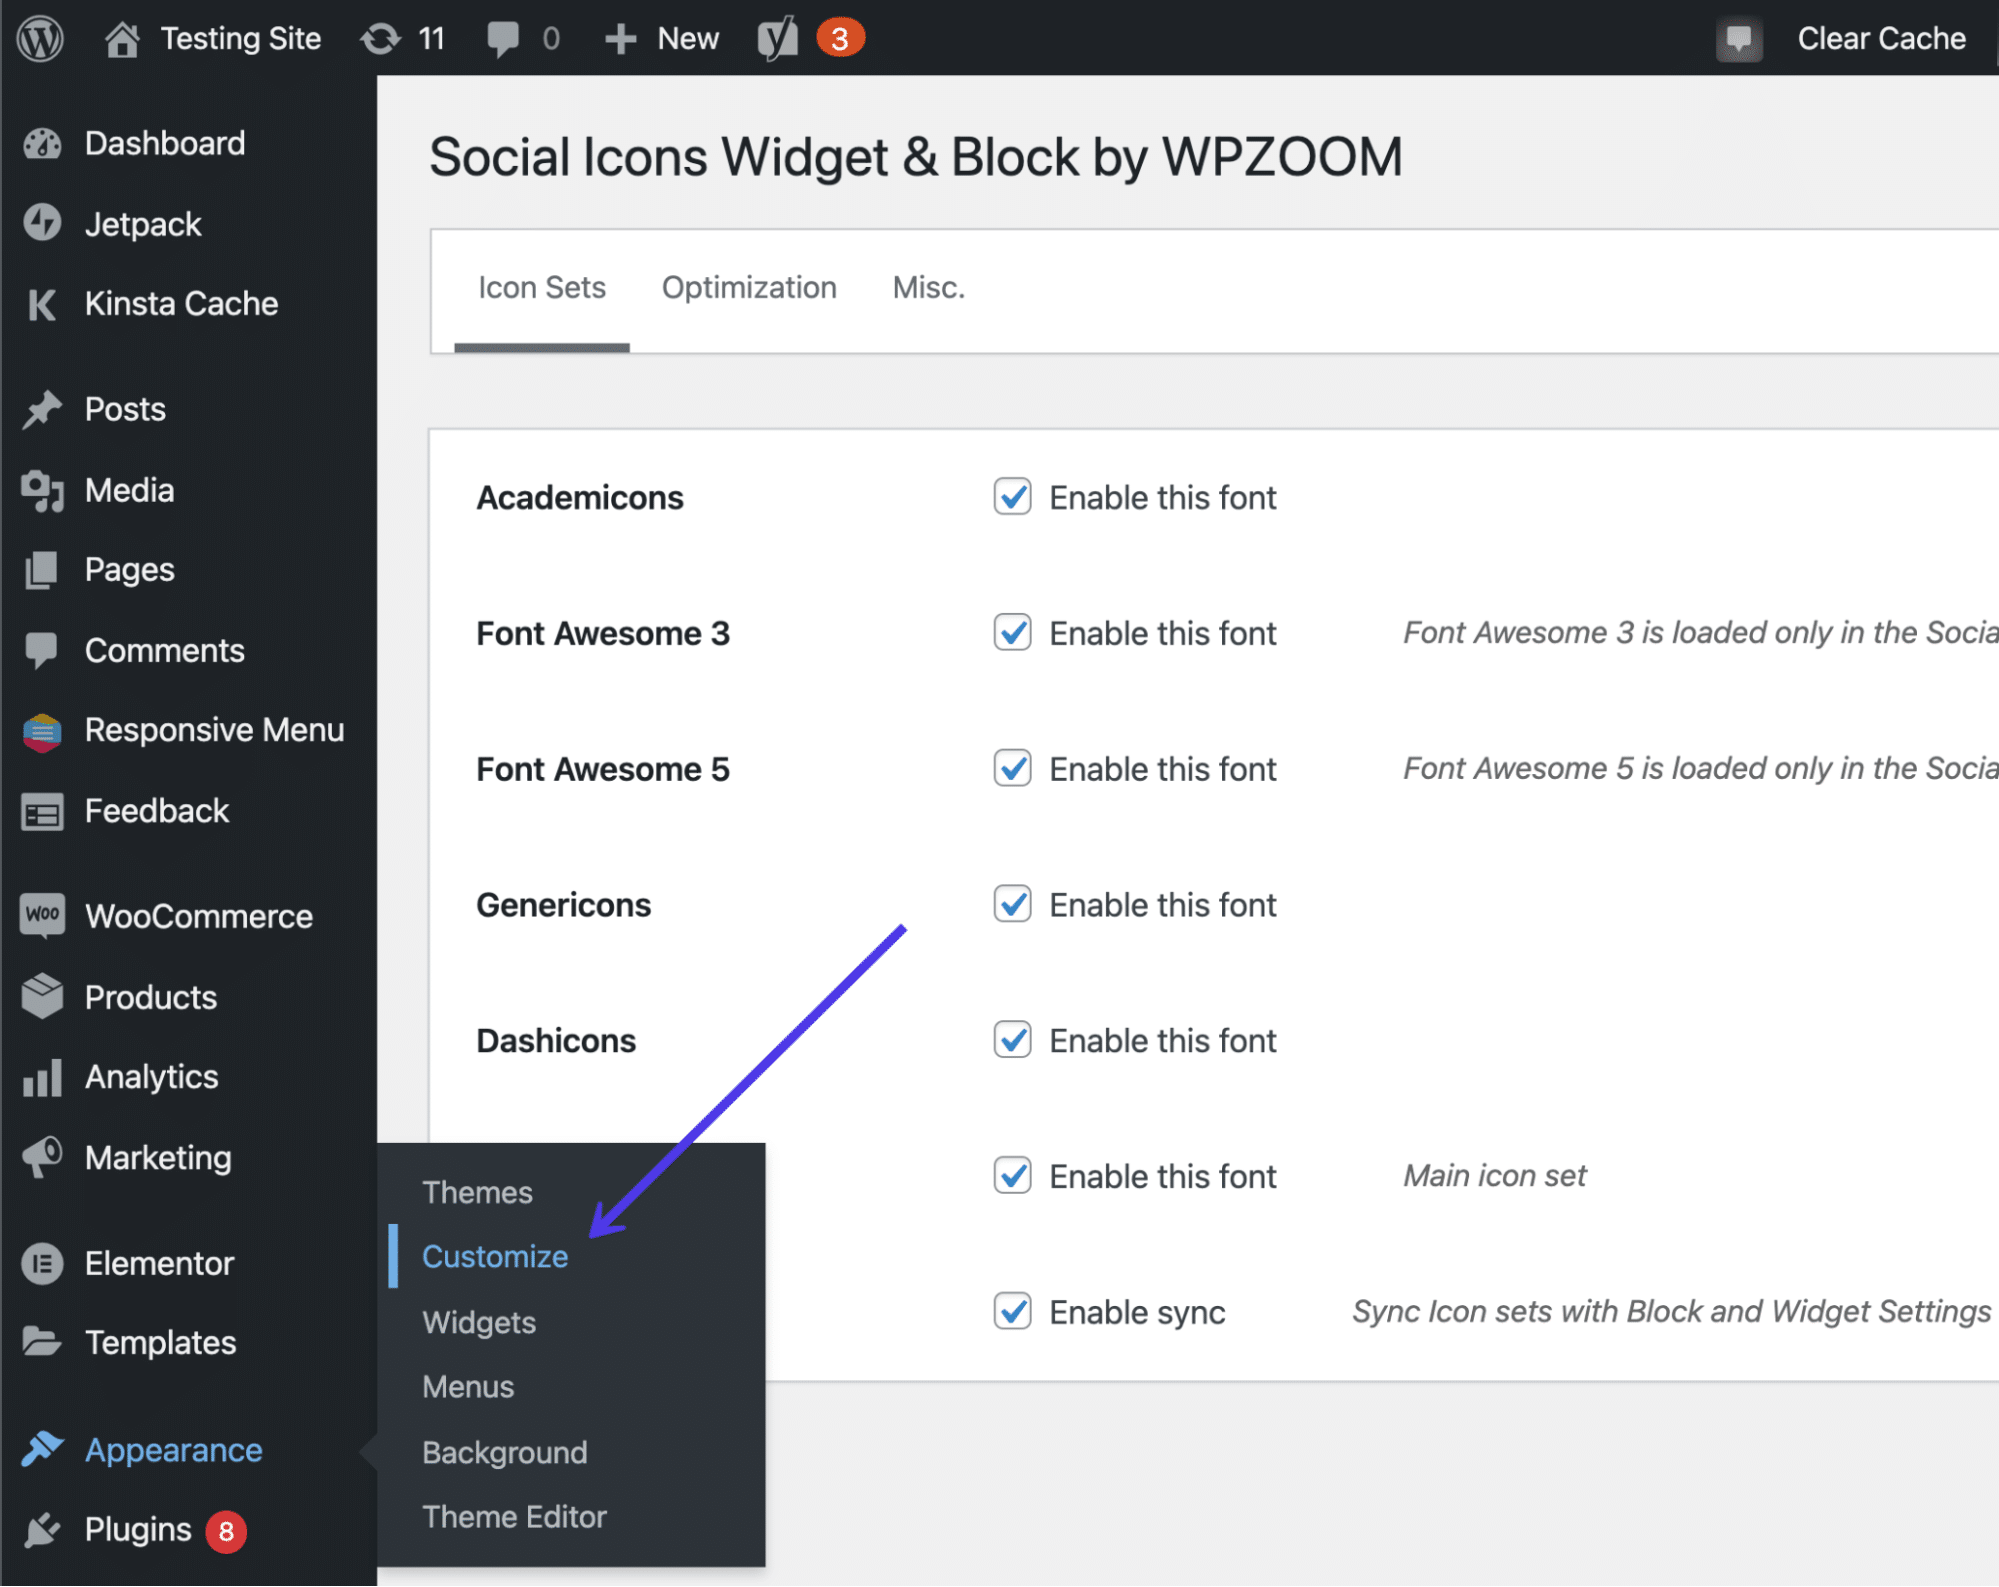
This brings you into the WordPress Theme Customizer, where y'all're able to add together widgets to the footer (as long every bit your theme supports widgets in the footer). As we've mentioned before in the commodity, the only fashion to get around a theme that doesn't take a footer widget is to find a new theme or custom code the footer yourself.
Discover and click on the Widgets tab to proceed.
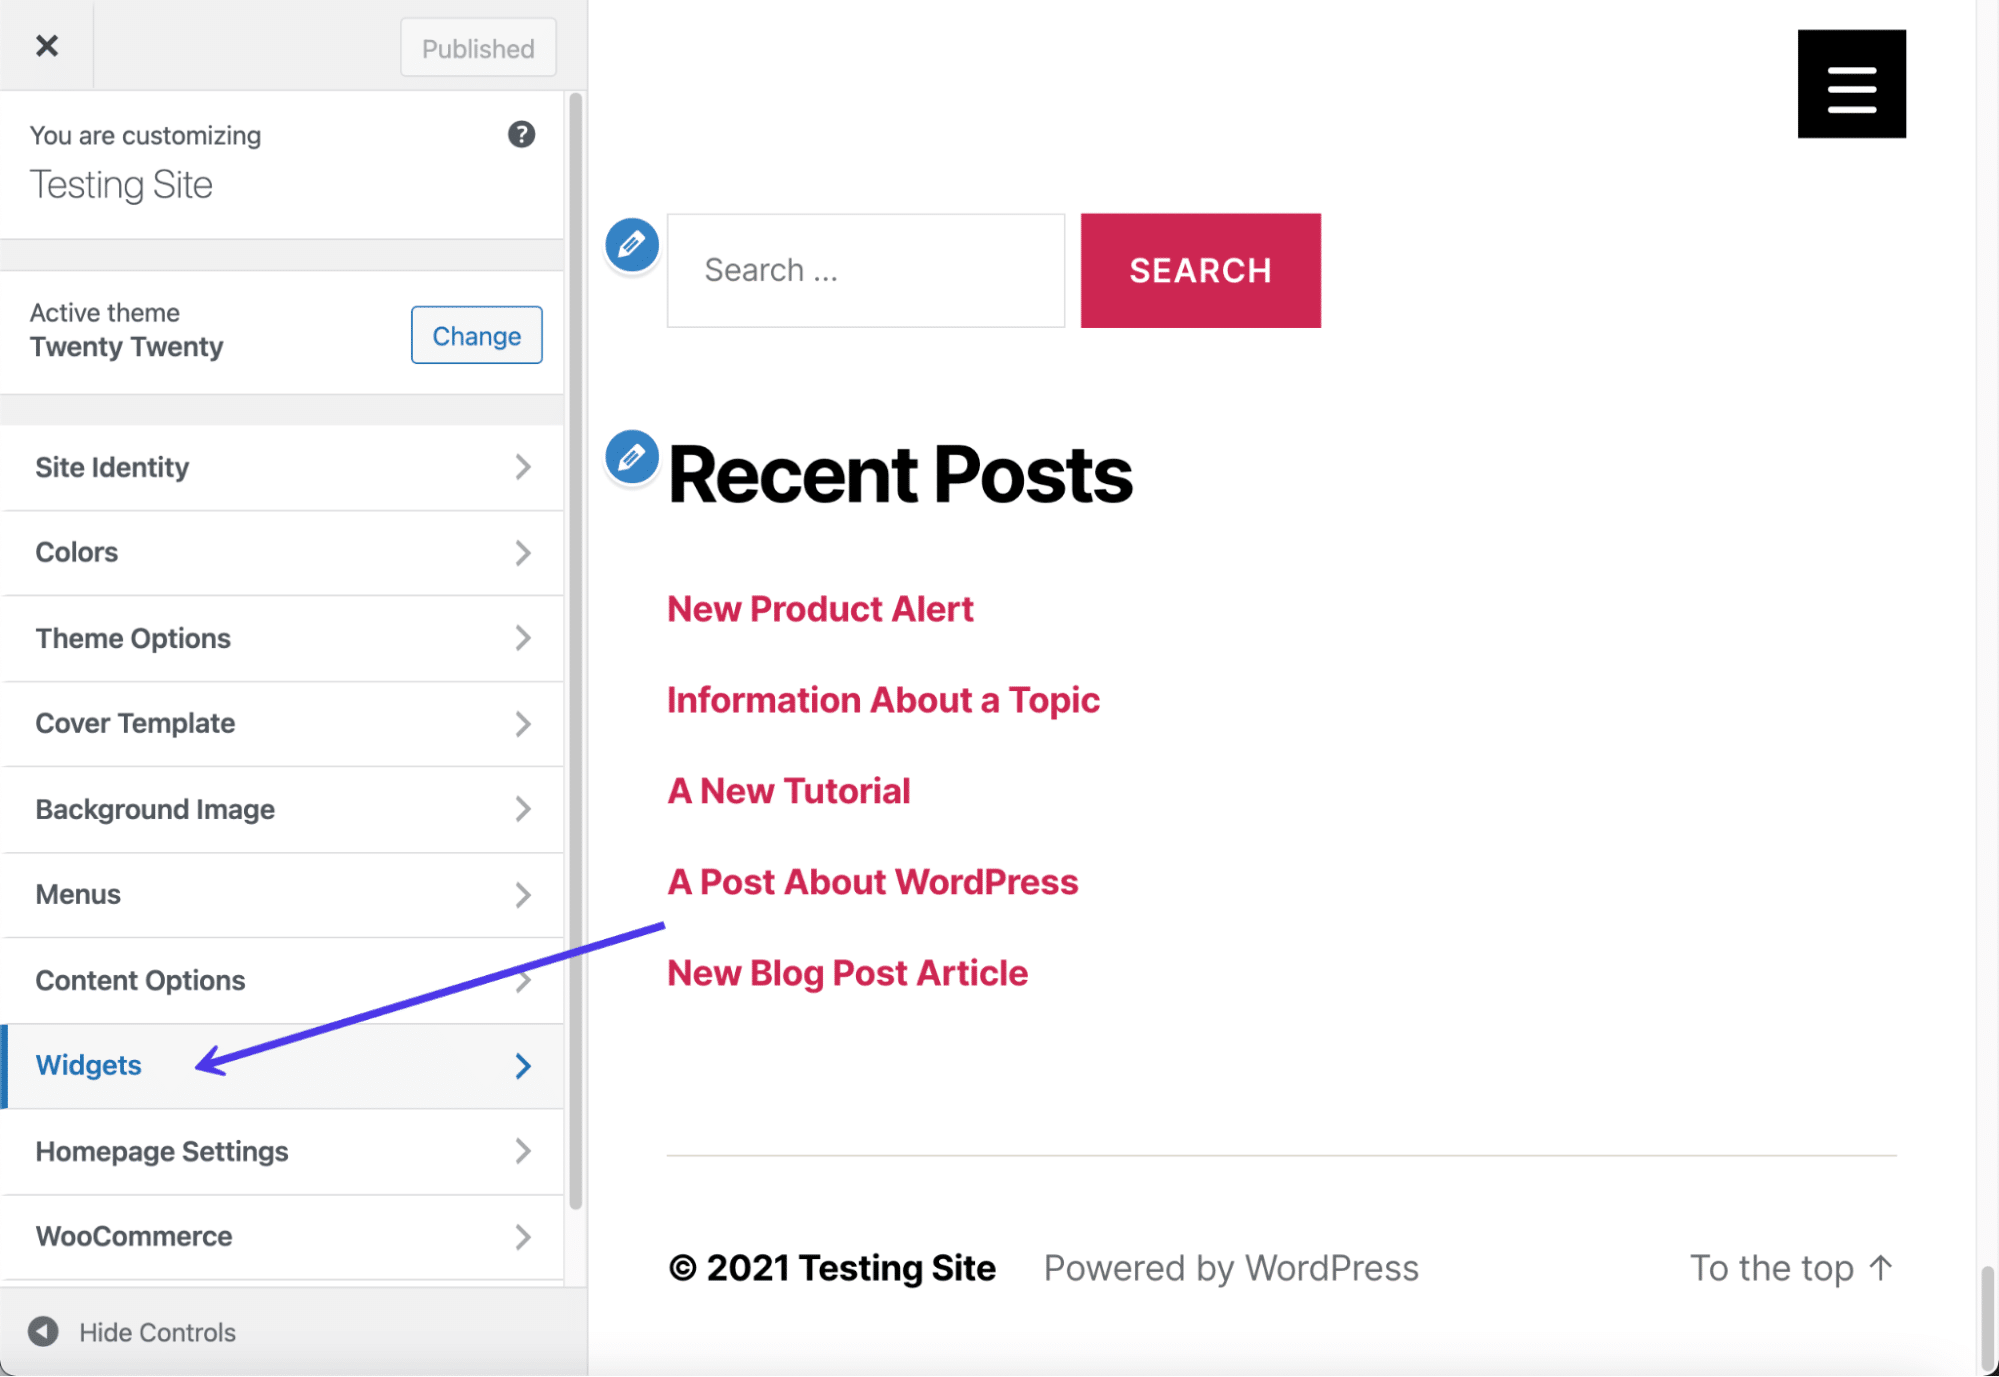
This theme has two areas to add together widgets to the footer. That'south not the example with all themes, so you may find that your theme has no footer widgets areas. On the other mitt, you might get lucky and have four or five spots to place widgets in your footer. It all depends on the theme you install.
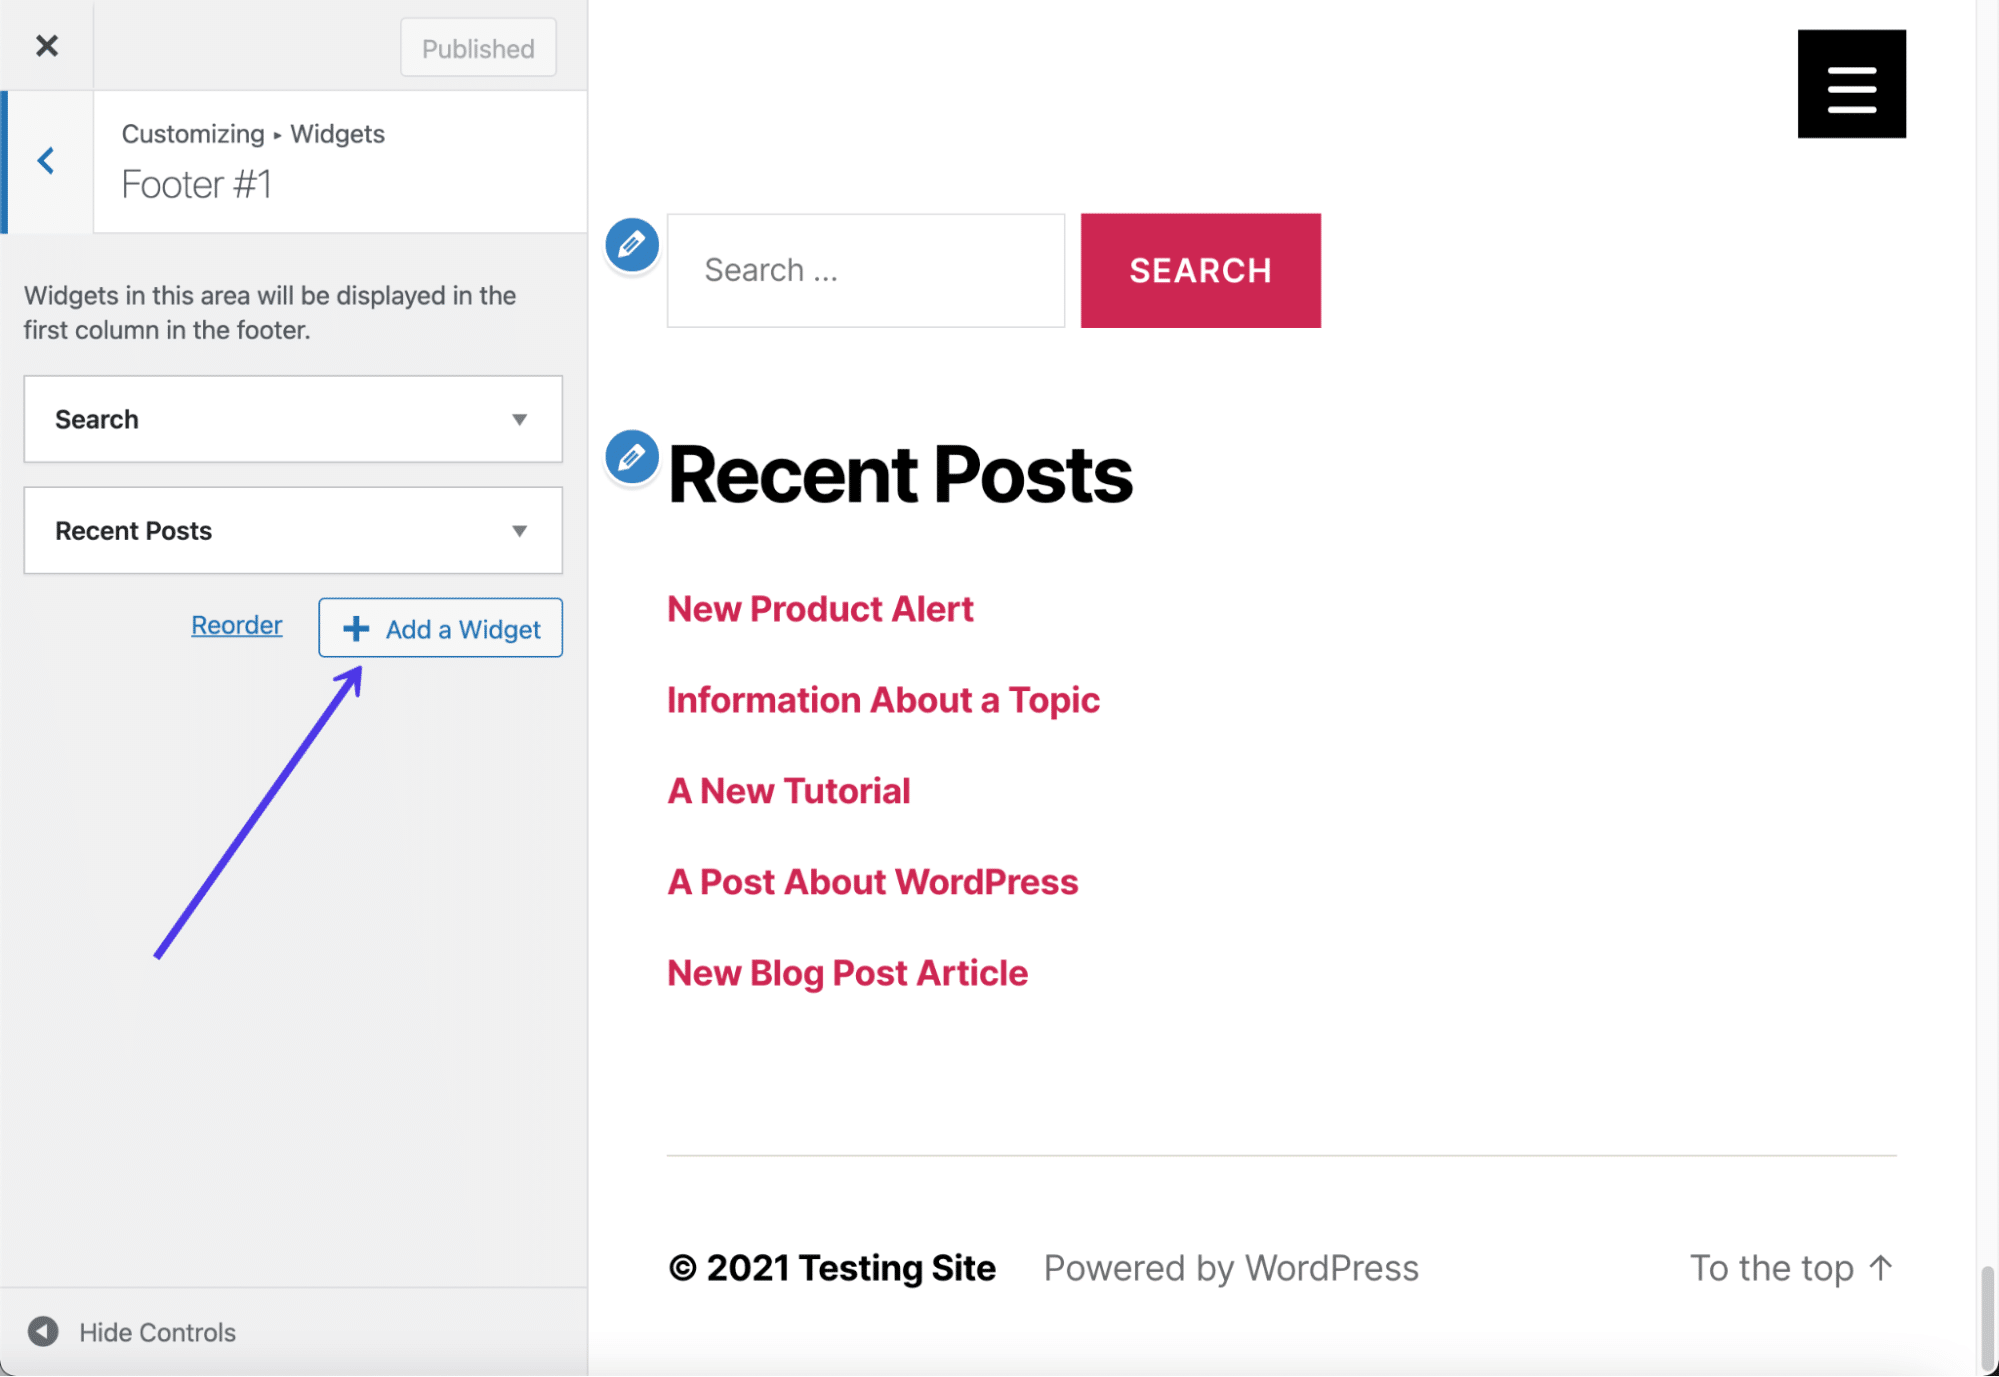
Click on ane of the Footer tabs.

It's possible to add together a myriad of widgets — or at least whichever widgets you accept installed — to the footer.
Click on the Add A Widget button to prove the carte of widgets bachelor to yous.
The slide-out menu provides a search bar and a listing of possible widgets. Scroll down to locate the widget called Social Icons By WPZOOM.
You should now see the default social media icons and buttons in the preview for your website.
However, you'll however need to customize the settings for these buttons to settle on the size of those buttons, coloring, and which links yous desire them to lead to.
Outset by typing in a title for the widget, which appears in the footer (you can also leave this bare if you lot'd like). Continue past specifying settings similar whether you want icon labels, nofollow links, and specific icon alignments.
Proceed on with the settings to specify the icon style, groundwork way, and padding. You can likewise choose an icon size and colour. Keep in listen that you need to click on the Save button at the bottom of the widget customization module in society to see the results of your changes in the preview.
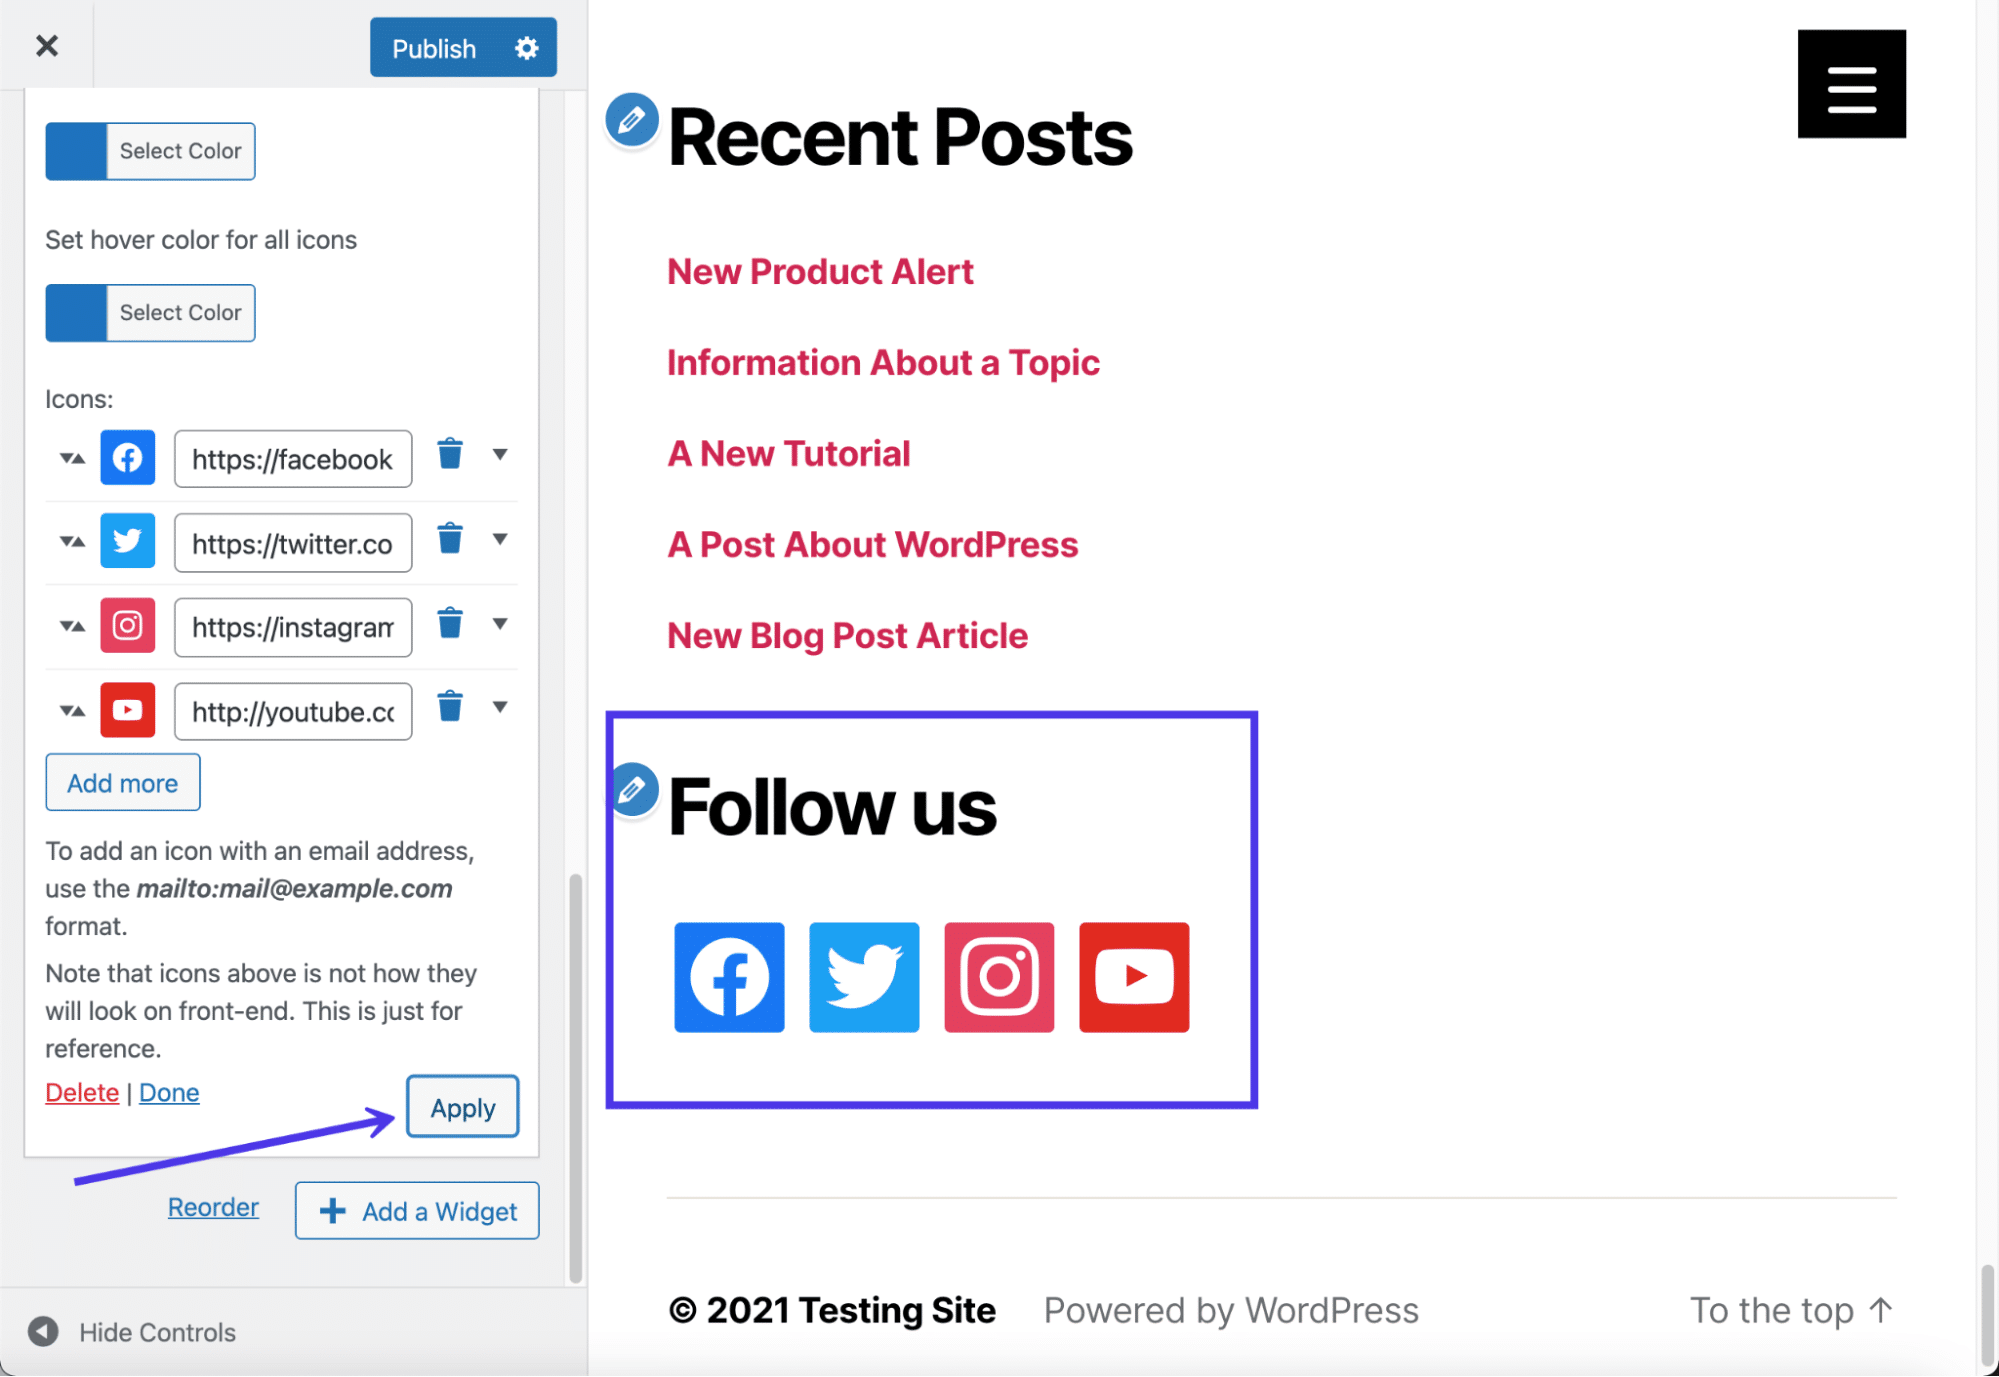
The Icons field already has some default social icons in there for you. Make a list of the social media sites yous run for your visitor, and re-create and paste the links into the respective fields. Remove any icons that don't make sense for your business concern.
To open up the icon library and add more icons, click on the Add More push button at the bottom of the field listing.
The plugin offers a large collection of icons, with options to gear up icon colors, hover colors, and the icon kit source. The primary kit is called Socicons, but several other kits come with the plugin for complimentary. Click on the Select Icon Kit dropdown to run across your options.
Finally, browse through the icons provided with each kit. Many of them yous may non fifty-fifty recognize, so just stick to the ones that you actively run and which will provide value to your customers.
In our instance, we'll choose the YouTube icon to add to our footer as well.
Click on the Save push to place it into the listing, then click the next Save button at the lesser of the widget box to see your changes.
As you lot tin see, we've made changes to the size and shape of the icons, while too adding an extra social icon. If your alterations don't look quite correct, become back into the widget settings to resolve the bug.
Always recall to hit the Publish button in order for the widget to accept effect on the front end of your website. We also recommend checking the frontend yourself to ensure the social icons appear the right fashion.
How To Add a Background to Your WordPress Footer
Footer backgrounds are possible with the help of some footer plugins and folio builders. However, you besides have the ability to place an epitome or colour background behind your footer by using the basic settings that come with your theme.
In case all else fails, nosotros'll show y'all how to insert CSS lawmaking to add a background to the WordPress footer.
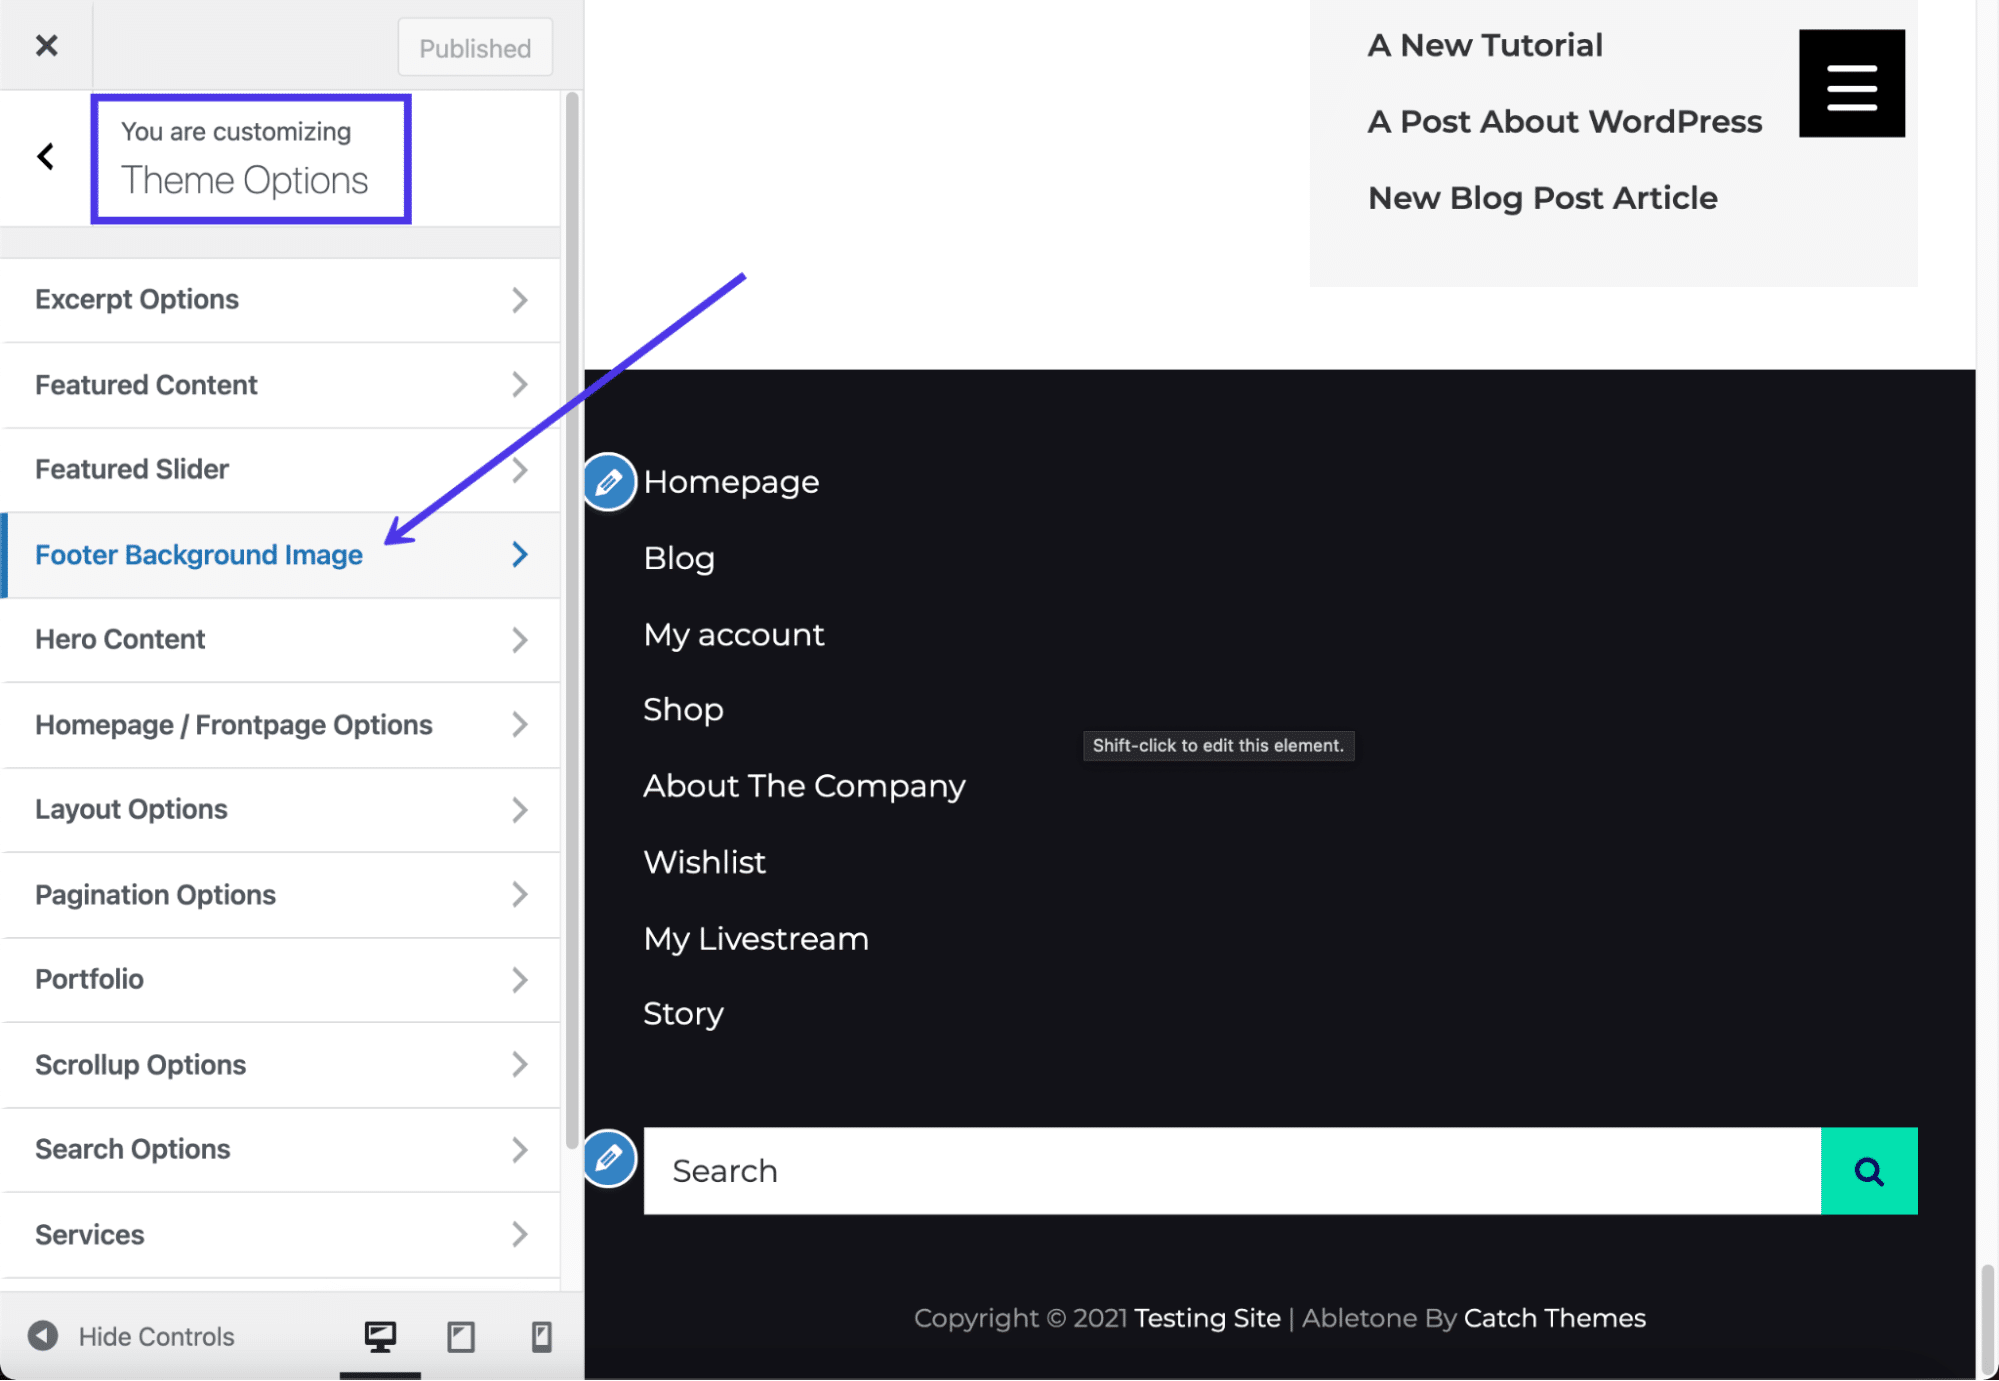
Earlier anything, check your theme settings to meet if footer background capabilities come standard. The Abletone Theme, for example, offers a Footer Background Image tab within the Theme Customizer.
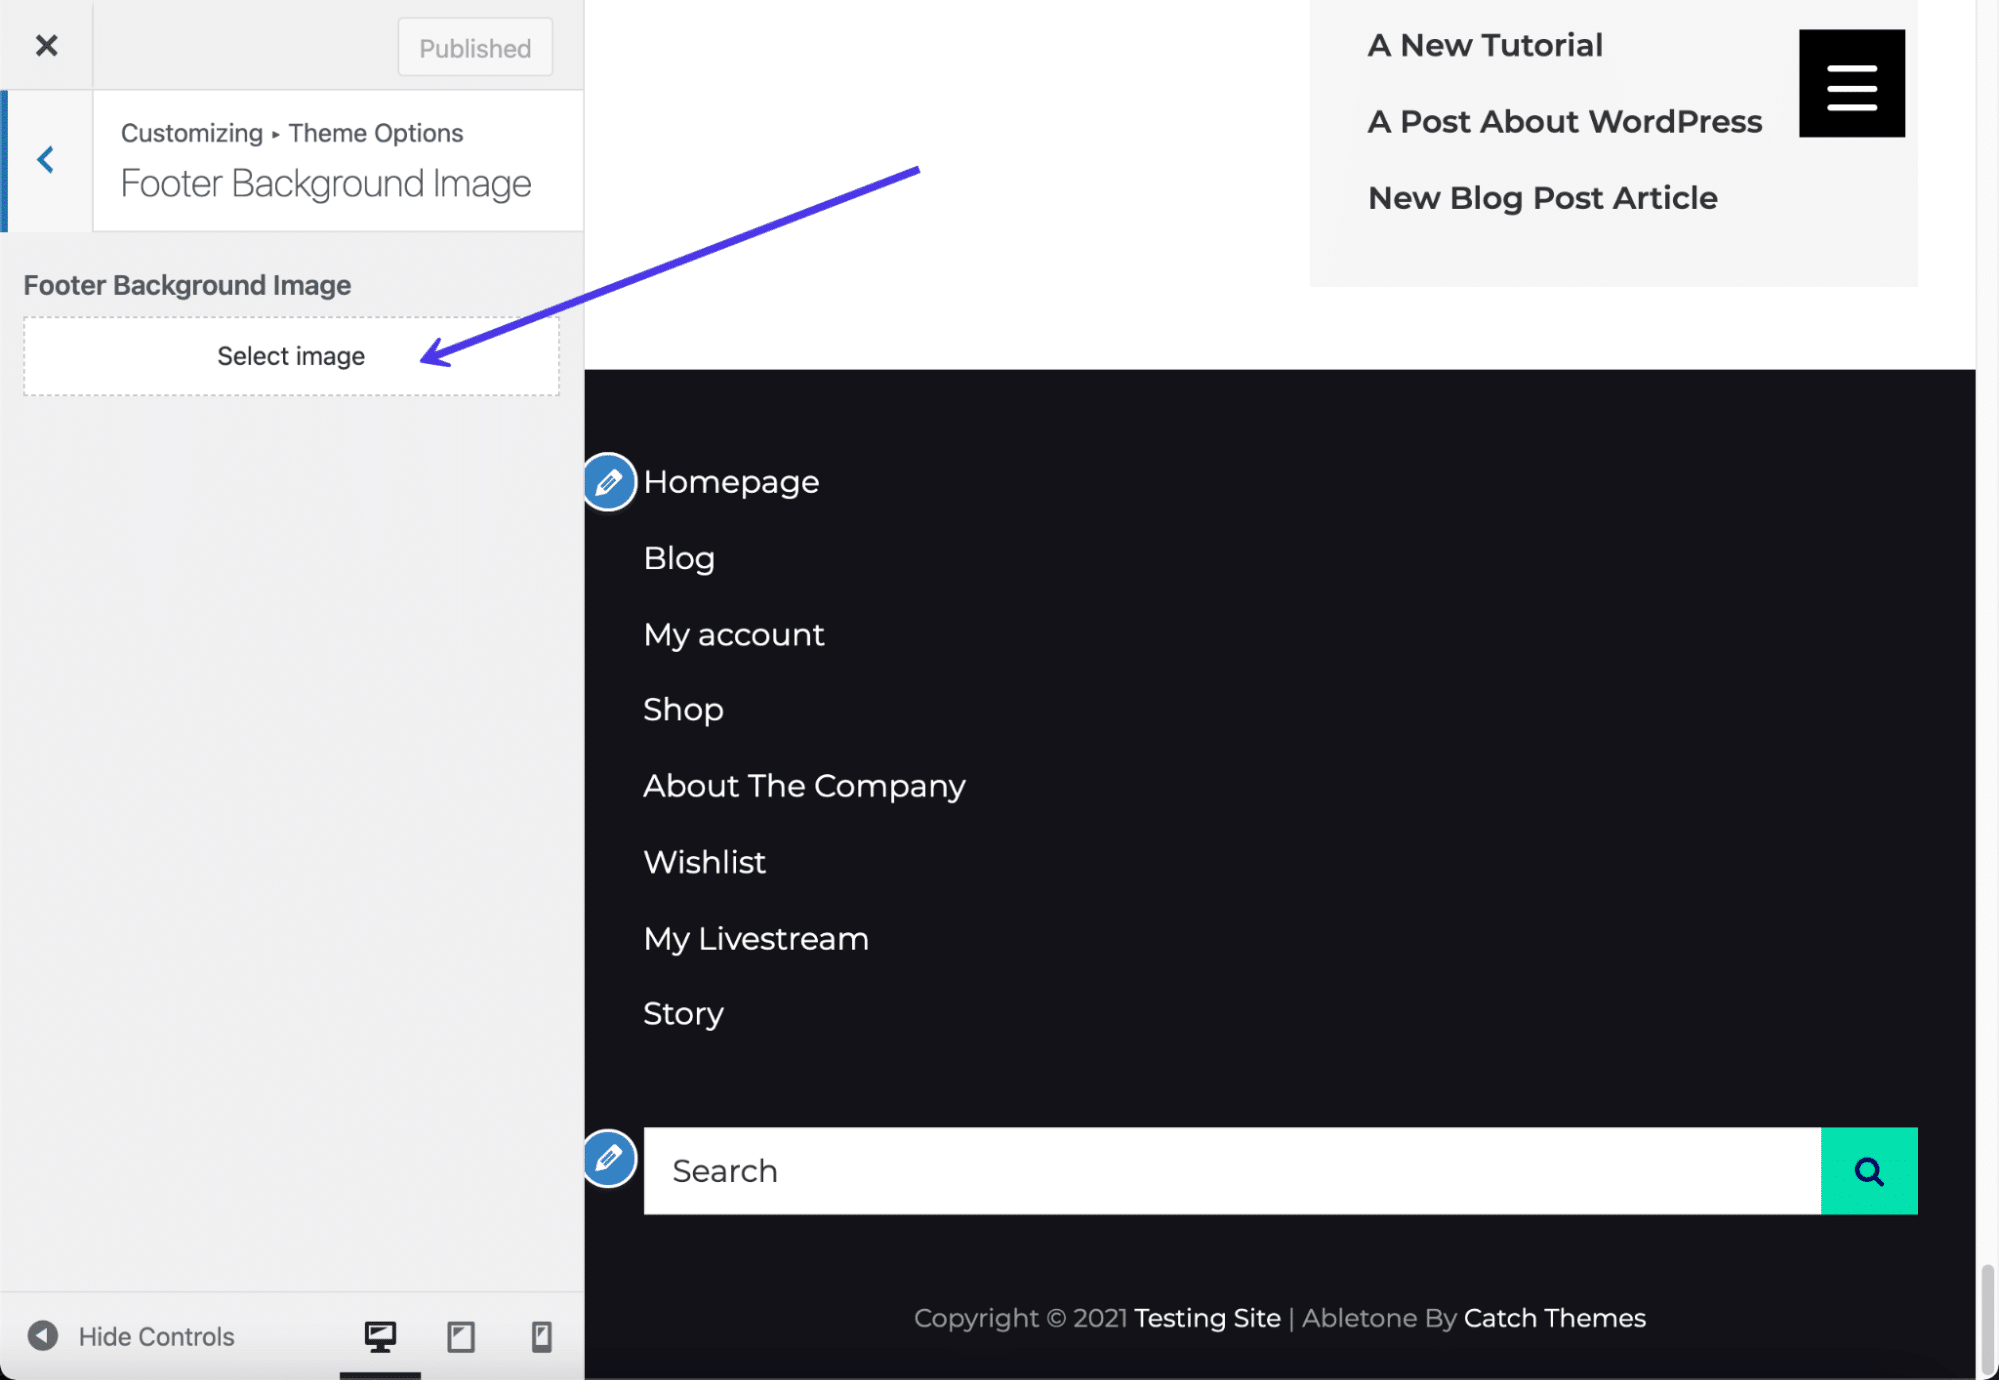
All that's required is for y'all to click on the Select Prototype button and search for an prototype in your Media Library, upload a new one from your computer, or look for a stock photo that will arrange your needs.
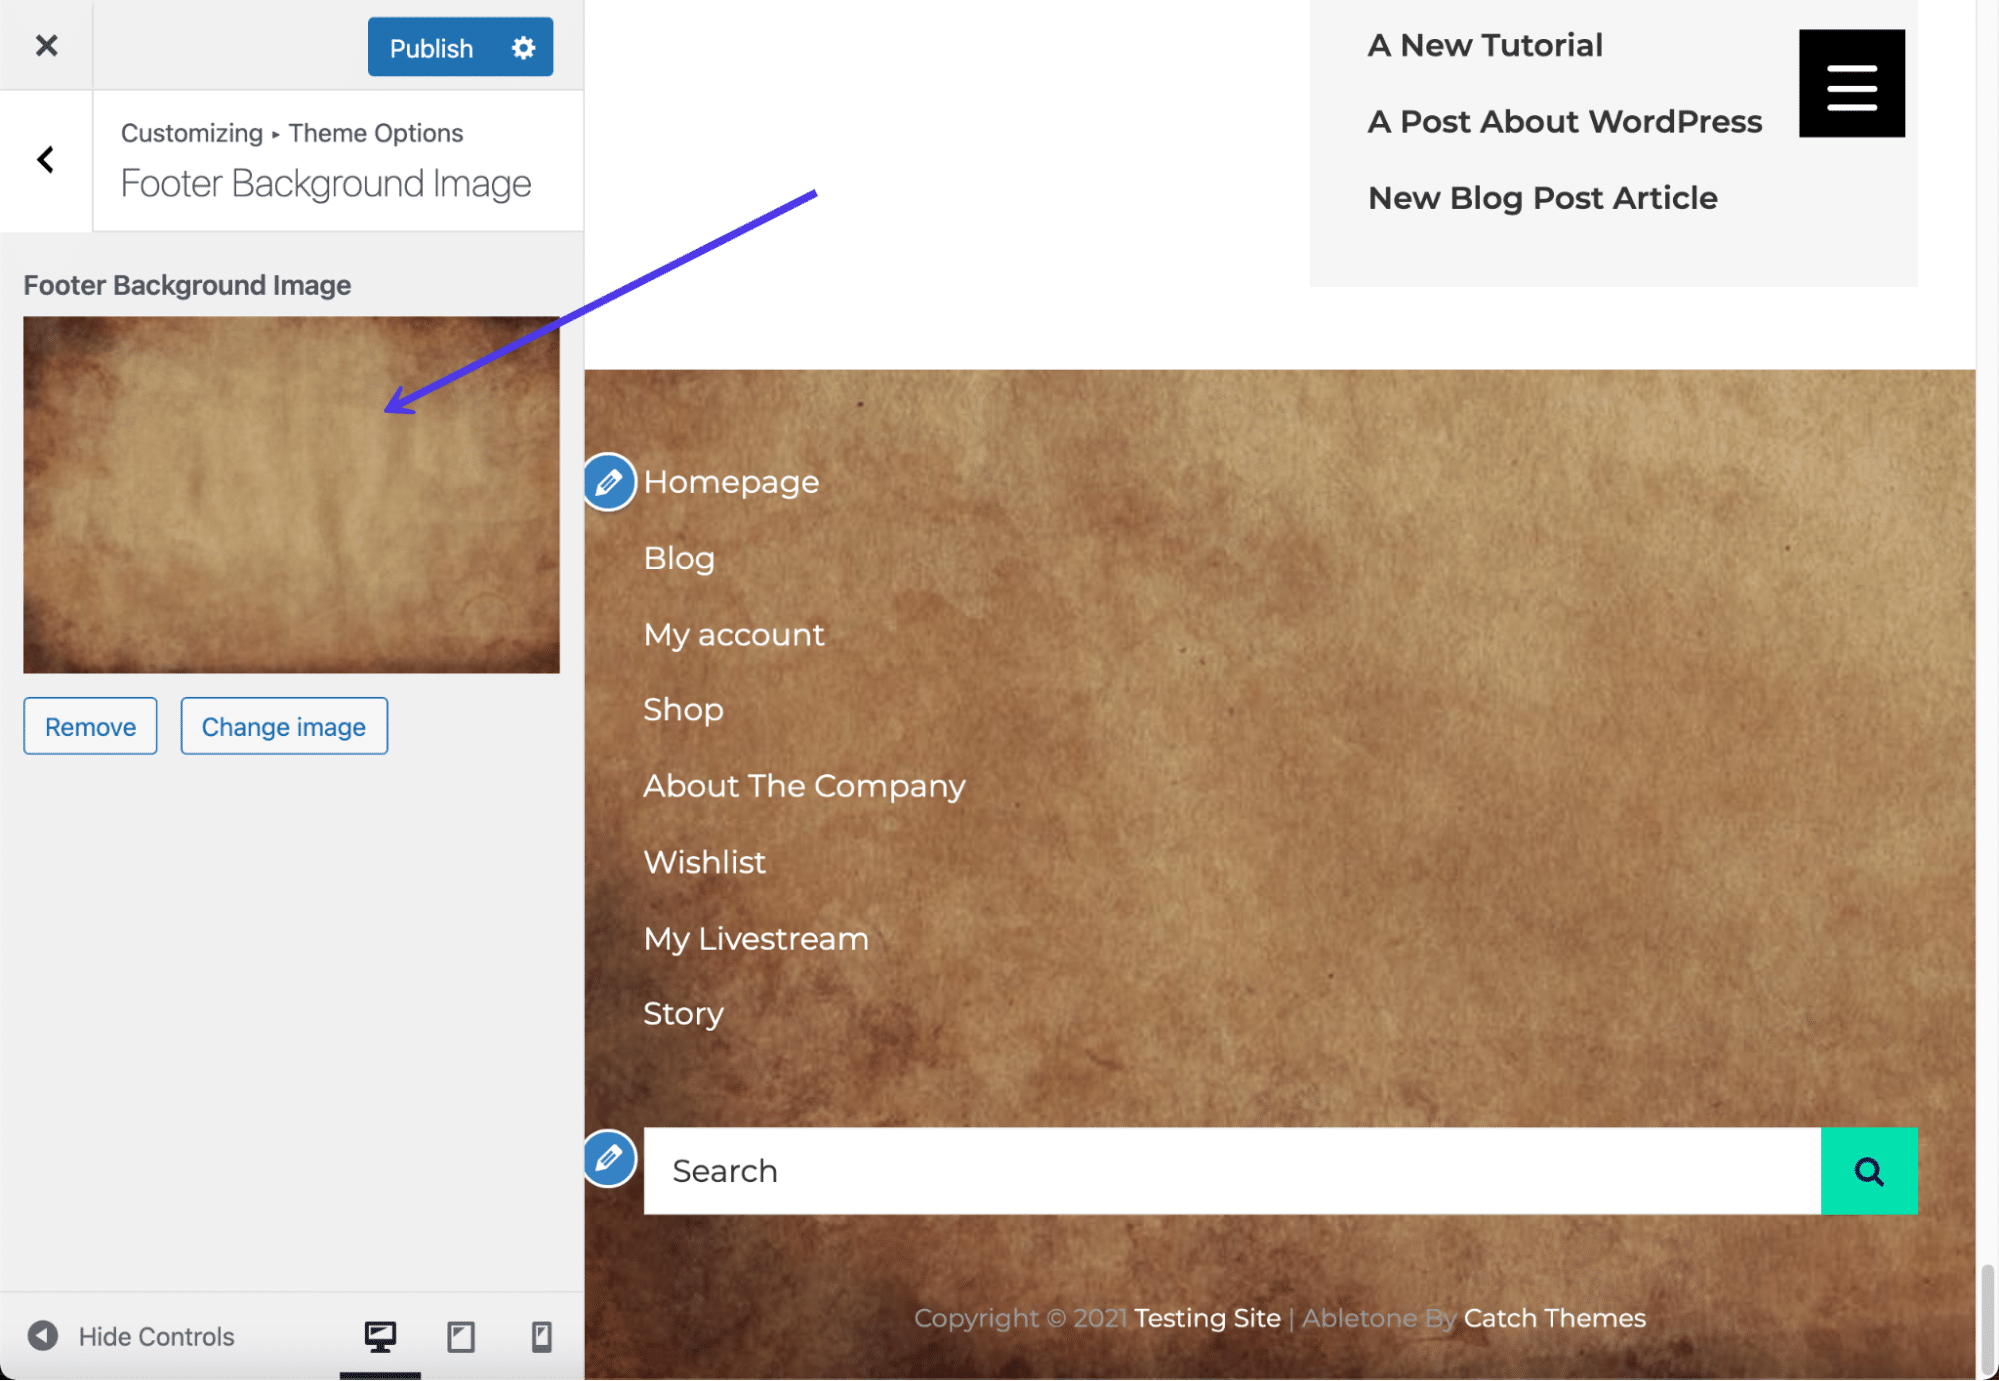
Once uploaded, the image appears as the background for your WordPress footer. Some themes offering boosted settings for stretching or tiling the image, merely without editing the CSS yourself, you lot're stuck with whatever settings come with the theme.
If you don't have a theme, page builder, or plugin that does the fox for adding a footer background, though, adding CSS code handles this job regardless of your theme or page builder.
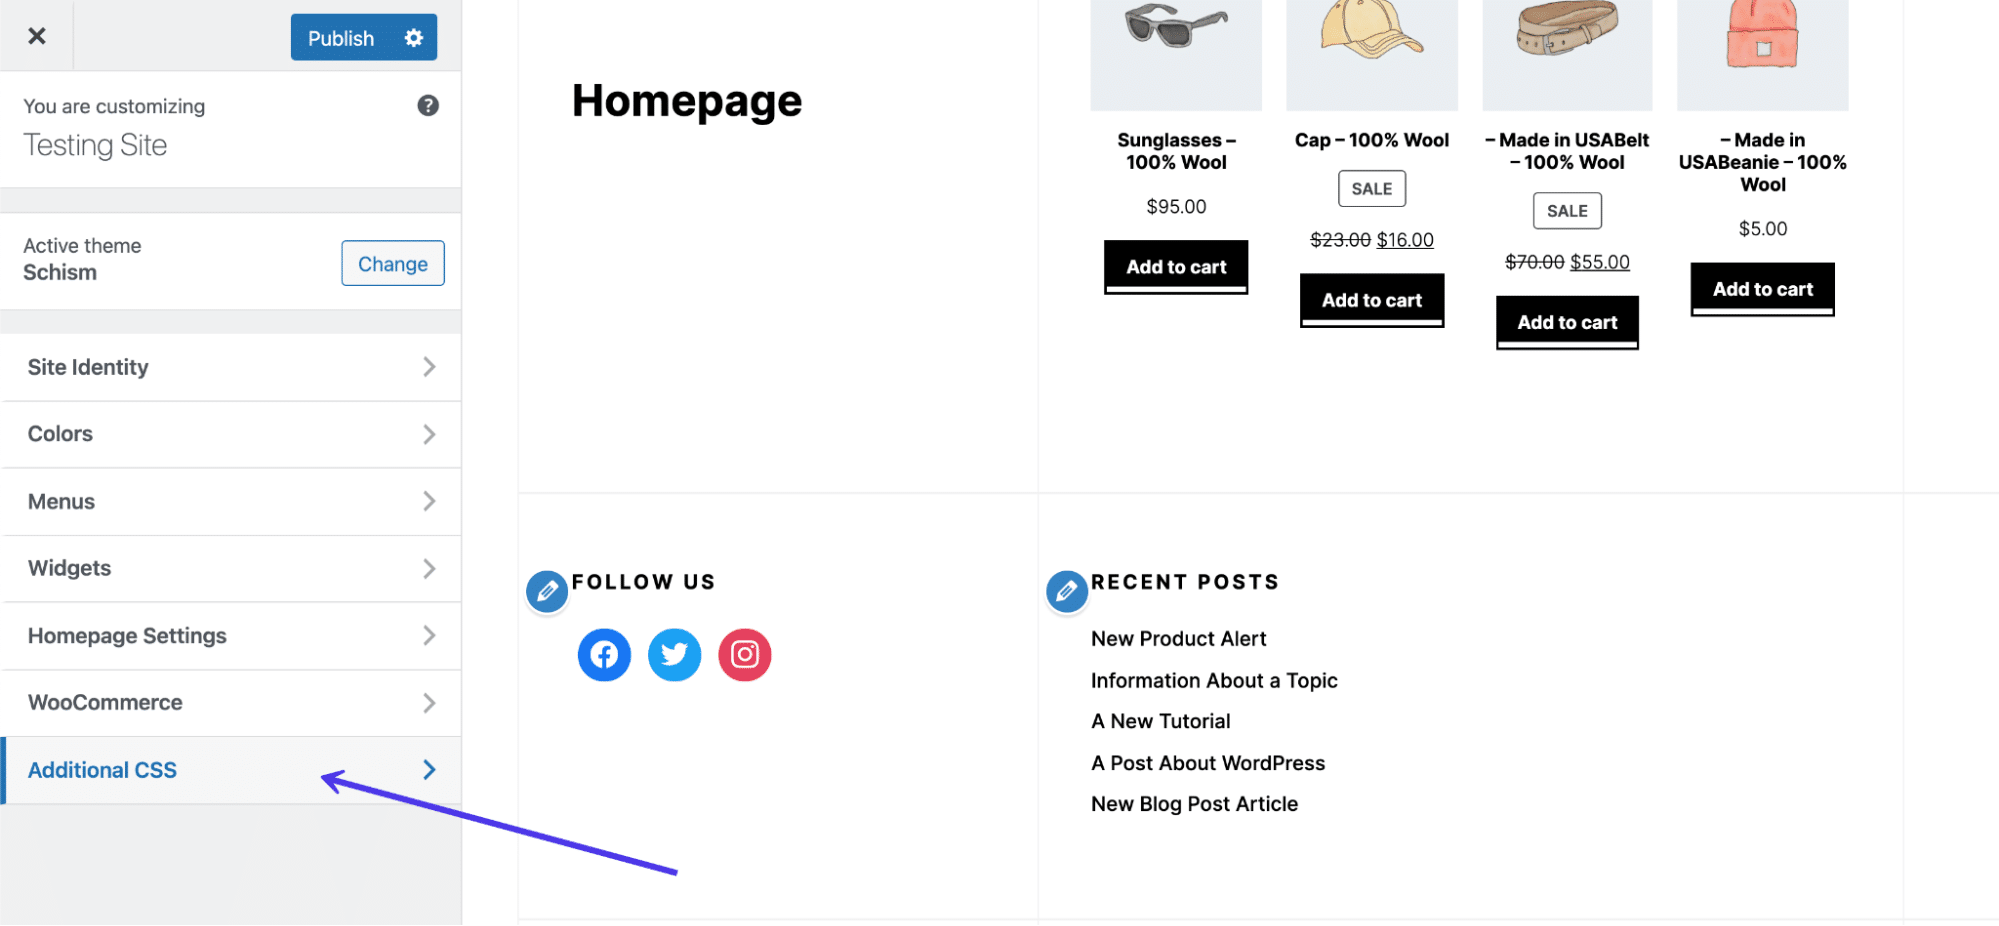
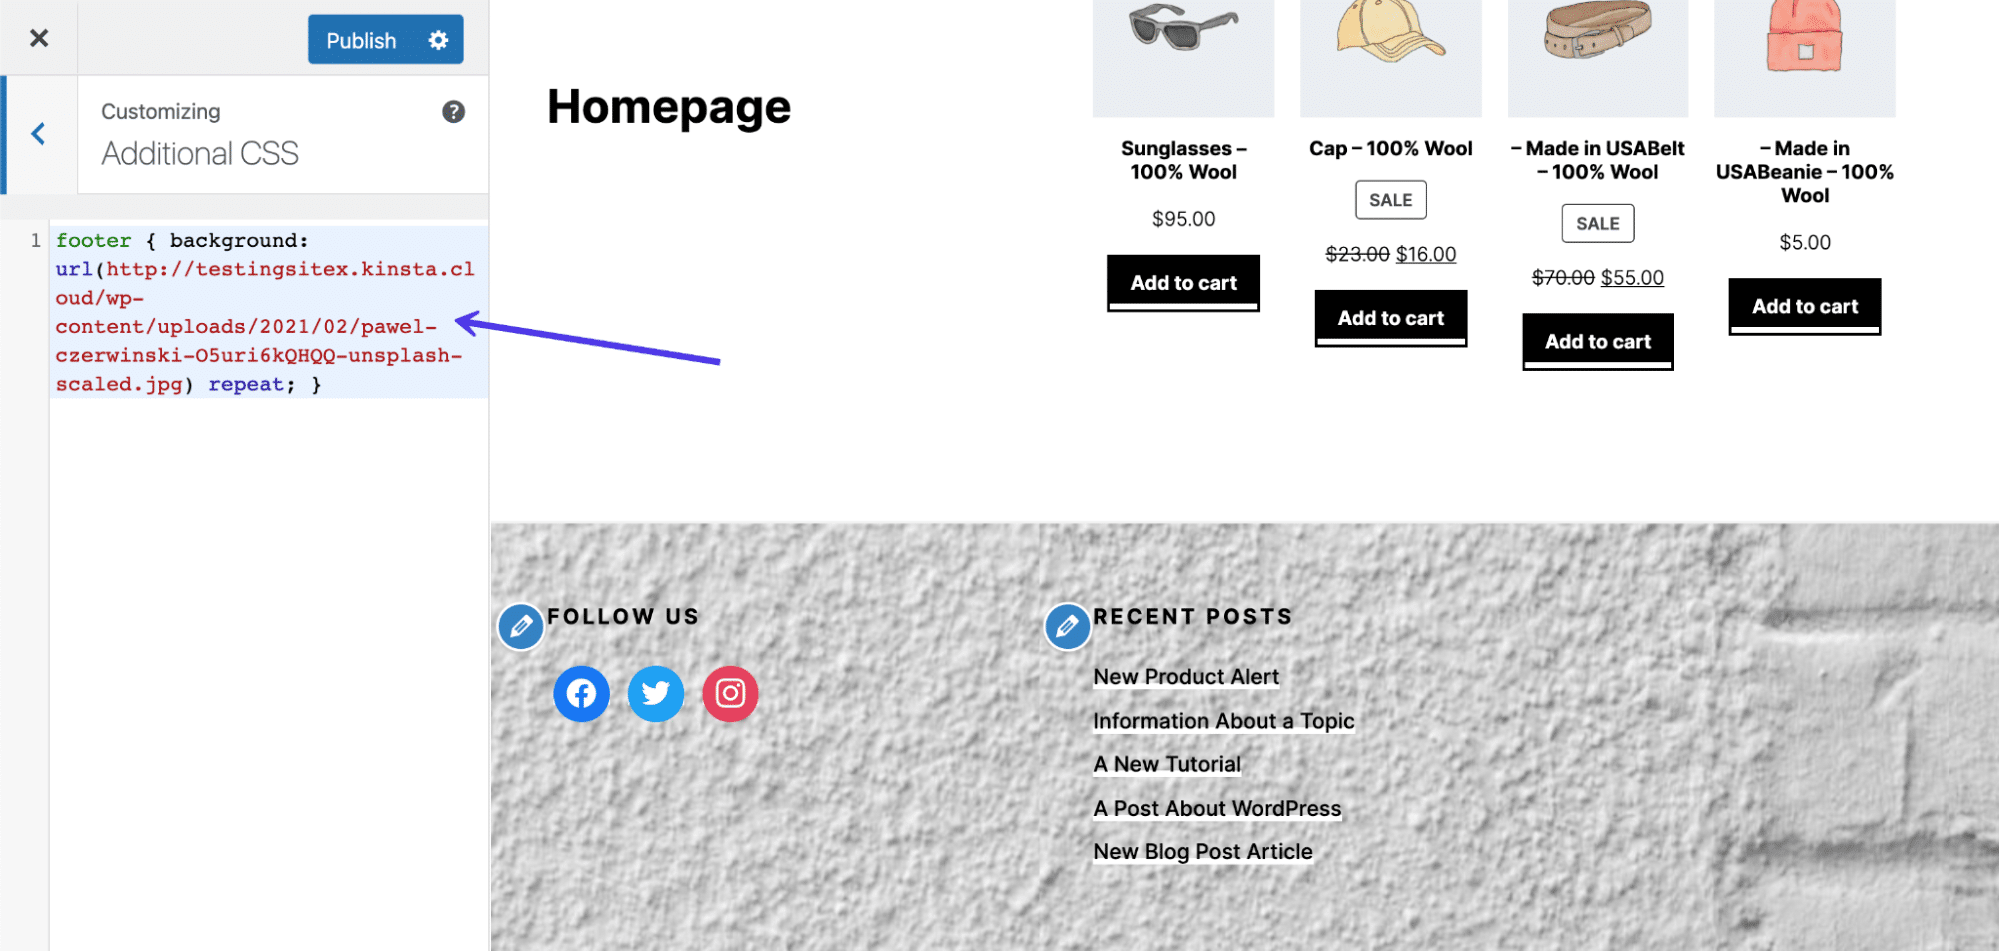
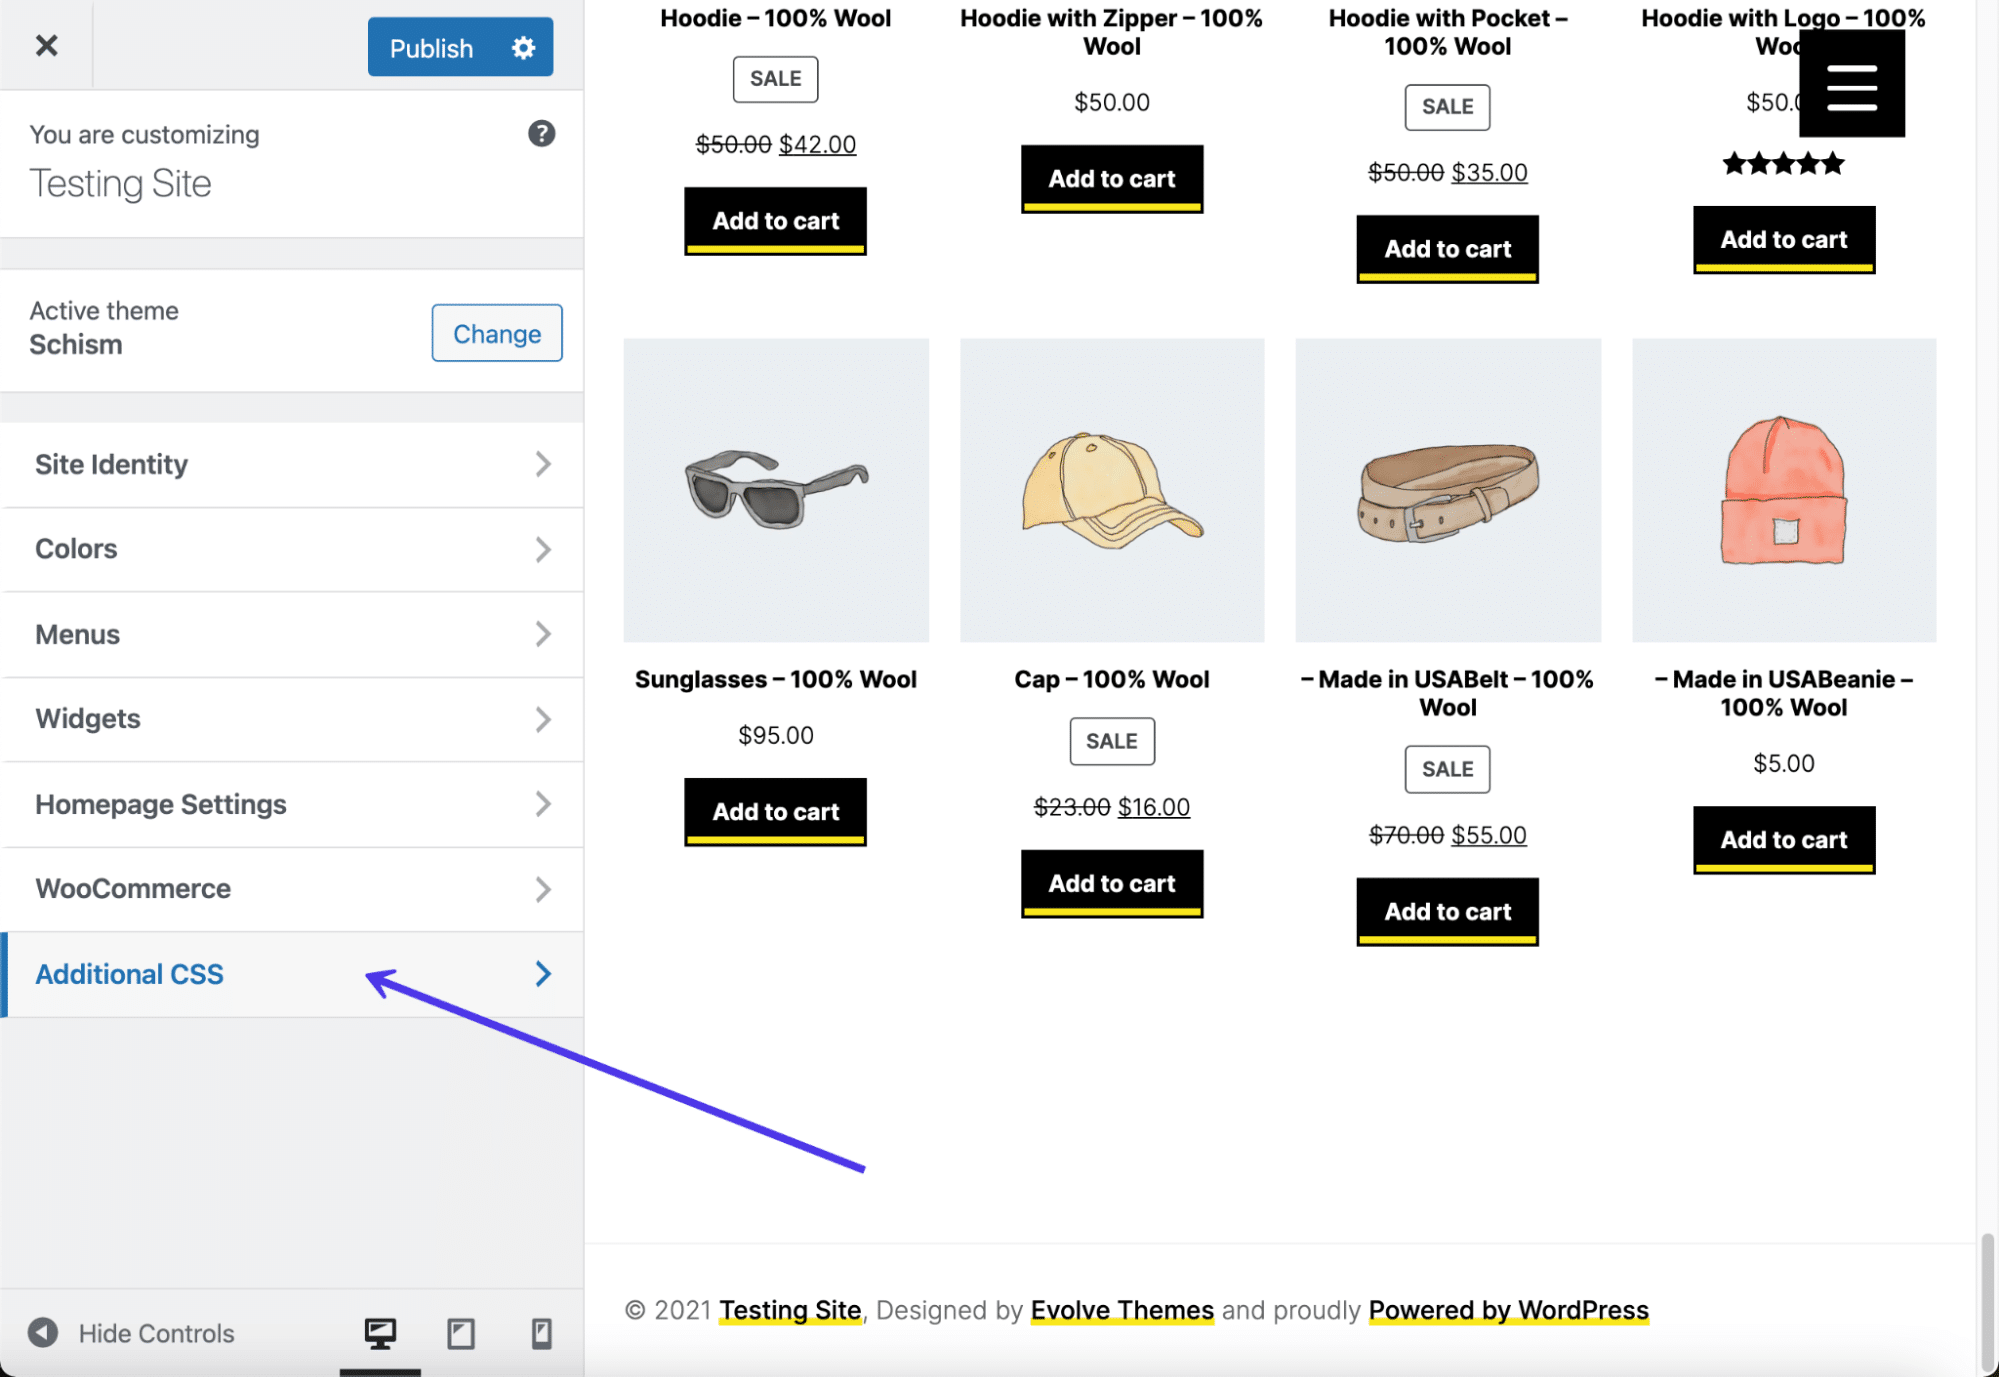
Go to the Theme Customizer in WordPress, then click on the Additional CSS menu detail.
Paste this CSS code into the field, but supersede the YOURIMAGEURL with the URL of your desired paradigm:
footer { background: url(YOURIMAGEURL) repeat; } You lot can observe the URL for any prototype in its details view after information technology's been uploaded to your Media Library.
Be sure to click on the Publish push button to see it on the front.
You can also insert other bits of code to change elements like sizing and background stretch size or repetition. As you may imagine, adding the CSS code is a little less simple than clicking on plugin buttons, merely a quick search online can help you find the right code for your needs.
Removing "Powered past WordPress" Text
In the previous department, we covered how to remove the WordPress credit in your WordPress.com footer. It's a little tricker on a self-hosted WordPress site since most themes don't offer a fashion to remove the credit in the Site Identity section of the Theme Customizer.
Therefore, nosotros must await at other ways to remove the "Powered past WordPress" text in the footer.

To tackle this process, read our in-depth guide on removing the "Powered By WordPress" tag in your footer. This knowledge base article covers all of the following topics:
- Why you may want to remove the "Powered By WordPress" message
- When y'all might not desire to remove it
- Methods to avoid when trying to remove the credit
- How to remove the credit with a plugin
- How to manually remove the "Powered By WordPress" credit
- Replacing the footer credit with your own code
Editing the footer credit with a plugin is significantly easier for the average WordPress user. All the same, going the manual route ensures you have full control over the footer, and it eliminates the need to have another plugin installed on your dashboard.
Is It Legal to Remove "Proudly Powered by WordPress"?
Considering that WordPress makes it a little tricky to remove the "Proudly Powered by WordPress" text from your footer, you may wonder whether it's kosher to become rid of the bulletin.
The answer is that you're more welcome to take out the "Powered by WordPress" text in your footer without having to worry nearly whatsoever legal repercussions or violations of the WordPress Terms of Service. This is because WordPress use falls under a GPL (General Public License), meaning anyone can redistribute and modify WordPress in any mode they come across fit.
Overall, nosotros highly recommend removing the "Proudly Powered past WordPress" text since information technology has naught to exercise with your make and simply promotes another organization. Yep, it'due south nice to become the word out about WordPress, but not at the expense of your own branding and valuable website space.
Now, footer messages shown by your theme developer are a different story. Nosotros'll talk almost that in the next section.
How to Remove "Powered past XYZ Theme" Text in WordPress Footer
We now know that you'll accept no problems with the law or WordPress when eliminating the "Proudly Powered by WordPress" footer message. But what virtually some of the theme developers who put "Powered by XYZ Theme" in the footer?
Luckily, the vast majority of WordPress themes too fall under a Full general Public License, making it entirely adequate to cutting out that text and supervene upon information technology with something more suitable for your business. Notwithstanding, it's prudent to double-check with your theme developer to ensure they don't have a requirement in their terms and weather condition that stipulates that you go along the development credit in the footer.
Y'all can do this by just request the developer if the theme falls under a General Public License. And if it doesn't, or their terms and weather condition make it a requirement to leave the credit, we suggest seeking out another theme, every bit that's not exactly a desirable particular to take on your website.
So how do yous get about removing the "Powered by XYZ Theme" text in your footer?
Some plugins that remove the "Powered past WordPress" message also can scrap any messaging inserted by the theme programmer. Nevertheless, this isn't a sure matter.
Therefore, we propose opting for i of the post-obit methods:
- Edit the footer site files direct to eliminate the credit message.
- Enquire the developer to remove information technology for you.
- Upgrade to the premium version of the theme.
Editing the footer site files takes a bit of technical knowledge, only you lot can often go this washed in a matter of minutes. Asking the developer to remove the theme developer credit could end upwards working, merely you're essentially hoping you'll get a friendly developer who'due south willing to walk you through the process. Unremarkably, they won't offering this if y'all're only using the free version of their theme.
The easiest option is to upgrade to the premium version of that theme. Many premium theme developers give away simplified, gratis versions of their themes in the hopes you lot'll upgrade for improved features and increased control.
Since upgrading to a premium theme and speaking with the developer can be done on your ain, we'll mainly talk about how to edit the theme site files to get rid of that credit message.
To begin, cheque out your theme'south footer to confirm if you have developer credit on the lesser. If so, have note of the exact text being displayed, every bit this could help seek out the bulletin in your site files.
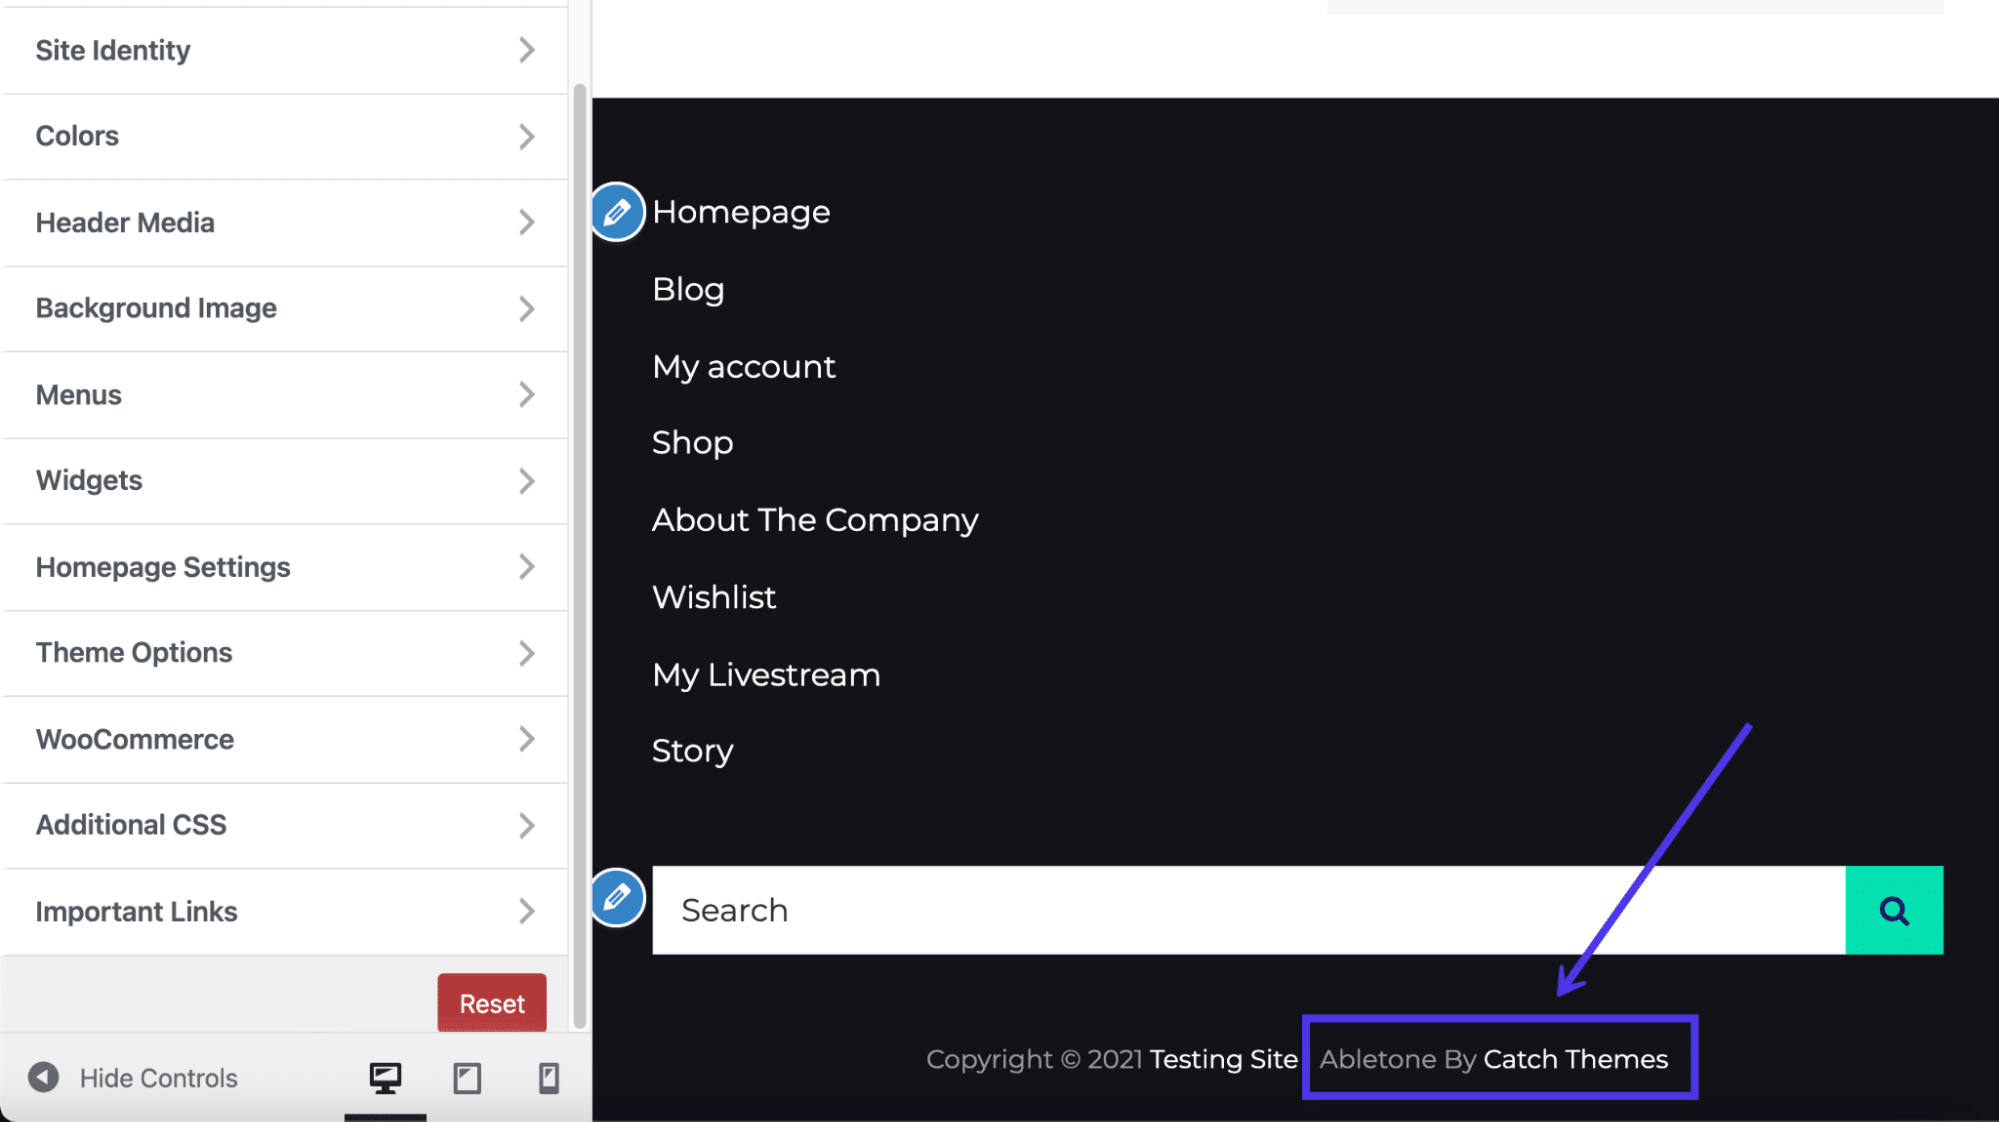
Connect to your site files using an FTP client, as discussed before in this commodity. Each theme developer differs on where they put the footer credit, but a good place to commencement is going to /public/wp-content/themes.
Choose the theme yous have activated on your website.
From here, one pick is to open the primary footer.php file in a text editor or PHP IDE and search for references to the footer credit. Utilize the Discover function in your chosen editor to blazon in and search for the exact text that appears every bit the credit message in your footer.
As with all themes, this may not exist the right file for removing the footer credit; information technology entirely depends on how the theme was built. If y'all have no luck with the footer.php file, proceed looking elsewhere.
I of the about common places to discover the footer credit data code is in the /template-parts folder. We found this was the case for the current examination theme nosotros accept installed for this tutorial.
We can become to the /footer folder, then click on the site-info.php file. That site-info.php file (or some variant of that) is a common place for storing the theme'south footer credit information.

Feel free to either delete the footer credits or replace them with something else. For this situation, we'll just remove the credits claw and the do_action credits code at the bottom.
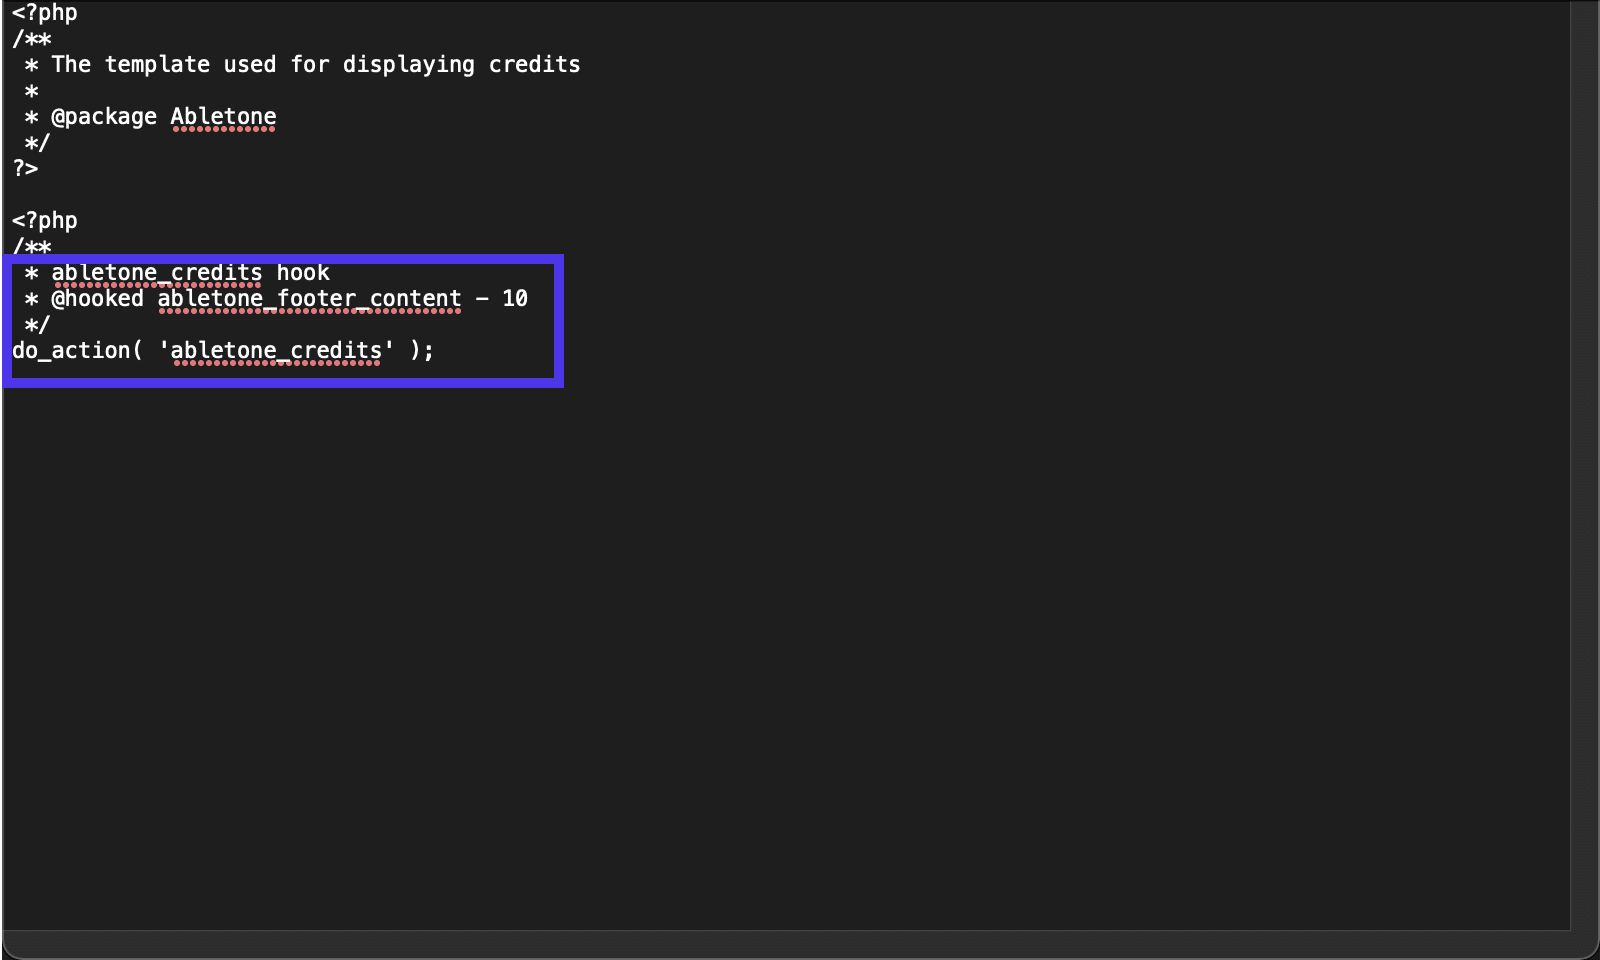
And that's successfully removed the entirety of the credit being shown for the theme developer. It as well didn't accept any effect on the footer content, like our widgets and menus.
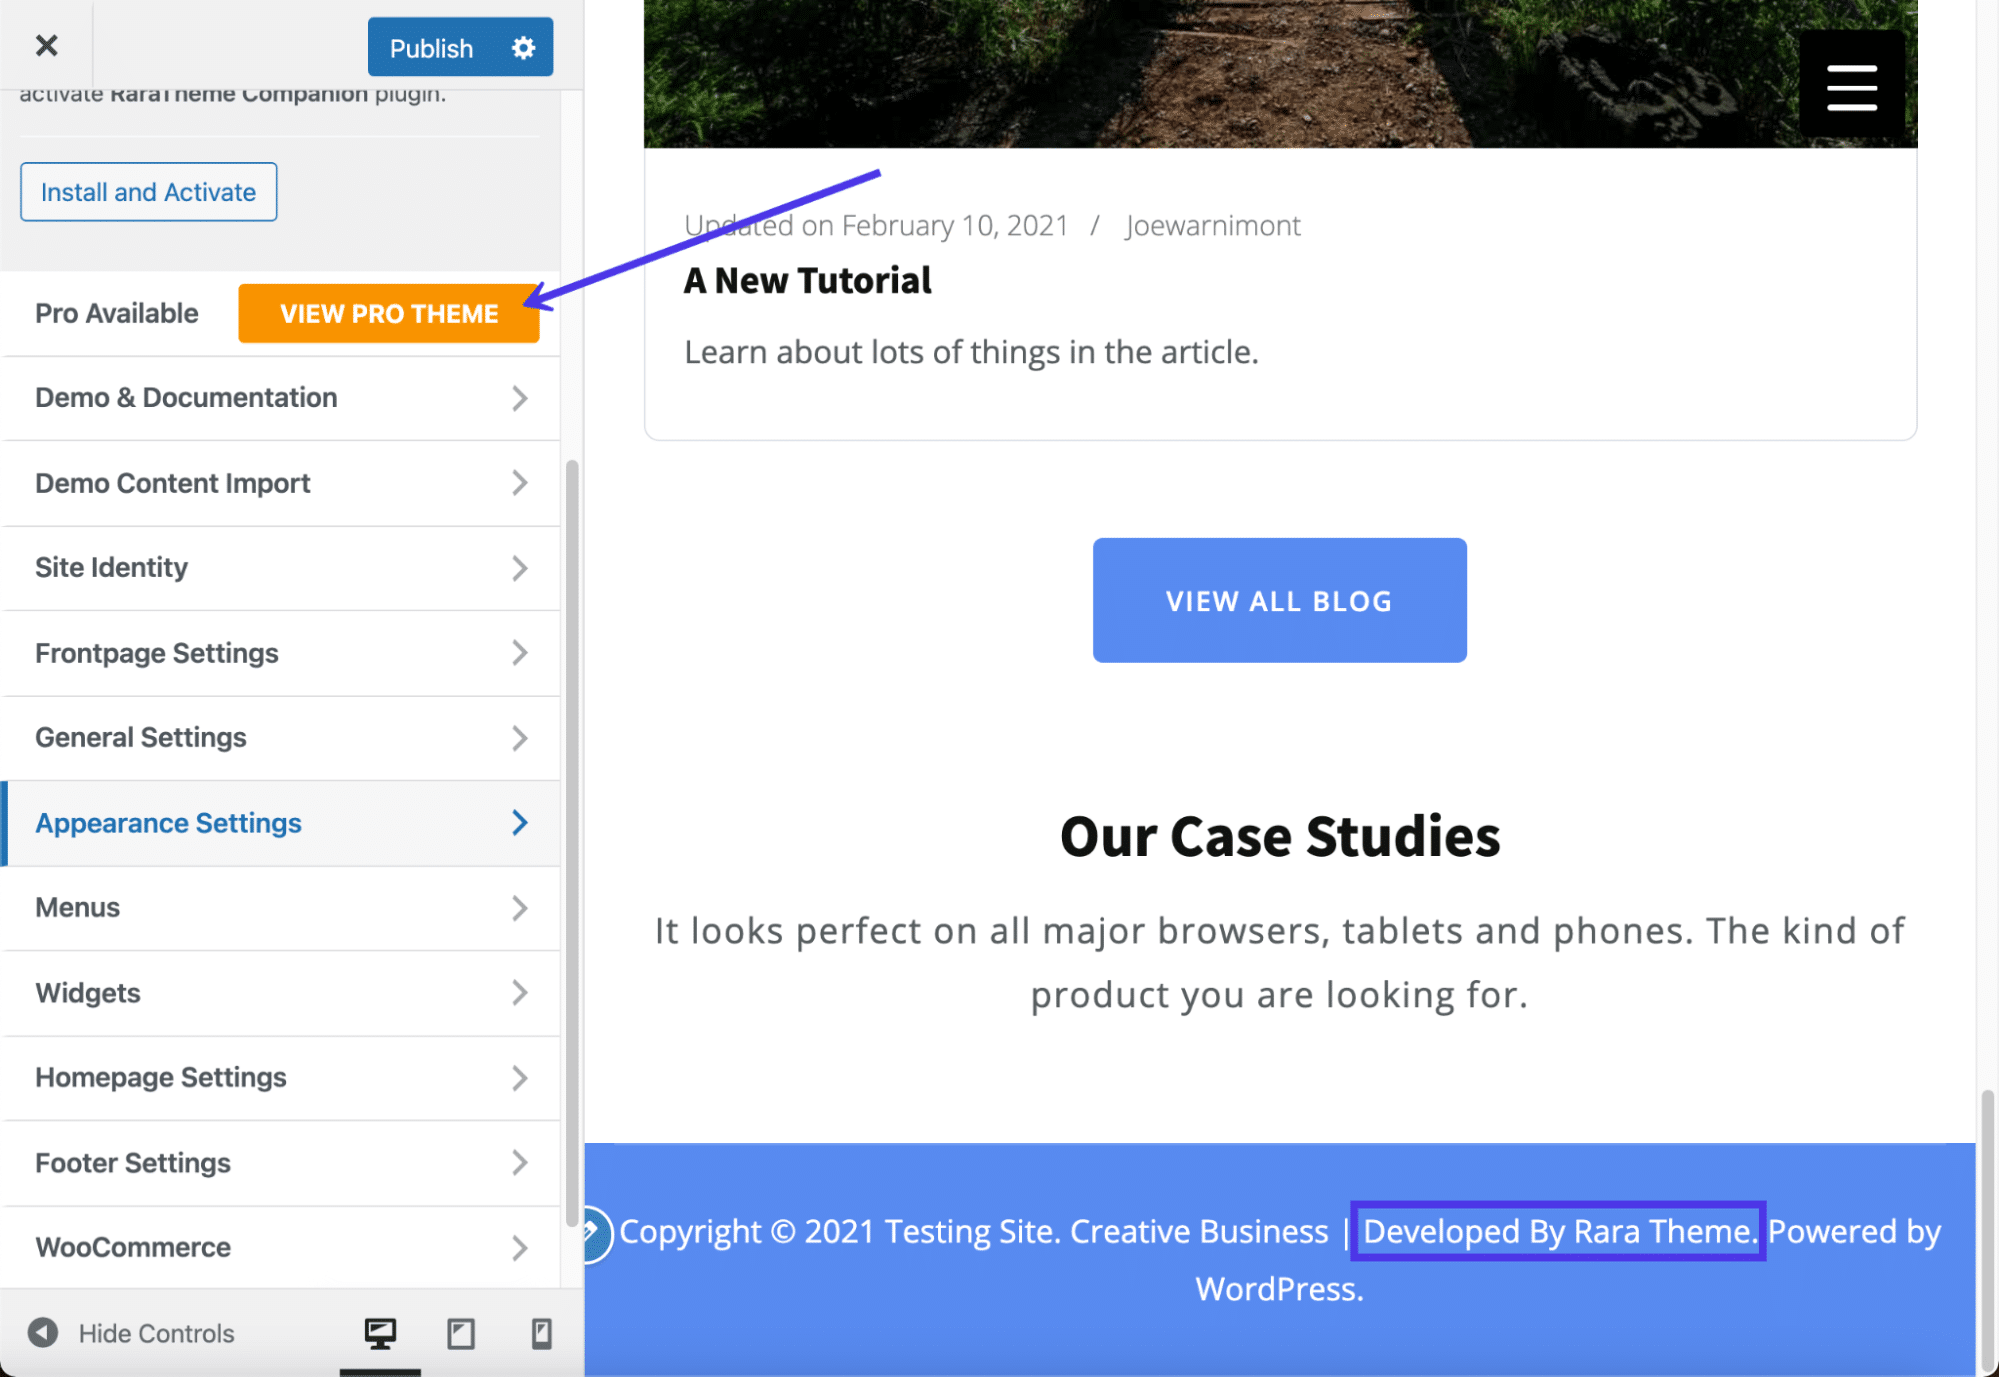
As mentioned before, ane manner to hide the footer credit, while also supporting the theme developer and receiving far better features, is to upgrade to the premium version of the theme. Keep an centre out for a push in your dashboard to upgrade to a Pro version, or become to the programmer'due south site to make a payment.
How To Remove the WordPress Footer Entirely
Although non recommended for most sites, it sometimes makes sense to remove the WordPress footer in certain situations altogether.
If you discover that a WordPress footer causes too much clutter (which is mutual with landing pages), or if y'all'd instead the footer didn't get crawled by search engines, taking the footer out of the equation entirely may not be a bad option.
Keep in mind, withal, that you lot're not deleting the footer from your WordPress files. The footer.php file is a core part of the WordPress files, so yous must leave it. Nevertheless, we tin can utilise CSS lawmaking to tell WordPress not to display the footer and its content.
To hide the WordPress footer completely, become to the Theme Customizer and click on the Boosted CSS tab.
The goal is to paste CSS to tell WordPress that nosotros don't want to see the footer on our website.
Nosotros're trying to hide everything in this instance, from the copyright data to the WordPress and theme developer credits. Yous can also utilize this method to hide items like widgets and menus within your footer.
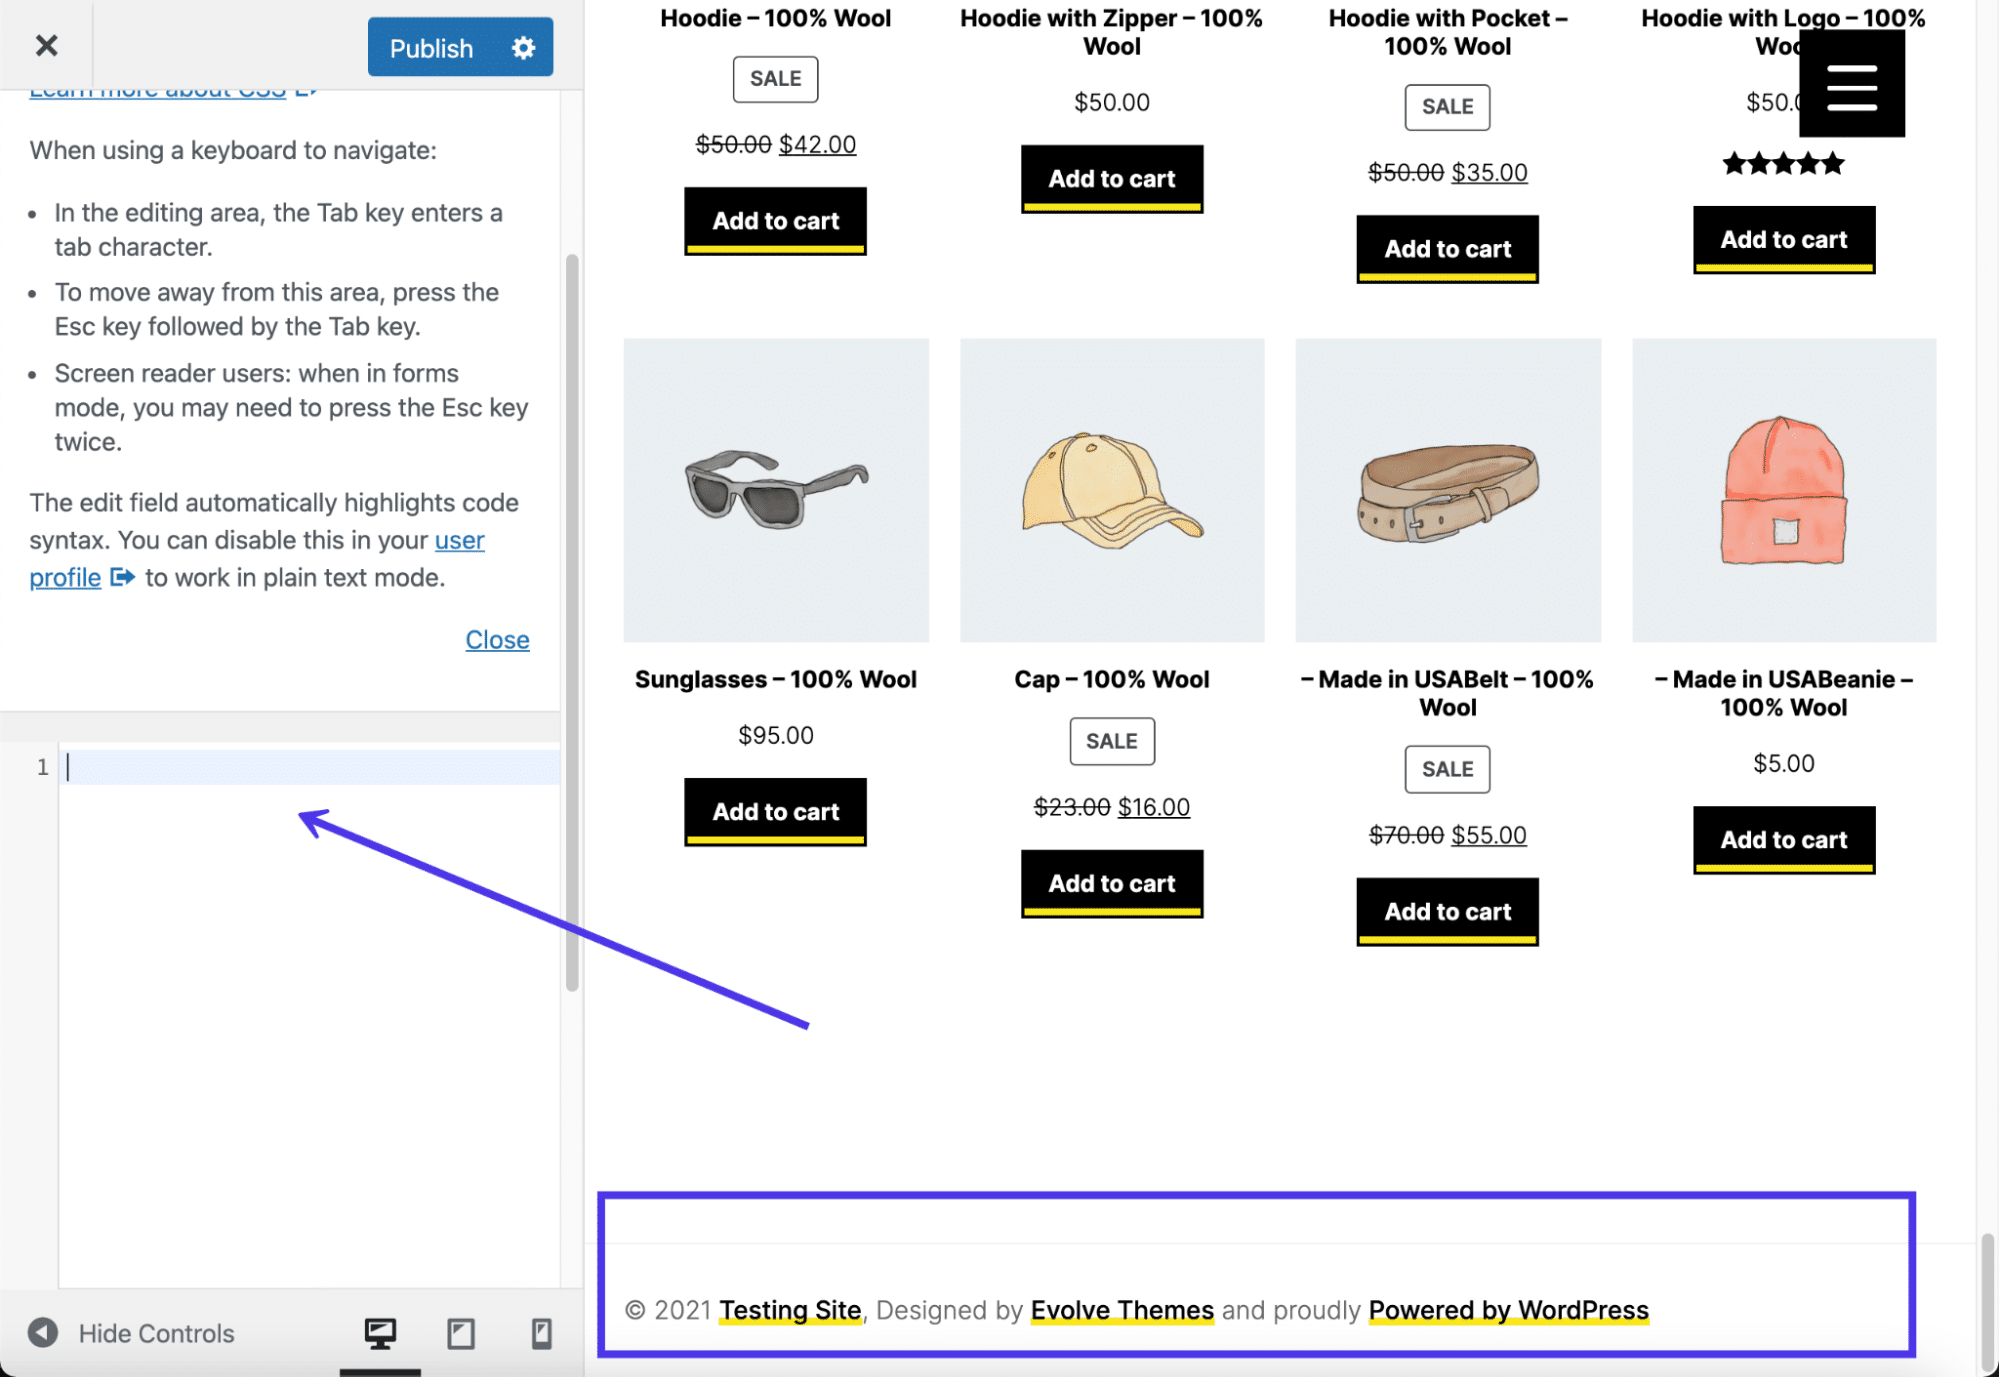
Go alee and paste the following code in the CSS box:
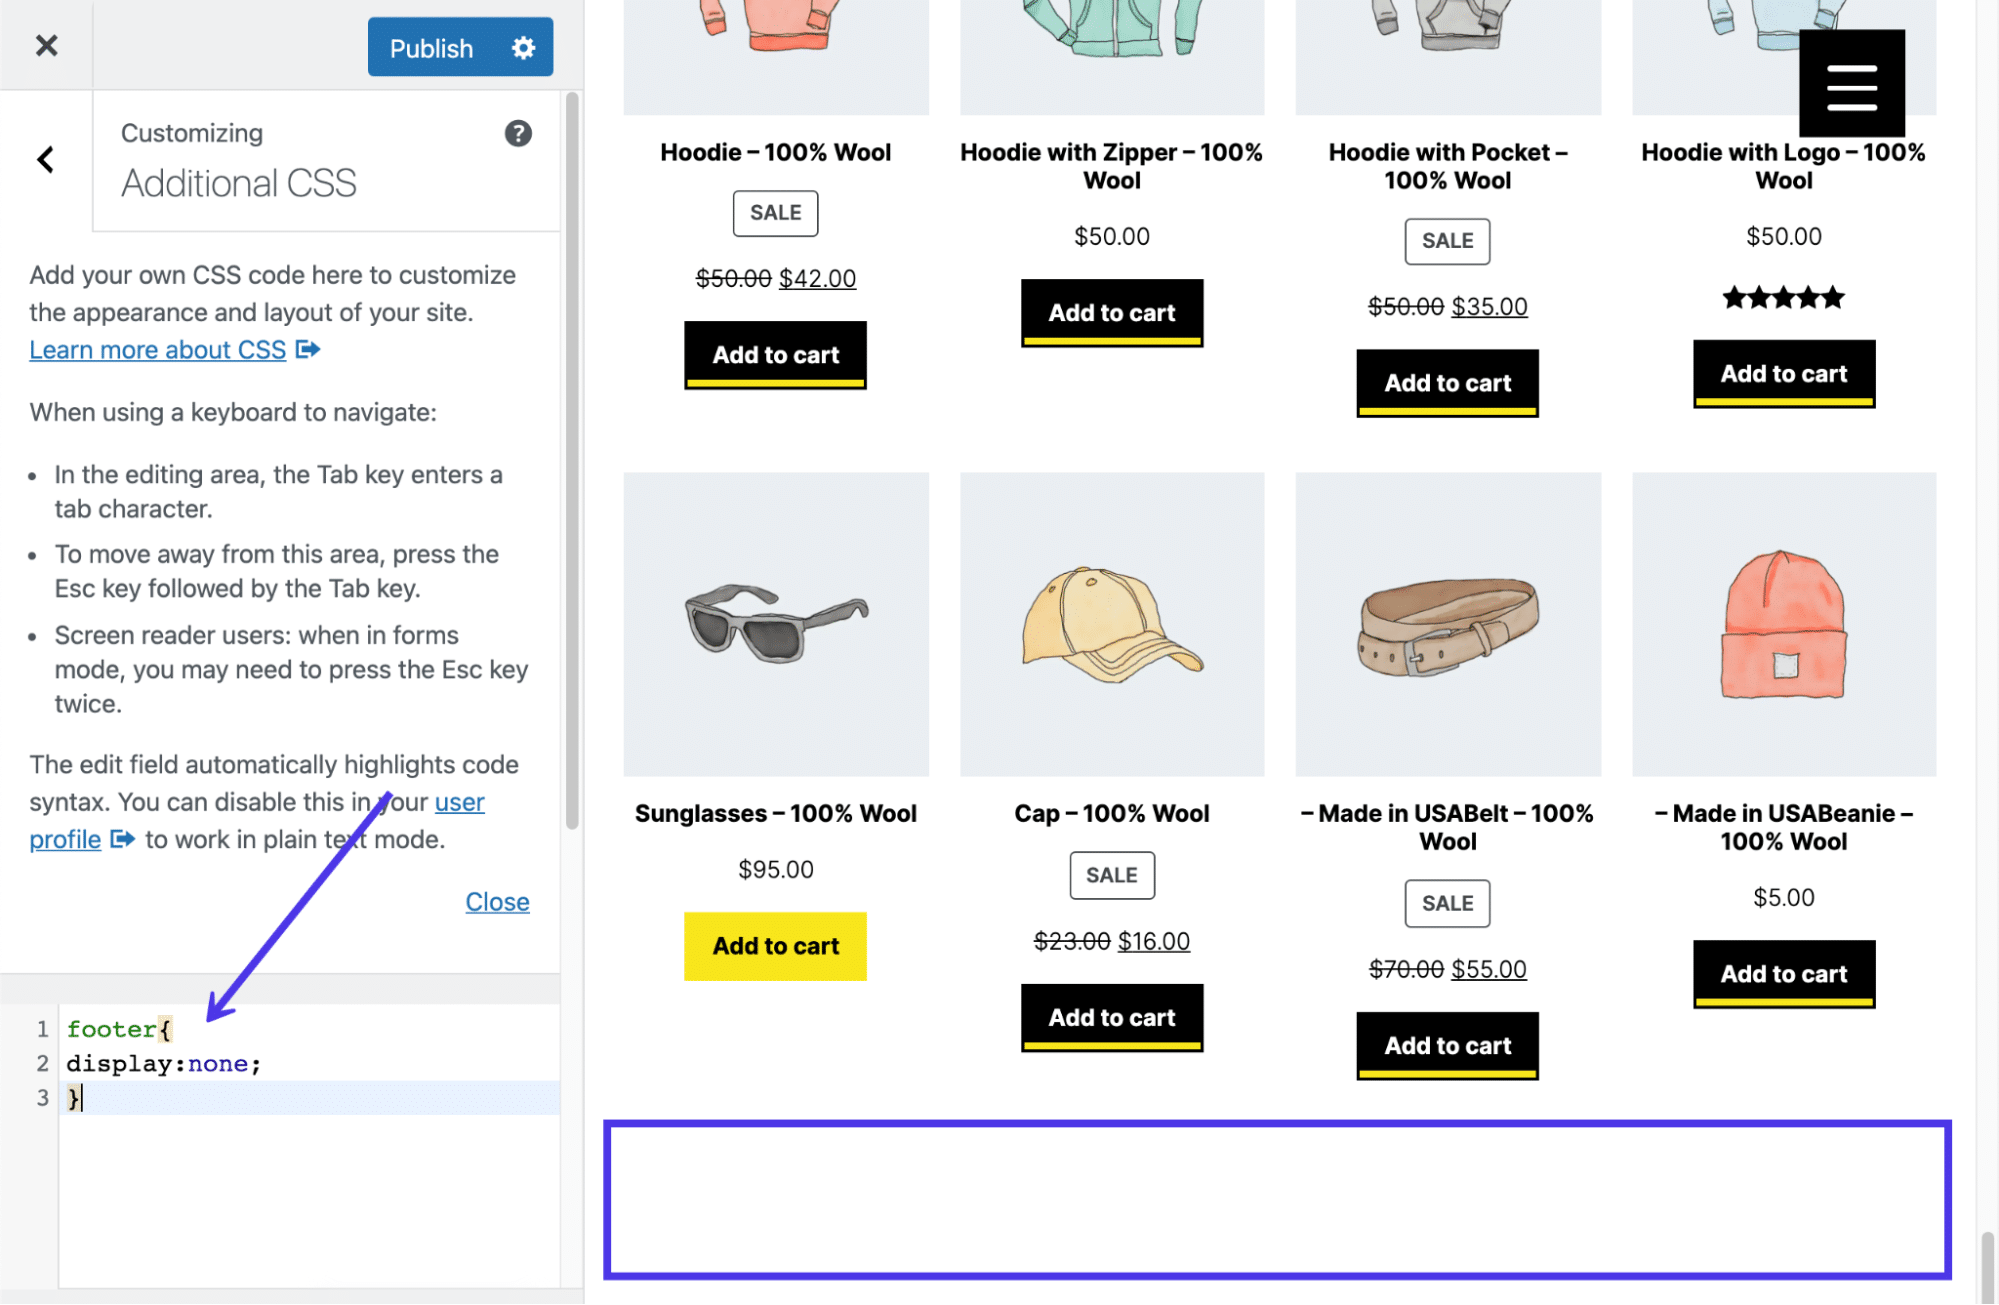
footer{ brandish:none; } This tells WordPress to hibernate everything inside the footer.php file. The file remains inside your file directory, just in instance you'd similar to re-add content in the future.
The Theme Customizer preview should at present show a blank space. Make sure you hitting the Publish push button to see the results on the forepart cease.
Although that CSS should work for most themes, yous may find that the theme developer has a unlike file configuration. Another way to potentially remove near of the footer content is by using the post-obit lawmaking instead of the previous code discussed:
.site-info { display:none; } This option is less likely to work, but it'southward not unheard of for theme developers to make a file called site-info.php in a footer'southward template-parts folder.
Summary
WordPress footers take many purposes, from adding social media buttons to displaying contempo blog posts, support pages, and forms. The goal is to take reward of this extra space, since it's not wise to pack your main carte with too many links or endeavour to make full your sidebar with an onslaught of content.
You've learned many means to edit a WordPress footer. We hope you can now successfully edit and customize footers on whatsoever WordPress site!
Let us know in the comments below if you have any questions virtually editing the footer in WordPress!
Salvage time, costs and maximize site performance with:
- Instant help from WordPress hosting experts, 24/seven.
- Cloudflare Enterprise integration.
- Global audition accomplish with 29 data centers worldwide.
- Optimization with our built-in Application Operation Monitoring.
All of that and much more, in i plan with no long-term contracts, assisted migrations, and a 30-day-coin-back-guarantee. Check out our plans or talk to sales to notice the program that's right for yous.
Source: https://kinsta.com/blog/how-to-edit-footer-in-wordpress/
0 Response to "How to Upload All the Files to the /wp-content/plugins/simple-footer-widget-area"
Post a Comment